• If you enjoy the forum please consider supporting it by signing up for a NES Membership  The benefits pay for the membership many times over.

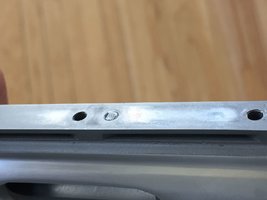
Sheered off my Dan Wesson scope base screws today

It appears they’re 6-48 screws. DW used Weigand scope mounts initially and in the product description it says you need to drill and tap 3 6-48 holes.

I found the exact screws. Flat Head Type D Screw 5/16 in. 6-48.
Amazon product ASIN B07J9HL4MMView: https://www.amazon.com/Numrich-Flat-Head-Screw-Thread/dp/B07J9HL4MM


Now just need to find them in a higher grade. Could also use a torx head as someone else suggested.
You may have to pick your battles here.

McMaster only has a couple options in 6-48, lengths are 1/4 and 3/8. BoltDepot's finest pitch #6 seems to be 6-40. The Brownell's link above is probably going to be your best selection.

It looks (from your photo) like you can handle the extra 1/16" of length. That said, you have a fair amount of engagement in the screw you backed out, so the extra length isn't gaining you much.

I'd go with either purple or blue, making sure it's actually tight, and allowing the full 24 hours to set. Remember that that threadlocker is effectively a lubricant when you install it, so your torque requirement is slightly less. Maybe apply a dot with a paint pen on each fastener so you can visually confirm that nothing has moved over time.

[reason for edit - typo. had the estimated safe extra length off by enough that I felt it had to be fixed]
 
Last edited:
To nice a pistol to try doing a hack job.... Best to get it to a pro and do it right.

How deep do you think he could get the slot in those screws with a dremel? You might, might be able to just tap them, but nowhere near enough to cut a slot without cutting into the top strap.

My personal opinion is, while a dremel has it's place, anyone taking them to something like a firearm should be bitch slapped. I've seen some horrendous dremel work on guns, but nothing I've actually thought was any good.
 
6 or 8 -32, but someone already mentioned that.

Look for a stainless alternative to anything thats available at lowes or h.d. I've snapped their "grade 8" stuff with little effort.

Stainless, unless it is a specialty alloy, is one of the softer bolts out there, I always consider them to be grade 2
 
6 or 8 -32, but someone already mentioned that.

Look for a stainless alternative to anything thats available at lowes or h.d. I've snapped their "grade 8" stuff with little effort.
You may have to piclk your battles here.

McMaster only has a couple options in 6-48, lengths are 1/4 and 3/8. BoltDepot's finest pitch #6 seems to be 6-40. The Brownell's link above is probably going to be your best selection.

It looks (from your photo) like you can handle the extra 1/6" of length. That said, you have a fair amount of engagement in the screw you backed out, so the extra length isn't gaining you much.

I'd go with either purple or blue, making sure it's actually tight, and allowing the full 24 hours to set. Remember that that threadlocker is effectively a lubricant when you install it, so your torque requirement is slightly less. Maybe apply a dot with a paint pen on each fastener so you can visually confirm that nothing has moved over time.
I just took some measurements and 1/2" is too long. The screws would contact the the barrel slightly. 3/8" would be perfect.

I was actually able to remove one of the screws just now. There was enough material sticking up that I could move it with my fingernail and a nylon punch.
Just one left to go!
2F9B025B-05BA-497B-BD35-50FFBCEF399B.jpeg
 
You may have to piclk your battles here.

McMaster only has a couple options in 6-48, lengths are 1/4 and 3/8. BoltDepot's finest pitch #6 seems to be 6-40. The Brownell's link above is probably going to be your best selection.

It looks (from your photo) like you can handle the extra 1/6" of length. That said, you have a fair amount of engagement in the screw you backed out, so the extra length isn't gaining you much.

I'd go with either purple or blue, making sure it's actually tight, and allowing the full 24 hours to set. Remember that that threadlocker is effectively a lubricant when you install it, so your torque requirement is slightly less. Maybe apply a dot with a paint pen on each fastener so you can visually confirm that nothing has moved over time.
Yeah the Brownells kit seems like the best option. Quality should be good I’d imagine.
Good idea on the dot/paint pen.
 
How deep do you think he could get the slot in those screws with a dremel? You might, might be able to just tap them, but nowhere near enough to cut a slot without cutting into the top strap.

My personal opinion is, while a dremel has it's place, anyone taking them to something like a firearm should be bitch slapped. I've seen some horrendous dremel work on guns, but nothing I've actually thought was any good.
Yeah I wouldn't touch this with a Dremel. Way too risky. Especially with this last screw. Part of the threads in the hole are exposed so the risk of damaging the threads would be very high.
 
Yeah the Brownells kit seems like the best option. Quality should be good I’d imagine.
Good idea on the dot/paint pen.
the kit comes with a "jig" to cut/file the screws to length. if you did use loctite it does not cure well with stainless. This is what the primer is for.
Now if you think you will never remove that scope base again use green loctite and primer and you could bed the base with JB weld also....not something I would do.

Clean the threads , use the loctite primer and 222 loctite.
 
You may have to piclk your battles here.

McMaster only has a couple options in 6-48, lengths are 1/4 and 3/8. BoltDepot's finest pitch #6 seems to be 6-40. The Brownell's link above is probably going to be your best selection.

It looks (from your photo) like you can handle the extra 1/6" of length. That said, you have a fair amount of engagement in the screw you backed out, so the extra length isn't gaining you much.

I'd go with either purple or blue, making sure it's actually tight, and allowing the full 24 hours to set. Remember that that threadlocker is effectively a lubricant when you install it, so your torque requirement is slightly less. Maybe apply a dot with a paint pen on each fastener so you can visually confirm that nothing has moved over time.

Blue loctite 242 should be fine for this application. You can use primer if you want but I think it is either essentially acetone or alcohol, I can't remember. The torque requirement with loctite does not change. Yes it is a lubricant and can help when the starting torque is higher than a final torque, common issue with screws that come with a locking patch already on them where you have to overcome that to get it started. Once it bottoms, the final torque value does not change.
 
Remind me never to take "help" from some of the expert level hacks here. LOL.
there is a level hack you can use on anything. A true hack does not know when to stop hacking. A real hack is the person who has the tools or the ability to do it right but the tools are across th shop or a small drive away and they are just to Fn lazy to get them.
 
Hopefully you're going to take this to Steve...
That's the plan. Hopefully he has a drill press. There's no room for error if trying to use a hand drill and a left hand drill bit. I agree with others that this should be locked in a vise and a drill press should be used to avoid slippage. But maybe I'm wrong.
 
there is a level hack you can use on anything. A true hack does not know when to stop hacking. A real hack is the person who has the tools or the ability to do it right but the tools are across th shop or a small drive away and they are just to Fn lazy to get them.
I broke a screw in a 15.00 wall bracket for a speaker. It was faster and a lot easier to do the removal on my Bridgeport than the BS of a hand drill and center punch. Let me marr for life your 1500.00 Dan Wesson .44 mag revolver with my Dremel. I'm really good with one. LOL
 
Those screws were loose - the clamping force should keep the mount from moving.
Look up the proper torque for the screw size (lubricated) and use removable thread locker.
The scope mounts wasn't clamped well enough allowing it to work the screws in shear. The screws don't like that and surrendered. Install tubular dowels (around the screw holes) to take the shear perhaps.
Agree screws loose,
Does the clamping force add enough to make a difference? I guess it does.
Since the top rail is all scratched can an adhesive or Loctite be added between mount and gun?
with 44mag +p+ [wink] your using that gun wants to go backwards and leave that scope were it is. the impulse shock must be huge.
 
the kit comes with a "jig" to cut/file the screws to length. if you did use loctite it does not cure well with stainless. This is what the primer is for.
Now if you think you will never remove that scope base again use green loctite and primer and you could bed the base with JB weld also....not something I would do.

Clean the threads , use the loctite primer and 222 loctite.
I have some Permatex blue loctite and just read the SDS online. Says to use a surface prep cleaner/primer if using on inactive metals such as stainless steel. I looked at their surface prep cleaner and it looks like it's just a degreaser/brake cleaner solvent. So essentially you want the threads dry and ultra clean before using the loctite. Thanks for the tip mac.
 
Last edited:
It’s only a hack job if you’re a hack.

If you've never done it before this is the type of thing where there is about a 90% chance that you will f*** it up and make it worse. Most people here
likely are not machinists.

I realize the resident skinflint club around here like to think they can do everything themselves but it's way cheaper in the long run to farm some shit
out... and this is literally, for most people "one of those things". There isn't a huge margin for error here.

I also don't think any decent gunsmith is going to charge him a lot of money to remove them anyways.

-Mike
 
I just took some measurements and 1/2" is too long. The screws would contact the the barrel slightly. 3/8" would be perfect.

I was actually able to remove one of the screws just now. There was enough material sticking up that I could move it with my fingernail and a nylon punch.
Just one left to go!
View attachment 356254
If the first one came out that easily, you may be able to use a pencil eraser to start the other until you can gain purchase to to the same. Just apply pressure in line, and twist. You might also try tweezers (preferably plastic) to push on the little bit of material that's at the top of the thread.

Otherwise, like so many have said, this is worth just paying a shop.
 
If you've never done it before this is the type of thing where there is about a 90% chance that you will f*** it up and make it worse. Most people here
likely are not machinists.

I realize the resident skinflint club around here like to think they can do everything themselves but it's way cheaper in the long run to farm some shit
out... and this is literally, for most people "one of those things". There isn't a huge margin for error here.

I also don't think any decent gunsmith is going to charge him a lot of money to remove them anyways.

-Mike


Can you make a sticky thread for things Andrew breaks? [laugh]
 
Agree screws loose,
Does the clamping force add enough to make a difference? I guess it does.
Since the top rail is all scratched can an adhesive or Loctite be added between mount and gun?
with 44mag +p+ [wink] your using that gun wants to go backwards and leave that scope were it is. the impulse shock must be huge.
Clamping force is enormous

But be very careful - the torque listed is DRY. If you use loctite the number goes way down because of lubrication of the threads. You will damage the threads torquing to dry specs when using any form of lubrication (even the dry type thread locker)
 
I have some Permatex blue loctite and just read the SDS online. Says to use a surface prep cleaner/primer if using on inactive metals such as stainless steel. I looked at their surface prep cleaner and it looks like it's just a degreaser/brake cleaner solvent. So essentially you want the threads dry and ultra clean before using the loctite. Thanks for the tip mac.
Clean well - the activator is a copper based compound but you can use warmth and an O2 free environment if they don't cure in 24hrs
How do you get an oxygen free environment - put it in a zip lock bag with a nice new chemical hand warmer.
 
If the first one came out that easily, you may be able to use a pencil eraser to start the other until you can gain purchase to to the same. Just apply pressure in line, and twist. You might also try tweezers (preferably plastic) to push on the little bit of material that's at the top of the thread.

Otherwise, like so many have said, this is worth just paying a shop.
Didn't think of a pencil eraser. I'll have to search my house for one. Thanks.
 
Yeah I wouldn't touch this with a Dremel. Way too risky. Especially with this last screw. Part of the threads in the hole are exposed so the risk of damaging the threads would be very high.

Before you come within social distance of your DW with that Dremel, please call me. I'll send this chick for a visit-

Screen-Shot-2020-04-29-at-9.47.19-PM.png
 
Clean well - the activator is a copper based compound but you can use warmth and an O2 free environment if they don't cure in 24hrs
How do you get an oxygen free environment - put it in a zip lock bag with a nice new chemical hand warmer.
More Info:

If you have copper sulfate - make a concentrated solution, clean the screw well and dip the threads in, let them dry then add a drop of thread locker to the female threads and install.
 
Back
Top Bottom