New life for an old soldier

Joined
Dec 31, 2005
Messages
1,990
Likes
160
Location
Central MA
Feedback: 10 / 0 / 0
Part-1 The Vetterli Rifle

It all started a couple of years ago when I bought a couple of really interesting Swiss rifles.

I collect interesting guns, sporters or military, and the Swiss Vetterli riles fall into both categories, interesting and military. It didn't hurt that they were also very reasonably priced.

The first was an 1869/71 model that I picked up from a dealer in Canada. The .41RF Vetterlis are regarded as antiques in most countries. The lack of restrictions and official paperwork was refreshing. I sent a MO and the seller mailed the gun to me, way cool!
Sometime later, I was wandering around the gun show in Springfield and spotted another Vetterli looking for a home. It was a very nice Model 1878/81, completely surrounded on the table by Garands. This is a sure sign of good hunting for serious bargain hunters.

Vetterlis tend to be reasonably priced because they are old, funny looking, and they fire a cartridge, the 10.4x38mm rimfire, that has not been available for about 80 years. The good news is that the bores tend to be very nice and the rifles are generally in good shape after a near-century as wall hangers. A large number of these rifles were "buba'd" into rather ugly sporters and sold by Sears & Roebuck and other arms merchants in the early 1900's. Fortunately, most were not subject to this fate.

Here is a photo of my 1878/81 rifle:
78_81_Vetterli_rifle_s-vi.jpg


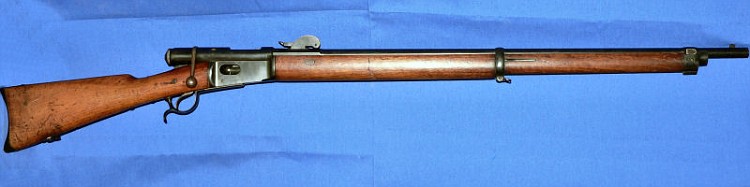
1878/81 Vetterli Specifications from Swissrifles.com:
Barrel Length: 33.5 inches
Overall Length: 52 inches
Weight: 10.19 lbs empty
Chambering: 10.4x38 (.41) Swiss Rimfire
Rifling: 4 groove, RH twist, 1 in 26"
Velocity: 1425 fps
Capacity: 13 (12 round tube magazine +1 in the cartridge elevator)
Total Production: 37,010 Model 1878/81s

Link to page about vetterli rifles:
http://www.swissrifles.com/vetterli/


There is something that draws me to old guns. The early breechloaders are examples of a very interesting and brief period between muzzleloaders and machine guns. The last fifty years of the nineteenth century began with the invention of the first self contained rimfire cartridge and ended with the development of the modern self-loading rifle and the first machine guns.
The development of the Vetterli rifle took place from 1869 to 1881. It was the first repeating cartridge rifle adopted by any modern army. The Swiss were a decade ahead of the rest of the world's armies with a reasonably powerful, large capacity repeating rifle.

Jack
 
Last edited:
Part-2 Converting the Vetterli Rifle

I can't take credit for coming up with the idea of converting the Vetterli rifle from rimfire to centerfire. Quite a few folks have blazed that trail for me. While the end result is the same, each person who does a conversion uses materials and techniques that are convenient and familiar. The object of the exercise is to drill the bolt for the new firing pin and fabricate a firing fin that will not fall out of the bolt. I chose to make the firing pin retainer from 6061-T6 aluminum because I have access to truckloads of it and it is easy to work with machine or hand tools. Others have used steel or nylon for the same reasons. The retainer simply keeps the firing pin located between the end of the striker and in the new firing pin hole in the bolt head. I used an RCBS headed decapping pin to make the firing pin. The decapping pin is .070" in diameter and about 1/8" longer than the finished product. I Drilled a .073" hole in the center of the bolt face and into the striker channel. After it was fitted to the bolt and retainer, the firing pin was trimmed to leave .06" protruding with the striker down and the tip was rounded and polished.

Here is a picture of the bolt with the original two-pronged rimfire firing pin and the two pieces of the centerfire conversion firing pin. You can see the end of the striker through the slot in the bolt. The striker is shown retracted to the cocked position and moves about .4" when released.

P1080264ms-vi.jpg


This photo shows one of the original Swiss military 10.4x38mm cartridges, a newly made 10.4x42mm and the .348 Winchester cartridge that provided the new brass.

P1080265ms-vi.jpg


All of the work to make the parts and modify the bolt can be done in two or three hours.

The Vetterli bolt with the new centerfire firing pin in place:

P1080271ms-vi.jpg


Converting the rifle to centerfire requires modifying the gun by drilling a hole for the new firing pin through the face of the bolt. This conversion does theoretically reduce the value of the gun as a collectable. The conversion also makes the gun more desirable as a shooter. I believe that the net effect on the value of the gun is nothing at all. Some people scrounge up a replacement bolt for the conversion. They are not easy to find or inexpensive.

Jack
 
Last edited:
Part-3 Forming and Loading cartridges for the Vetterli Rifle

"To retain respect for laws and sausages, one must not watch them in the making."~usually attributed to Otto von Bismarck
The same might be said of making cartridges for vintage arms. Such an undertaking requires a clear understanding of the function and limitations of the cartridge case in a particular firearm. There are no SAAMI specs, no proven loading data, and no readily available loading components. Period documents, collectors cartridges, and carefull measurements of available firearms are the source of most information. If this does not make you nervous, welcome to the dark side of handloading.

The important characteristics of the 10.4x38mm cartridge and the Vetterli rifle are as follows.

1. The head of the 10.4 cartridge is just slightly larger than the .348 Winchester cartridge and the rim is a little larger. In both cases, the size difference is within safe working tolerance.

2. The .348 Winchester case is more than long enough to trim down to the required length.

3. The nominal bore and groove sizes of the Vetterli rifle are just a few thousandths smaller than bullets used for modern .44 magnum and .444 Remington cartridges. While we are now accustomed to bore sizes that vary within tenths of thousandths, the bores of firearms made a century ago had much larger tolerances. It is not unusual to find bores .008" or more larger than the nominal size. Many of the old guns used hollow based soft lead bullets so that the bullet could expand to fit whatever size the barrel was bored. The only way to dertermine the actual bore size is to push a well lubed soft lead ball through the bore and measure it. My 78/81 Vetterli barrel, when slugged, measures .426" across the grooves. This is close enough to use a .429 soft lead bullet.

4. The mechanism in the Vetterli rifle that moves the cartridge from the tube magazine to be in line with the chamber is the same as that used in the Henry and early Winchester rifles. The cartridge in the carrier serves as a stop for the next cartridge in the magazine. A cartridge that is too long will catch in the end of the magazine tube and one that is too short will allow the next cartridge to partially enter the carrier and, in both cases, prevent it from rising. The correct length for a 10.4mm Swiss cartridge is 2.2" overall. The original cartridges used a very long heel seated, hollow based bullet of about 330 grains weight. the closest match for the original bullet is from the Lee .429 - 310grain mould. It is blunt and flat nosed and quite a bit shorter than needed for the 38mm long Swiss cartridge, but it is close to the original weight and diameter.

5. The 10.4mm Vetterli rifles are chambered a lot deeper in the throat than modern cartridges. The extra length was intended to leave room for powder fouling. I decided to lengthen the cartridge case into this space to make up for the short bullet. This practice was also employed with the original rimfire loadings to allow the use of a shorter and lighter bullet. Many folks just keep the original case length and single load the cartridges with a lighter and shorter bullet. I measured the useable length of the chamber by making a case quite a bit too long and measuring how much the rim protruded from the chamber. The case was cut back until it just fit and then trimmed another .02" for clearance. The final case length was just determined to be a bit short of 42mm at 1.645".

The original loadings for the 10.4x38mm were black powder. Later loadings used low pressure smokeless powder loads with either outside lubricated or paper patched soft lead bullets. I decided to "split the difference" and am loading my first cartridges with Hodgdon's Triple7, a black powder substitute. This powder burns at the same pressure levels as black powder and is very bulky. The 10.4 cartridge is too large for a safe full load of any modern smokeless powder. The Triple7 powder will fill the case for best ignition and accuracy, while keeping the pressures down to safe levels. By consulting available loading data for this powder in other guns, I estimate that the velocities should be arguably close to the original factory loadings. The powder charge was determined by filling a formed case to about 1/16" above where the base of the bullet would be in a loaded cartridge. Hodgdons suggests that, with Triple7, the powder charge be compressed lightly or not at all, but the loading density should be 100%. The powder is measured by volume, not weight, like black powder and the charge was determined to be 45 grains equivalent, by volume.

The only loading dies that are currently available are from RCBS and cost about as much as a Vetterli in excellent condition. Many other people have found that the cartridges can be formed and subsequently neck sized by using the mouth of a .44 Mag die and the bullets can be seated with a .45 ACP die. Since these dies were available, that's what I used. The first attempt at forming cost me a couple of ruined cases but the next 18 went without a problem.

The Vetterli chamber has a slight bottleneck and the cases were formed so that the shoulder bears firmly to maintain minimum headspace. After the cases were formed, a cutoff wheel in a dremel tool was used to remove the bulk of the excess brass. Finally the cases were trimmed to a finished length of 1.645" with the Forster case trimmer.
The necks were opened up and the mouths very slightly belled with a Lyman .44 caliber "M" die.

I have found that many of the older calibers shoot more accurately with pistol primers. Many times a rifle primer will start the bullet moving before the powder is properly and consistently ignited. My first loads use the Winchester large pistol magnum primer, seated with the Lee auto-prime tool.

The powder was measured by volume, using the Lee dipper and the bullet was started in the case as for as possible by hand. The seating was finished with a .45 ACP seating die. The slight bell of the case mouth was removed and a slight taper crimp applied by driving the cartridge a short distance back into the original sizing die. The primer was protected from accidental firing by placing a shell holder back on the case and tapping the cartridge back into the die with a nylon hammer.

The loaded cartridges fit the chamber with just a little resistance at the end of the bolt handle travel and function through the magazine.


Vetterli 10.4x38mm rimfire and 10.4x42mm centerfire cartridges
348 Winchester case - 10.4x42mm CF - 10.4x38mm RF
P1080270ms-vi.jpg


For more information about the 10.4x38mm cartridge:
http://www.swissrifles.com/ammo/index.html

Jack
 
Last edited:
Part-4 Firing the Centerfire Vetterli Rifle

The proof of the pudding is in the eating. ~ancient proverb

vetterlioffhand-vi.jpg


The 78/81 Vetterli proved itself to be still quite capable, after more than a century of silence.
A few shots were fired at 25, 50, and 100 yards to get the feel of the rifle and to check the trajectory of the bullets. I was not surprised to find the gun shooting high. The lowest setting on the sight is 225, yards or meters, I don't know which. At 25 yards it was about 8" high, over a foot high at fifty and a couple of feet high at 100 yards. The Hodgdon's Triple7 black powder substitute produced a satisfying cloud of smoke but without the rotten egg smell of real black powder. The recoil was negligible, as expected from a cartridge of about the same power as a .44 Magnum, in a ten pound rifle.

Vetterliontherange-vi.jpg


I set up targets at 25 yards so that the shots would all fall on the target. The chronograph is an Ohler Model 33 that I have had for many years. The screens are a PITA to locate and cost $80 each, the last time that I shot one. I set the screens out to the end of the reach of the cables to try to keep the muzzle blast, smoke and powder residue from affecting the results

vetterli_targets_25yds-vi.jpg


Three groups, each of five shots were fired. The flyer to the left of the first group was the offhand shot fired when taking the photo of the offhand shooting. All of the groups were fired from a rest for best accuracy. The first two groups were fired using a six o'clock hold on the lower targets. The third group was fired taking a twelve o'clock hold on the lower target, shown by the red front sight outline added to the photo. The group sizes in order of firing were 1-3/4", 1-1/2", and 3/4". I attribute the smaller size of the last group both to growing familiarity with the gun and sights, and to having a much clearer sight picture with the twelve o'clock hold. It is noteworthy that the chronograph results for the last group showed an extreme spread of 12 fps and a standard deviation of only 4 fps!

The average velocity for the 15 shots was 1271 fps with an extreme spread of 62 fps and a standard deviation of 19 fps. I was pleasantly surprised and encouraged by the consistency of the chronograph results. While the velocity is a couple hundred fps below the original loadings, I am still more comfortable using the Triple7 at black powder pressure levels and 100% loading density than with a quarter of a case of fast burning pistol powder. The magnum pistol primers proved their value in the consistent velocities and lack of set back.

The cases formed nicely to the chamber, increasing .02" in diameter at the shoulder and extracted with ease. The cases now have a long tapered shoulder like the original rimfire cartridge shown earlier. There is no measurable case head expansion. The primers are deeply indented but with no signs of immanent perforation and the edges of the primer and firing pin mark are well rounded. In the absence of a pressure gauge, these are all positive signs of chamber pressure that is appropriate for this type of gun. There is no blackening of the case necks, which would show poor sealing caused by excessive clearances or inadequate chamber pressure.

The bore was not cleaned during the firing session. I checked the bore after every five shots and found that there was no more fouling after the 18th shot than after the second shot.

VetterlifirsttargetsS-vi.jpg


It was a great day to bring the Vetterli back to life.
I think it heard it whisper, "Let's do this again."

That's my story and I'm stickin' to it.

Jack
 
Last edited:
Great write up Jack and some great info there as well!
There is a guy at my local range that shoots Swiss antiques. He has gotten in on a couple of group buys from the Swiss rifle forums and I think he did the bolt modification too.
 
Thanks Ray,
I can provide more detail, dimensions etc., of the firing pin retainer and the way that I fitted it, if anyone is interested. I tried to keep the info basic for ease of reading.

Jack
 
Wow, great read and a great job on that old beauty. Thanks for sharing the story. Way back when I was 13 or so I picked up a Vetterli for $5.00 from a classmate. I never did shoot it because ammo was nearly impossible to find in the early 60's and if I found it I did not have any money to buy it. I think my father eventually sold it after I grew up and moved out. I used to study that rifle. I remember marveling at the way it worked. I would take it apart and put it together endlessly. Do you think Winchester got a few ideas from it? Just a fantastic bit of history.
 
EXCELLENT write up, Jack. I, too, have been bitten by the black powder cartridge bug lately. My latest acquisitions include a 1884 Springfield Trapdoor, a British Martini-Henry MkIV, a Portuguese Kropatschek and a Dutch Beaumont-Vitali. I think the thing that held me back on getting one like yours was the rimfire set-up. I guess that's really not such a big deal when you have the know-how. And like may of these old-timers, it's so damn fugly, it's beautiful!

I've been sticking with Goex blackpower (FFg) for the most part, but I may have to try the substitutes just for fun.

Something about the cloud of smoke, and the sound of "BOOM - WHACK" as the slow-moving round hits the target just appeals to me. It's dirty and a chore to clean, but I still love it.

If you ever want to do a comparison of pre-loaded cartridges, I would strongly recommend www.gadcustomcartridges.com. Bernie is a one-man band, but has a great reputation.

Ken
 
... Do you think Winchester got a few ideas from it? Just a fantastic bit of history.

Thanks Goose,

It was the other way around,
from www.Swissrifles.com/vetterli : "Vetterli already been involved in weapon design with the Germans, French, and British, and was strongly influenced by American rifle designs, most notably the Henry Repeating rifle."
Click on the link at the end of Part 1 or above to read more about the Swiss rifles.

Jack
 
Thanks Goose,

It was the other way around,

Click on the link at the end of Part 1 or above to read more about the Swiss rifles.

Jack

Jack, Very interesting indeed. Back when I had mine I scoured every gun book I could find for info. I finally found one reference, which was pretty limited, and it allowed that the Vetterli influenced the Henry rifle. That always stuck in my mind and I have repeated it many times. Oh well, live and learn. Regardless, you made my day with this post and brought back some fond memories. Goose
 
Thanks USMA-82.

EXCELLENT write up, Jack. I, too, have been bitten by the black powder cartridge bug lately. My latest acquisitions include a 1884 Springfield Trapdoor, a British Martini-Henry MkIV, a Portuguese Kropatschek and a Dutch Beaumont-Vitali.

These would all probably be fun to shoot. The '84 Trapdoor will be easy and inexpensive. The Martini will be fun (and expensive.) If you can find a few Kynoch cartridges, they can be reworked to take readily available primers.

...
I've been sticking with Goex blackpower (FFg) for the most part, but I may have to try the substitutes just for fun....

This was the first time that I used Triple 7 and I was very impressed with the shooting results. Also, the cleanup was quick, 2 patches with black powder solvent, two patches with Shooters Choice, and two patches with oil, and the bore was better than new. I'm now thinking about loading the 38-55 with it.

Jack
 
Last edited:
Outstanding post !

There is something that draws me to old guns.

I've always loved the look of this rifle, but never considered one as I thought I'd never be able to actually shoot it.
( Where's the fun in that ? [thinking] )

Thanks for taking the time to detail the conversion and including a range report complete with pictures.

Ya made my morning ! [smile]
 
Last edited:
...
If you ever want to do a comparison of pre-loaded cartridges, I would strongly recommend www.gadcustomcartridges.com. Bernie is a one-man band, but has a great reputation.

Ken

Looks like he will convert the bolt to centerfire also. His prices are not outrageous, but I didn't find the conversion all that difficult, YMMV.

BTW, I completely forgot about www.ch4d.com when I did the writeup. They have dies for most of the old cartridges and their prices aren't too bad, compared to RCBS. I recently bought dies for the 8x58RD cartridge for my 1869 Swedish rolling block from them. Nice folks with outstanding customer service. A two dies set with an extra expander ball and a neck expanding die for cast bullets came to about $90.

Jack
 
Last edited:
Thanks MrTwigg,

I've always loved the look of this rifle, but never considered one as I thought I'd never be able to actually shoot it.
( Where's the fun in that ? [thinking] )...

I don't get a commission for this, but I spotted a couple of 10.4mm Swiss Vetterlis on Gunbroker and GunsAmerica for less than $300, last night.[devil]

Jack
 
Thanks USMA-82.


These would all probably be fun to shoot. The '84 Trapdoor will be easy and inexpensive. The Martini will be fun (and expensive.) If you can find a few Kynoch cartridges, they can be reworked to take readily available primers.


This was the first time that I used Triple 7 and I was very impressed with the shooting results. Also, the cleanup was quick, 2 patches with black powder solvent, two patches with Shooters Choice, and two patches with oil, and the bore was better than new. I'm now thinking about loading the 38-55 with it.

Jack

Brass for the Martini can be made from 24 ga brass shotgun hulls. I think Grafs has them. Dies are available from Lee. Lee also makes a set of Vetterli dies. I just picked up a Vetterli. Of all the conversions I have seen I think I like your use of the aluminum the best. Can you send me the details on the manufacture? I need to clean my Vetterli up and see what the bore looks like before I take the time to convert it and order the dies and a bullet mold.
 
.... I just picked up a Vetterli.

Measure your bore before you spend too much money. If it is smaller than .430, you are good to go. Mine is .426 and I am using .430 bullets, cast soft, with no problems. A larger bore might be a problem to find suitable bullets. I know of one guy who is sizing .446 bullets down to fit a .435 bore. I have read that the 1869 models tend to have larger bores than the later ones.

While it is preferable to slug the bore, you can learn all you really need to know by simply measuring the groove diameter at the muzzle with a dial caliper.

Of all the conversions I have seen I think I like your use of the aluminum the best. Can you send me the details on the manufacture? ....

Thanks. It has worked OK for me so far. I have fired mine about 60 rounds since converting it. Another Vetterli shooter told me that he made a firing pin retainer of aluminum and it cracked after a few shots. If I have such a problem, I will make another of steel or nylon. I was thinking that the low mass of the aluminum might be better, but who knows. I would certainly advise against dry firing the gun with the conversion firing pin in place.

I have the drawings at w*rk and will try to remember to get them tomorrow. If I forget, give me a reminder in a week or so.

I reloaded my now fully formed cases and tried them out Sunday. They now hold another 5 gr equivalent of powder, 50 gr equivalent, and the average velocity has increased from 1271 fps to 1335 fps. The SD and ES are about half what the case forming loads gave, and the groups are consistently 2 moa or better.

I made a replacement front sight that clamps to the barrel in front of the original sight and is about .3" higher. It is .085" wide and gives a very nice sight picture. I had to raise the rear sight from the 235 meter setting to 250 meters for 50 yards and to the 300 meter setting for 100 yards. I will post pictures and details of the front sight in a few days.

Jack
 
Jack, you are the man. Awesome post(s). How did you lube the bullets? It looks like most of the bullet is outside of the case in your photos. Did you get some Alox in the last groove?
 
Last edited:
Jack, you are the man. Awesome post(s). How did you lube the bullets? It looks like most of the bullet is outside of the case in your photos. Did you get some Alox in the last groove?

Thanks.

The bullets are sized to .430 and lubed with White Label 2500+ lube in my Lyman 450.
The only thing in the case is the gas check, two lube grooves and one driving band. I run the loaded case neck back into the sizing die about 1/8" to make a taper crimp. They can't be moved by hand and are backed up by sitting directly on the powder charge. I've run a few through the tube magazine and they work without a problem.
I would like to have a bullet with a longer and less blunt nose to put another 1/8" of the bullet in the case, but that would require a custom mould.

Jack
 
Thanks Coyote33,The range is at the Quaboag Sportsmans Club in Warren, Ma.
25, 50, 100, and 200 yards with covered firing line.
It's a nice local club, inexpensive at $35 per year, and not too busy most of the year.

Jack
 
Centerfire firing pin adapter for Vetterli Rifle

It is not safe to carry the gun loaded with the striker down.

cfconvertfpadapt-vi.jpg


The dimension for the largest counterbore, missing from the drawing, is .190" diameter by .500" deep. This is the counterbore for the shaft of the striker, and should be a couple of thousandths larger than the striker.
This drawing is for reference only. You will have to measure the height and width of the slot in your bolt. Manufacturing tolerances were more casual in the 1800's.

Before assembly, the front and rear faces of the adapter were radiused by hand on the belt sander to suit the slot in the bolt. The adapter should have about 1/8" travel and the firing pin should be able to go back into the bolt about 1/16" when the action is cocked.
The actual diameter of the RCBS decapping pin is close to .073, a light press fit in the adapter, and was polished down a little to slip through the hole in the bolt.

The striker in the bolt is a shade larger than the slot. That is why the .190 counterbore breaks through the sides. If you are making one of these on a drill press, leave the thickness at 1/4" so that the drill doesn't walk through the side and then file or belt sand it to .178 or the height of the slot in your bolt after drilling.

Remember that the only function of this part is to keep the firing pin from falling out of the bolt when the action is cocked. You can make this with a hand drill, files and sandpaper. A chunk of heavy, non-brittle plastic should work in place of the aluminum. Nylon, delrin, or a piece cut from a heavy plastic pipe, heated and roughly flattened might do as well.

After the parts are assembled, measure the firing pin protrusion past the face of the bolt, with the striker down, and grind the pin shorter. It should stick out no more than 0.060" (1/16") and be rounded and smooth.

Make sure that this assembly moves freely in the bolt and that there are no burrs or sharp edges that will force the firing pin to protrude from the bolt while the action is cocked. Otherwise you might get a slam fire when the action is cycled quickly.

Please remember that this is not an inertia firing pin. Keep the firing pin clean and lightly lubricated to prevent it from binding in the firing pin hole.
It is not safe to carry the gun loaded with the striker down.

ETA: This device is not intended to resist the full force of the striker. If you dry fire, it will fail quickly. Hold the trigger back and lower the bolt handle to uncock the gun.

Disclaimer:
If you are the sort of person that can't ever get things right the first time, you should refrain from gunsmithing, handloading and skydiving. This modification of a firearm may make the firearm dangerous if it is done incorrectly, or if the firearm is handled carelessly. You must carefully investigate and evaluate the risks involved in attempting this project, and proceed only if you are fully prepared to assume all responsibility for any seen or unforeseen results.

Be safe, have fun.

Jack
 
Last edited:
New front sight

new_front_sight-vi.jpg


The Vetterli, like most military rifles, is sighted for longer range than most of us plink. The sight on this one starts at 235 meters.
At the lowest sight setting, the bullets were striking so high that I resorted to posting two targets so that I could aim at the bottom one and hit the top.
I made this replacement sight from a bit of scrap steel and left it .300" higher than the original sight. Now I can shoot 25 yards at the 250 meter setting, 50 yards at the 300 meter setting and 100 yards at the 350 meter setting.
A nice square and .085" wide blade makes a much more precise sight picture than the issue barleycorn.
The barrel band is split and clamped with a single #6-32 screw. This makes windage adjustments possible and does not require modifying the gun. If I need to remove the sight, I will scribe a couple of lines on the rear of the new sight to index it to the original sight base.
I left the base of the sight, under the blade, heavy on purpose.
I thought that I might want to mount a Lyman globe front sight later. If I decide to mount the lyman sight I will grind the blade off flush with the base and then cut a 3/8" dovetail in the heavy part of the band.

The cold blueing did not photograph well with the flash. In natural light it matches the bluing on the barrel pretty good.

For those who are interested in these sort of things, the sight was modeled with Autocad Mechanical Desktop, programmed with Mastercam Mill V8.2 and milled on a converted knee mill with an Anilam 5300 control.

This sight could be made with simple hand tools from a rectangular block 1/8" wider than the barrel and it would function just as well.

Jack
 
Back
Top Bottom