-
If you enjoy the forum please consider supporting it by signing up for a NES Membership The benefits pay for the membership many times over.
-
Be sure to enter the NES/MFS May Giveaway ***Canik METE SFX***
You are using an out of date browser. It may not display this or other websites correctly.
You should upgrade or use an alternative browser.
You should upgrade or use an alternative browser.
My Walther PPS experience (many pics)
- Thread starter SJan
- Start date
I handled one in a shop last week.
I was afraid something was either wrong with the gun or that I would break the trigger, it pulled so damned hard. As EC said..it had to be at least 17 pounds.
I was afraid something was either wrong with the gun or that I would break the trigger, it pulled so damned hard. As EC said..it had to be at least 17 pounds.
btnh6668
NES Member
I had to send mine back to S&W because the trigger was sticking in the back position. I guess im not the only one having this issue. http://www.waltherforums.com/showthread.php?t=8400
I just picked up a PPS at Four Seasons this morning.
Damn - that trigger is heavy. Overall I like it though - it seems to fit well in my hand with the large palm swell. I am able to hold the pistol in the proper way with my fingers squeezing the grip back into my palm. I think the thinness actually helps get a proper grip.
Like one of the previous posters mentioned - the slide does seem very tight, I think that is the dual spring setup.
I probably won't get to actually fire it until I can get to the range - maybe next week.
Mine only came with one mag - is that normal?
If I make this a carry gun I would like to put night sights on it - the only info I can find on this is some place that mods the original sights and it is like $180.
SJan
NES Member
Update
Second time to the range with my PPS today. Fired another 200 rounds without any malfunctions. The trigger seems to have worked out the grittiness. I also now have 2 six, 2 seven, and 1 eight round magazines. The 8 feels great for range shooting, but I think I will be using a 7 for CCW. Sure with the 6 round mag the PPS is tiny, but I feel much better with something for my small finger to rest on.
Second time to the range with my PPS today. Fired another 200 rounds without any malfunctions. The trigger seems to have worked out the grittiness. I also now have 2 six, 2 seven, and 1 eight round magazines. The 8 feels great for range shooting, but I think I will be using a 7 for CCW. Sure with the 6 round mag the PPS is tiny, but I feel much better with something for my small finger to rest on.
Second time to the range with my PPS today. Fired another 200 rounds without any malfunctions. The trigger seems to have worked out the grittiness. I also now have 2 six, 2 seven, and 1 eight round magazines. The 8 feels great for range shooting, but I think I will be using a 7 for CCW. Sure with the 6 round mag the PPS is tiny, but I feel much better with something for my small finger to rest on.
Where did you get the mags? Mine only came with one mag in the case. I have been looking online and they want like $50 + for a mag.
SJan
NES Member
Got mine here:
http://andean-inc.com/Merchant5/merchant.mvc?Screen=CTGY&Store_Code=TAOS&Category_Code=Walther_Magazines_Clips
Mags are $46 each for 6,7 or 8 round. All in stock as of this posting.
Delivered in less than a week.
http://andean-inc.com/Merchant5/merchant.mvc?Screen=CTGY&Store_Code=TAOS&Category_Code=Walther_Magazines_Clips
Mags are $46 each for 6,7 or 8 round. All in stock as of this posting.
Delivered in less than a week.
Last edited:
Got mine here:
http://andean-inc.com/Merchant5/merchant.mvc?Screen=CTGY&Store_Code=TAOS&Category_Code=Walther_Magazines_Clips
Mags are $46 each for 6,7 or 8 round. All in stock as of this posting.
Delivered in less than a week.
Thanks - I will check that out.
I shot mine today. I put about 300 rounds through it of all types of 9mm: S&B (warm), UMC (weak), some light handloads, some very strong handloads, and some Federal Hydrashock.
It fed and ejected everything without a hiccup, the slide locked back at the end of every mag. The accuracy was OK, but....
It has the worst trigger of any gun I own. It's so bad that I have a blister on my index finger from the little lever in the middle of the trigger. I've been shooting Glocks for years and that little lever has never bothered me, the PPS gave me a friggin' blister.
SJan, I noticed in your pics that your disconnector is marked with an "S". Mine has an "H". Could this be "standard" and "heavy"? I already have another disconnector on order, we'll see if that improves it.
Mine is 17. No lie. I had to use a fish scale to measure it. I really hope the new disconnector helps.
I checked one out at Four Seasons today and have every reason to believe that Jim's fish scale is right on. I actually thought the trigger on the display case sample was broken. This is by far the heaviest trigger I have ever experienced on a firearm. I was impressed with the size and form of the pistol, but until a proven work-around for that trigger is tested, I'll stay away.
Chris
Where can I get an "S" trigger or disconnector? Anyone have a guide for full disassembly?
Installation of a standard ("S" marked) disconnector fixes the trigger pull problem. My PPS now has a trigger pull of about 5-6 pounds. Order the disconnector from Walther America (S&W). I installed the disconnector as follows.
To get the action out of the plastic frame, drop the mag, take off the grip insert, field strip the gun, then remove the takedown latch (right to left). Tap out the rear roll pin (tight) and front pin (comes out easily). The action is tight in the frame and I used my slide to gently work out the action. Be careful not to lose the slide stop lever and spring (remove them).
Now the fun part. Numbers that follow refer to the parts diagram posted earlier in this thread.
I began by removing the strut assembly (12.10 - this is the link to the grip-insert safety feature), noting how it connects to the decocker. Pliers may be needed for reassembly later in order to compress the spring and re-hook the strut assembly onto the decocker (by the way, this system is just a decocker engaged by a spring; the grip insert pushes up, disengaging the decocker).
I did not remove the sear assembly entirely, but that would probably be the proper way to go. Instead, I tapped out the pin at the top/back of the action (12.5 - this small pin comes out easily and goes all the way through the top/back hole of the action) and wiggled out the trigger bar guide (12.8 - put aside and reinstall later). I then unhooked the trigger spring from the rear. This gave me enough room, after pushing the trigger forward, to pull out the disconnector and insert the new one. To get the disconnector out, tap out the pin (12.11) holding the bottom hole on the disconnector by lightly driving a very small punch into the little hole opposite the pin (the only reason for this little hole to be there as far as I can tell).
Reassemble with the new disconnector.
I will note that I am not a gunsmith, I am not offering advice here, I may not have adequately described the process I followed, and my method in particular may be flawed or even unsafe. Good luck!
I found this post on another website that has pictures of the action out.
http://www.waltherforums.com/vb/showthread.php?t=6124.
Also just to make sure I get the right part is it?
Part number: 268 58 84 -- Disconnector
Do you have to tell them you want the S not the H?
thanks
steve
http://www.waltherforums.com/vb/showthread.php?t=6124.
Also just to make sure I get the right part is it?
Part number: 268 58 84 -- Disconnector
Do you have to tell them you want the S not the H?
thanks
steve
Economist,
Can you describe getting out the rear pin a bit more? I just tried to take mine down and it did not budge with hand pressure. I used the punch with some taps from a rubber mallet and it still didn't budge. Not wanting to take a full swing at a brand new firearm I stopped.
Did you go right to left? left to Right? or did it not matter?
steve
Economist,
Can you describe getting out the rear pin a bit more? I just tried to take mine down and it did not budge with hand pressure. I used the punch with some taps from a rubber mallet and it still didn't budge. Not wanting to take a full swing at a brand new firearm I stopped.
Did you go right to left? left to Right? or did it not matter?
steve
You have to hit it, and I don't think the direction matters. The roll pin is a tight fit, and I drove mine out with a small hammer and a roll pin punch.
I found this post on another website that has pictures of the action out.
http://www.waltherforums.com/vb/showthread.php?t=6124.
Also just to make sure I get the right part is it?
Part number: 268 58 84 -- Disconnector
Do you have to tell them you want the S not the H?
thanks
steve
I just asked for a standard Walther PPS disconnector.
Detail strip
I completely detail strip my Glocks a couple times a year for cleaning and to change out parts.
The PPS is very similar to a Glock in terms of function and safeties, but is about three times as difficult to disassemble.
The challenge comes from the internal metal chassis and the backstrap decocking "quicksafe" system.
This will cover disassembling the entire lower frame, excluding the magazine release.
First, obtain and study this exploded view:
http://www.carl-walther.info/dev2/files/pdf/PPS 2753880.pdf
ERROR: Note that all the parts are labeled/numbered correctly, but the drawing has the location of part 12.5 and 12.11 swapped.
The stepped pin is what goes through the bottom disconnector hole, the straight pin goes through the trigger bar guide pivot and secures the trigger spring.
I will refer to part numbers and names in the above drawing. Note that left is your left when holding the gun normally and looking through the sights
Tools required:
Glock disassembly tool or standard 3/32 punch.
3/32 Roll pin punch
1/16 punch
1/32 punch or a stout pin. A paper clip may also work.
Wood or nylon block with a hole for the pins to come out
Light hammer.
First, field strip the PPS as per the manual:
1) Unload the firearm.
2) Remove backstrap.
3) Remove the slide, recoil spring, and barrel.
Next remove the chassis from the frame:
4) While holding down the take down lever (18) drive out pin (17) using the 3/32 punch. Note that the pin is notched and will not come out unless spring (15) is depressed.
5) Hold down spring (15) with a punch and remove the take down lever (18) through the left side of the frame. You will need to wiggle it around the spring.
6) Drive out roll pin (21) using the 3/32 roll pin punch. The chassis is now free.
7) You can use the field stripped slide to help pull the chassis out of the frame.

Now the tricky bits. Experiment with the quick safe system to see how the parts move. You may want to do the following with your hands and gun inside a clear plastic bag to contain escaping springs.
8) Remove the slide stop (13) and spring (14)

9) Unhook the strut assembly (12.10) from the decocker (12.7) and remove the strut with it's spring from the chassis.

10) Drive out the trigger spring pin (12.11) with a 1/16 punch. Note that the diagram is wrong. See location below

11) Wiggle out the trigger bar guide (12.8). Note how it engages a post on (12.7) towards the front and visable through the mag well.
12) Unhook the trigger spring from the back of the chassis. Note how is slips over the post.
13) Drive out the right sear housing pin (12.5). It only comes out by using a 1/32 punch in the tiny hole on the left side. Note that the diagram is wrong. See location below (just started out)

and a paperclip in the hole you need to drive it out

14) Drive out left sear housing pin (12.2) using a 1/32 punch or paperclip from the right side hole as shown below


15) Slide out the disconnector (12.12) up and back. You will probably need to slide the trigger bar up on top of the decocker tang for clearance. Slightly pulling the sear housing down may also help with removing the disconnector
Stop here if you are just replacing the disconnector. From now on you should experiment carefully.
Remove the trigger bar and sear housing
16) Drive out trigger pin (12.3) with a 3/32 punch.
17) remove the retainer (12.14) and spring (12.15) noting how they connect to the chassis.

18) Slide the plastic sear housing down out of the chassis. Note how the decocker (12.7) rides in two slots along with a tiny spring. This spring WILL attempt to escape so be careful. You will need to spread the tangs of the chassis slightly.
Move the trigger bar so that it clears the decocker.
19) Carefully seperate the decocker spring (12.6) decocker (12.7) from the sear housing (12.9)
20) Remove the trigger bar from the chassis.
Done. Some notes:
Be very careful when reinstalling the chassis into the frame. It is a tight fit and you will have to spread the plastic frame slightly to get everything together. Use the stripped slide again to assist.
Here is a pic showing the proper orientation of parts before disassembly. Take your own pics for more insurance.

"Cutaway" view of how the disconnector ramps the sear down off of the striker just before the shot breaks.

I completely detail strip my Glocks a couple times a year for cleaning and to change out parts.
The PPS is very similar to a Glock in terms of function and safeties, but is about three times as difficult to disassemble.
The challenge comes from the internal metal chassis and the backstrap decocking "quicksafe" system.
This will cover disassembling the entire lower frame, excluding the magazine release.
First, obtain and study this exploded view:
http://www.carl-walther.info/dev2/files/pdf/PPS 2753880.pdf
ERROR: Note that all the parts are labeled/numbered correctly, but the drawing has the location of part 12.5 and 12.11 swapped.
The stepped pin is what goes through the bottom disconnector hole, the straight pin goes through the trigger bar guide pivot and secures the trigger spring.
I will refer to part numbers and names in the above drawing. Note that left is your left when holding the gun normally and looking through the sights
Tools required:
Glock disassembly tool or standard 3/32 punch.
3/32 Roll pin punch
1/16 punch
1/32 punch or a stout pin. A paper clip may also work.
Wood or nylon block with a hole for the pins to come out
Light hammer.
First, field strip the PPS as per the manual:
1) Unload the firearm.
2) Remove backstrap.
3) Remove the slide, recoil spring, and barrel.
Next remove the chassis from the frame:
4) While holding down the take down lever (18) drive out pin (17) using the 3/32 punch. Note that the pin is notched and will not come out unless spring (15) is depressed.
5) Hold down spring (15) with a punch and remove the take down lever (18) through the left side of the frame. You will need to wiggle it around the spring.
6) Drive out roll pin (21) using the 3/32 roll pin punch. The chassis is now free.
7) You can use the field stripped slide to help pull the chassis out of the frame.
Now the tricky bits. Experiment with the quick safe system to see how the parts move. You may want to do the following with your hands and gun inside a clear plastic bag to contain escaping springs.
8) Remove the slide stop (13) and spring (14)
9) Unhook the strut assembly (12.10) from the decocker (12.7) and remove the strut with it's spring from the chassis.
10) Drive out the trigger spring pin (12.11) with a 1/16 punch. Note that the diagram is wrong. See location below
11) Wiggle out the trigger bar guide (12.8). Note how it engages a post on (12.7) towards the front and visable through the mag well.
12) Unhook the trigger spring from the back of the chassis. Note how is slips over the post.
13) Drive out the right sear housing pin (12.5). It only comes out by using a 1/32 punch in the tiny hole on the left side. Note that the diagram is wrong. See location below (just started out)
and a paperclip in the hole you need to drive it out
14) Drive out left sear housing pin (12.2) using a 1/32 punch or paperclip from the right side hole as shown below
15) Slide out the disconnector (12.12) up and back. You will probably need to slide the trigger bar up on top of the decocker tang for clearance. Slightly pulling the sear housing down may also help with removing the disconnector
Stop here if you are just replacing the disconnector. From now on you should experiment carefully.
Remove the trigger bar and sear housing
16) Drive out trigger pin (12.3) with a 3/32 punch.
17) remove the retainer (12.14) and spring (12.15) noting how they connect to the chassis.
18) Slide the plastic sear housing down out of the chassis. Note how the decocker (12.7) rides in two slots along with a tiny spring. This spring WILL attempt to escape so be careful. You will need to spread the tangs of the chassis slightly.
Move the trigger bar so that it clears the decocker.
19) Carefully seperate the decocker spring (12.6) decocker (12.7) from the sear housing (12.9)
20) Remove the trigger bar from the chassis.
Done. Some notes:
Be very careful when reinstalling the chassis into the frame. It is a tight fit and you will have to spread the plastic frame slightly to get everything together. Use the stripped slide again to assist.
Here is a pic showing the proper orientation of parts before disassembly. Take your own pics for more insurance.
"Cutaway" view of how the disconnector ramps the sear down off of the striker just before the shot breaks.
Last edited:
SJan
NES Member
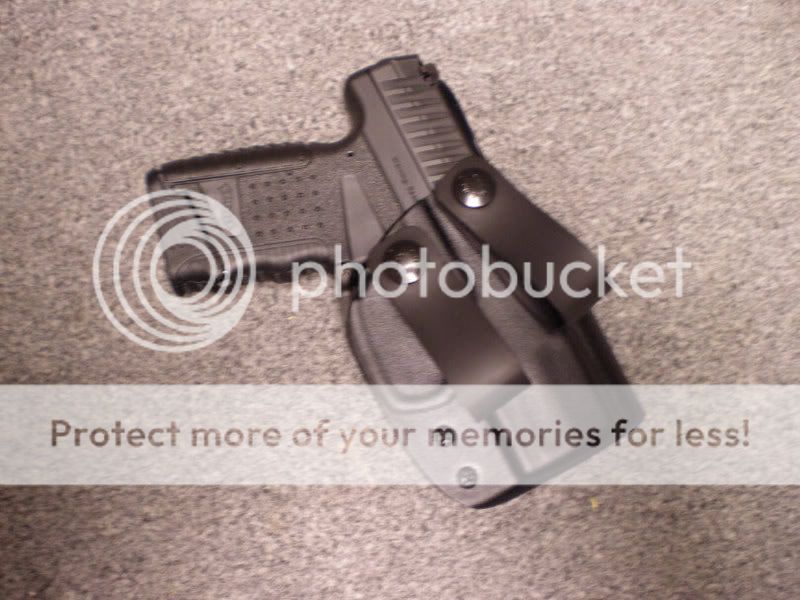
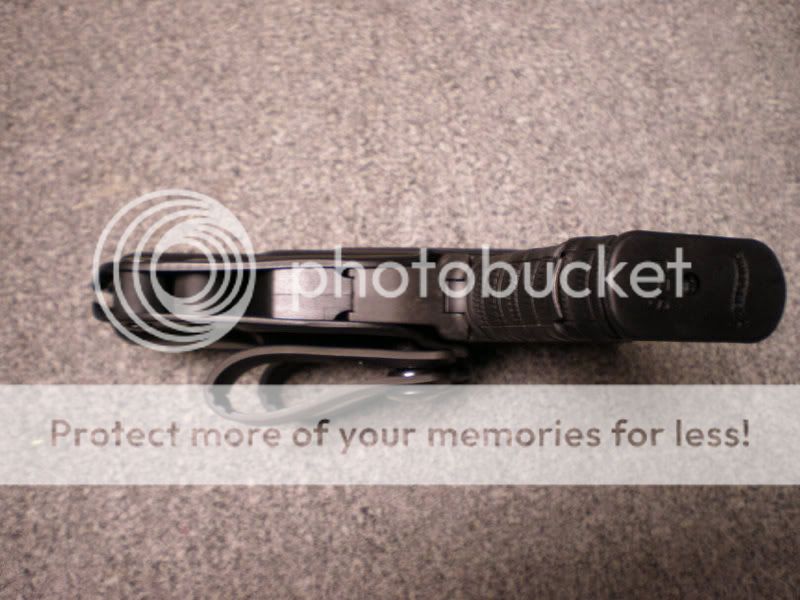
Here is the Blade tech IWB holster I received yesterday. Fits the PPS great, the whole package is kept very slim. The loops, snaps, and tension hardware look to be very high quality.
Obligatory bathroom mirror holster pic:
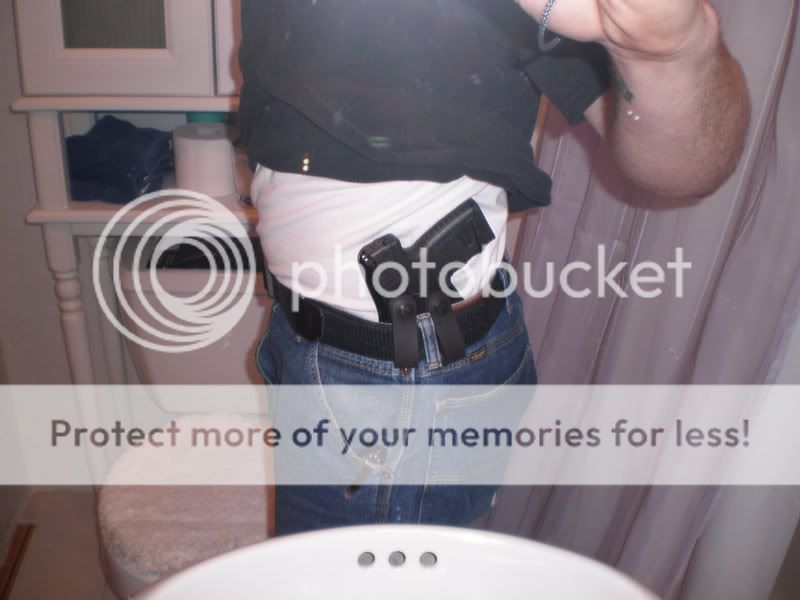
Obligatory bathroom mirror holster pic:
I completely detail strip my Glocks a couple times a year for cleaning and to change out parts.
The PPS is very similar to a Glock in terms of function and safeties, but is about three times as difficult to disassemble.....
Best first post ever destr01d!
I just gave you +6 rep points. I'd give you 600 if I could.
Destro1d,
Great pictures and it's good to know that I can use my Glock punch to get that roll pin out. I'll have to try again with it, It just felt like I was hitting it a bit too hard with the rubber mallet for my liking. Maybe a smaller hammer would be great.
SJan,
While playing around with all my holsters I noticed that the PPS actually fits in my Don Hume IWD holster for my SW40VE. Yes the pps is a bit shorter and thinner but somehow it fits nice. It makes for a very very comfortable SOB carry. Which seems to be the most comfortable for me unless I'm sitting in a car.
I still would love to get the feel of my Roy Baker Pancake that I have for my AMT Backup. That is perfection for me. I've realized I don't really like molded holsters. They print too much for my liking. My Original Roy backer pancake is not molded and doesn't print much.
Thanks for these pictures and the detailed instructions. They definitely made the modification much easier. I performed the operation at my computer desk with the exploded parts diagram and your instructions.
I had trouble with step 11, wiggling out 12.8. I spent about 20 minutes on this step and could not get it out. I skipped it and went on to the other steps. When I got to step 15, removing the disconnector, the part was tight. I used a set of needle nose pliers to yank it out. I tried to put the disconnector in w/o removing 12.8, but I could not. It came out easily at this point, the disconnector went in smoothly and 12.8 went back in easy. you need to have a punch under the trigger bar and lift it up to make clearance.
I took pictures of the S and H disconnector side by side. you can see the different slope where the disconnecting occurs.
Not this weekend but I got mine out for the second time Last weekend. Things seem to be looseing up a bit. Still hard for me to group well at 50 feet. I'm getting better with it. At 7 yards it's good to go.
Another 100 rnds of WWB through it and no problems, no ejection jams, no FTF's, just pull and bang like it's supposed to. I'm waiting on my disconnector to see how that feels. There is another post here with more info on the trigger.
Another 100 rnds of WWB through it and no problems, no ejection jams, no FTF's, just pull and bang like it's supposed to. I'm waiting on my disconnector to see how that feels. There is another post here with more info on the trigger.
Not this weekend but I got mine out for the second time Last weekend. Things seem to be looseing up a bit. Still hard for me to group well at 50 feet. I'm getting better with it. At 7 yards it's good to go.
Another 100 rnds of WWB through it and no problems, no ejection jams, no FTF's, just pull and bang like it's supposed to. I'm waiting on my disconnector to see how that feels. There is another post here with more info on the trigger.
Thanks for the update. I heard that some people may have been experiencing failure to ejects. So far most of what i read is good.
I've put about 700 rounds through mine so far (300 before, and 400 after the disconnector change).
I like to shoot this gun, which will now replace the 642 as my full-time summer carry gun.
I have yet to have one failure to fire, feed, or eject with it.
The new disconnector makes the trigger much better, but it's still not great. It's like a standard Glock trigger now. At first, I had a few instances of the trigger not resetting. When I had it apart to replace the disconnector, I smoothed some burrs on some of the metal parts. I'm not sure if that did the trick, or if there was a break-in period, but the problem hasn't recurred since the disconnector swap.
The pistol is pretty accurate for what it is. I was ringing a 16" steel gong from 40 yards 4 or 5 times out of 7, and I wasn't taking my time.
I've said before that my ideal carry pistol would be a thin remake of the 1903 Colt in 9mm. Except for the DA trigger, this fits the bill.
Not this weekend but I got mine out for the second time Last weekend. Things seem to be looseing up a bit. Still hard for me to group well at 50 feet. I'm getting better with it. At 7 yards it's good to go.
Another 100 rnds of WWB through it and no problems, no ejection jams, no FTF's, just pull and bang like it's supposed to. I'm waiting on my disconnector to see how that feels. There is another post here with more info on the trigger.
Took mine out last Wed nite to Manchester Firing Line. I also brought my M&P 9C and a Beretta 92FS. Out of all three - I was the least accurate with the PPS and the most accurate with the Beretta.
The trigger is definitely a challenge. I may do the work to get the trigger pull down. I had thought the M&P trigger was bad - the PPS made me appreciate that the M&P isn't that bad
![[wink]](/xen/styles/default/xenforo/smilies.vb/002.gif "Wink [wink]")
SJan
NES Member
Anyone have a pic of this thing with the short, flat magazine installed?
-Mike
post 39 here
http://northeastshooters.com/vbulletin/showthread.php?t=54910&page=4
Anyone have a pic of this thing with the short, flat magazine installed?
-Mike
quick pics with 6 and 7 round magazines


The Goose
NES Member
Just my .02 now. I bought a PPS last week based upon the reviews I have read by folks that I respect. This is one hell of a pistol. Walther just ate Glocks lunch. Glock fans have been crying for a slim single stack 9mm for years now and Walther jumped on it. I really like this gun. Even with the heavy trigger I still like it. Today I put 300 + round through it without a hitch. Winchester White Box, Federal JHP's and some Double Taps. I did get the finger blister that Jim mentioned, but I still love this gun. It ain't no tack driver, but it will get her done. Easy to carry and easy to shoot, fits my hand very well. A damn fine piece!
Share:
Similar threads
- Replies
- 36
- Views
- 1K