• If you enjoy the forum please consider supporting it by signing up for a NES Membership  The benefits pay for the membership many times over.

3D printing

so far i see no issues at all using bone stock hotend from ender 3 v2. just swapped out nozzle for steel and tubing for capricorn.
firmware recompiled for 300 max temp in it, so it sets factual temp up to 285 and so far it has no issues.

none of cheaper filaments work well on 285 even, they want less, as i think most companies alter mixes they bake to accommodate mainstream stock ender units.
again, it means NONE of PA06 or PC mixes that say they print at 240-265 are what they say they are, it is a mixed in ABS or PETG and the smell test during printing will tell you what was done.

the superhard priline does not like 285 at all - 275 is optimal there. but printer handles 285 fine and nothing clogs or has any issues so far. if i see any i can upgrade the hotend, but so far for what i use it for - i see no reason to do it. a regular priline pc-cf is pure shit, i think it is an almost pure rebranded petg, with no PC in it at all.

i had some ideas to do some custom car manifold parts in glass nylon, but do not want to venture there yet. it will wait. polymaker has some pa6-gf for $35 per 500g right now, but it seems people say it is good for flat parts only, as usual, needs to have 50deg bed only, then be annealed at 80deg later and warps during that process.

if you really after printing lowers or glocks - i still think the superhard pc-cf is probably the best, but, i think it is more practical just to buy a p80 80% frame and save yourself the hassle.
The stock temp sensor in the hotend has PTFE coated wiring. I don't feel comfortable releasing PTFE fumes into my home, so I have stayed away from exotic materials.

Sources: Ender 3 v2 all metal hotend upgrade - NotEnoughTech and What Is the Maximum Temperature Ender 3 (Pro/V2) Can Reach? - 3D Print Beast

Although, I feel like many sites these days are written by a computer smashing random words together (or maybe writing and research skills have just become that bad), so who knows?

Interesting though that those blends melt at such low temps, makes sense why they're priced relatively low.
 
I don't feel comfortable releasing PTFE fumes into my home
if that is a concern - do not use it at all, as it will indeed fume a lot. i run it in the unfinished part of the basement, in the enclosure, and it`s a tad open window right above it.

the wires are not getting any hot, as it all is right by the fan that blows at them.

i am concerned of fumes from caprcorn tubing way less than about fumes from the filament itself, as the latter no one has any idea of - what is it and what is inside of any of it.
also, i can tell - wiring i have does not show any signs of the heat impact, at all.
 
Last edited:
i am learning fusion 360 and having a ton of fun. great software, once you get an educational license for it to open up most features. wife works at the school, so, it was easy.

the other thing, i got to say, this new upgraded sprite direct extruder pro is nothing short of amazing.
it prints at 200mm/s (walls at 100mm/s) settings in cura fine, quality is great so far, i am still testing it.
i had one on the $92 lightning deal but amazon delivery screwed me - it was never delivered, so i had to re-buy it at $109 regular.
Amazon product ASIN B0B8BX5H5FView: https://www.amazon.com/dp/B0B8BX5H5F
 
guys, i need some help here with understanding of what cura takes to account when slicing and assessing speed. i am confused a bit.

with all other factors set same - i set wall speed to
20mm/s - i get 16h 30min.
30- 14:01
40- 13:02
50 - 12:35
60- 12:22
70- 12:14
80- 12:09

what is the limiting factor for severe decline in print time reduction above 50mm/s?

time assessment shows, for last 80mm/s quote:
infill - 02:51
inner walls - 04:04
outer walls - 1:43
retractions - 1:12
travel - 1:47

and if i boost travel speed from 200mm/s to 300mm/s it INCREASES time from 12:09 to 12:15. wtf?
Do you have acceleration control on? It may be limiting speeds due to exceeding acceleration and jerk thresholds.
 
Do you have acceleration control on? It may be limiting speeds due to exceeding acceleration and jerk thresholds.
well, it is quite something, that cura UI. i opened up to play with accel control and jerk control.
set first to 5000 - why not, second to 20 from default 8. it dropped time to 10:52. i disabled the checkbox - hoping for time to drop, well, no - it stays, apparently if you remove the checkbox, it still uses values you put in there.
so, the 500 to 5000 move did not do a major change there. it still is confusing as hell, as profile is not changed for anything else, but with those sections altered back-forth and back to 500/8 in accel/jerk time shows now as 11:35.

i alter accel to 5000 from 500 - get 11:31.
alter jerk from 8 to 16 - get 9:24
get back accel from 5000 to 500 keeping 16 jerk - get 9:28.
printer`s default max jerk is set to 10. ok, this is rather interesting. i did not expect the jerk alone to be such the limit there. hmm.

still no clue what made it drop from 12:09 to 11:30. so odd.

with accel/jerk at 700/10 it estimates 10:37. an another hour off, but, at what cost it will be? with all default settings there in cura prints are very smooth looking now.
 
Cura basically guesses at the print time, I find the estimate to be off by ±20%

Best option is to look at the numbers given as a ratio, for example, the above suggests infill is wasting a lot of print time and could benefit from adjustment.
 
Cura basically guesses at the print time, I find the estimate to be off by ±20%

Best option is to look at the numbers given as a ratio, for example, the above suggests infill is wasting a lot of print time and could benefit from adjustment.
CHEP on YouTube has some good info on speeding up prints with cura settings. Cutting time by insane amounts. Of course you sacrifice some quality either aesthetically, or physically but I think a lot of time we end up printing stuff to be wayyyy more sturdy than we need it.
 
CHEP on YouTube has some good info on speeding up prints with cura settings. Cutting time by insane amounts. Of course you sacrifice some quality either aesthetically, or physically but I think a lot of time we end up printing stuff to be wayyyy more sturdy than we need it.
what would be a summary of his approach?
 
CHEP on YouTube has some good info on speeding up prints with cura settings. Cutting time by insane amounts. Of course you sacrifice some quality either aesthetically, or physically but I think a lot of time we end up printing stuff to be wayyyy more sturdy than we need it.
a very counterintuitive shit it is.
like the activation of the 'alternate extra wall' increases time from 10:52 to 11:36. that was the thing i disabled, apparently, without noticing.
 
ok, so his 'trick' is a jerk set to 12. my firmware is limited to 10 now, that would require a recompile. will see, i will print some test cubes with it to see.
Higher jerk and acceleration require higher structural rigidty of your printer body. The more reinforcement you have, and th stiffer your printer frame is, the higher you can push acceleration and jerk without loss in quality. Basically you will be straining your frame if you get too extreme which will shake/vibrate your print and result in increasing levels of quality degradation.
 
so my profile test cube was estimated for 39min, printed out in 28.
i got his 0.2mm profile, it estimated for 28min, printed in 27. interesting stuff.

his cube looks a little tad bit better than mine, but almost identical.

of annoying things - with this new extruder, or may be after beating printer up for a while, the x-y-z 20mm cube now measures as 20.25-20.30-19.70. what in the world...

i now will test his cube with 100mm/s walls. this new extruder i got can push an elephant out of that nozzle.
 
I haven’t watched it in a while but here’s the videos. One is 7 months old the other is 3
Not sure how much they overlap


View: https://youtu.be/t_9ADBZVCoA


View: https://m.youtube.com/watch?v=jM_jdsx5yFc&t=191s

any idea of why his imported profiles would refuse to take in automatically the bed temp and cooler fan speed when i change material?
the temp of the filament is getting in, but those 2 - do not. so weird.
i was printing 2 last cubes from PC having fan running 100%. also an issue with octoprint not showing current fan speed nowhere.
No clue. I’m an idiot with this stuff.
 
guys, i need some help here with understanding of what cura takes to account when slicing and assessing speed. i am confused a bit.

with all other factors set same - i set wall speed to
20mm/s - i get 16h 30min.
30- 14:01
40- 13:02
50 - 12:35
60- 12:22
70- 12:14
80- 12:09

what is the limiting factor for severe decline in print time reduction above 50mm/s?

time assessment shows, for last 80mm/s quote:
infill - 02:51
inner walls - 04:04
outer walls - 1:43
retractions - 1:12
travel - 1:47

and if i boost travel speed from 200mm/s to 300mm/s it INCREASES time from 12:09 to 12:15. wtf?
Acceleration - that's what will kill you and fast (pun intended)
Especially on a bed slinger it takes time to reach max speed and time to slow down - so much so that unless you are moving across the entire bed the printer might never reach commanded speed.

You can increase the acceleration values but then you get excessive ringing and possibility of missed steps. On a bed slinger you can simply knock over tall, thin parts by printing too fast.
 
any idea of why his imported profiles would refuse to take in automatically the bed temp and cooler fan speed when i change material?
the temp of the filament is getting in, but those 2 - do not. so weird.
Generally the fix is to open the imported profile in a text editor and remove the hardcoded profile-level setting for bed temp and cooler fan speed.

Removing the line entirely from your imported printer profile ensures the setting in the material profile is used instead.
 
well, it is quite something, that cura UI. i opened up to play with accel control and jerk control.
set first to 5000 - why not, second to 20 from default 8. it dropped time to 10:52. i disabled the checkbox - hoping for time to drop, well, no - it stays, apparently if you remove the checkbox, it still uses values you put in there.
so, the 500 to 5000 move did not do a major change there. it still is confusing as hell, as profile is not changed for anything else, but with those sections altered back-forth and back to 500/8 in accel/jerk time shows now as 11:35.

i alter accel to 5000 from 500 - get 11:31.
alter jerk from 8 to 16 - get 9:24
get back accel from 5000 to 500 keeping 16 jerk - get 9:28.
printer`s default max jerk is set to 10. ok, this is rather interesting. i did not expect the jerk alone to be such the limit there. hmm.

still no clue what made it drop from 12:09 to 11:30. so odd.

with accel/jerk at 700/10 it estimates 10:37. an another hour off, but, at what cost it will be? with all default settings there in cura prints are very smooth looking now.
Remember those times are estimates - sometimes they are outlandishly wrong
Cura gives times 2-3x reality for my X5SA Pro.
 
Acceleration - that's what will kill you and fast (pun intended)
Especially on a bed slinger it takes time to reach max speed and time to slow down - so much so that unless you are moving across the entire bed the printer might never reach commanded speed.

You can increase the acceleration values but then you get excessive ringing and possibility of missed steps. On a bed slinger you can simply knock over tall, thin parts by printing too fast.
it all makes perfect sense. i am mostly testing the shit out of that sprite pro extruder today, and so far it is very nice.
one thing that was surprising - i need to keep infill flow 15% under the regular wall flow to prevent forming an ocean of messy goo. other than that - the quality of that direct extruder is amazing. there is no ringing so far at 60mm/s wall print speed - printing that same superhard PC, all comes out very clean, so far.
will see how it will progress.

ps. the simplicity to swap out the filament alone was worth $109 of its price. the thing is amazingly good.
 
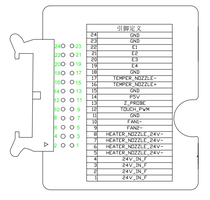
i got a pinout for ribbon cable that comes along with the sprite pro extruder - may be useful for those who will get it.
was trying to find if there is a way to control the side fan, so far - not too successful.
Cable pins.png
 
was trying to find if there is a way to control the side fan

Do you mean the heatsink fan or the parts cooling fan?
If it's the former, why would you need to control it. It should pretty much always run. But you could set it to turn on above X° hotend temp and off below, via firmware.
 
Do you mean the heatsink fan or the parts cooling fan?
If it's the former, why would you need to control it. It should pretty much always run. But you could set it to turn on above X° hotend temp and off below, via firmware.
why would it need to run when hot end is cold and printer is idle? it is loud, and it is annoying.
marlin has ways to control that, but it is not doable, apparently, on the sprite pro.
to set it in firmware you need to know which pin to use.
#define E0_AUTO_FAN_PIN -1
..
#define CHAMBER_AUTO_FAN_PIN -1
#define COOLER_AUTO_FAN_PIN -1
#define EXTRUDER_AUTO_FAN_TEMPERATURE 50
#define EXTRUDER_AUTO_FAN_SPEED 255 // 255 == full speed
 
Last edited:
marlin has ways to control that, but it is not doable, apparently, on the sprite pro.
to set it in firmware you need to know which pin to use.

It's not an issue of the sprite. You just need to select the right fan pwm pins/port on the board... except the 4.2.2 board that's likely in your E3P doesn't do PWM on the hotend fan port. That fan is connected directly to the power terminal of the board, so it's always receiving 24v.

The cable is irrelevant, it's just a convenient bundling of all the separate plugs into a ribbon.

TLDR: Solution: get a SKR mini E3 v3 for like $35-40. It'll have PWM on 3 fan ports, built in ABL port, built it filament sensor port, silent drivers, etc etc etc. I have this board and set heatsink fan to 50°c on/off, the mainboard fan to turn on when bed heater is on and part cooling fan as normal config.
Alternatively, turn off printer when not in use to not hear the fans.
 
Last edited:
It's not an issue of the sprite. You just need to select the right fan pwm pins/port on the board... except the 4.2.2 board that's likely in your E3P doesn't do PWM on the hotend fan port. That fan is connected directly to the power terminal of the board, so it's always receiving 24v.

The cable is irrelevant, it's just a convenient bundling of all the separate plugs into a ribbon.

TLDR: Solution: get a SKR mini E3 v3 for like $35-40. It'll have PWM on 3 fan ports, built in ABL port, built it filament sensor port, silent drivers, etc etc etc. I have this board and set heatsink fan to 50°c on/off, the mainboard fan to turn on when bed heater is on and part cooling fan as normal config.
Alternatively, turn off printer when not in use to not hear the fans.
cable relevance was about sprite ribbon having 2 extra connectors of unknown origin and purpose.
 
I would guess that it was easier to procure 24pin ribbon cables in bulk and they just put dummy terminals on the unused wires. Believe 19 of the 24 pins are used.
 
I would guess that it was easier to procure 24pin ribbon cables in bulk and they just put dummy terminals on the unused wires. Believe 19 of the 24 pins are used.
a chinesium mfg providing unused useless connectors for free? hmm. it is unheard of. :)
 
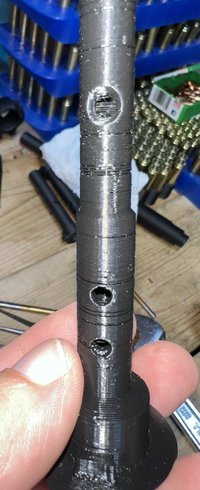
Could anyone pls explain what may be the reason of those concentric defects on that print below? It is a pla at 205deg.

This sample was delayed to 5sec 60mm/s flow for tube, a 2sec per layer 100 mm/s flow faster print had same exact pattern. PC-CF printed at 100/2 fast settings and 270deg had none of those.

59985E9E-6192-419D-938F-A38ADE3A1F94.jpeg
 
Last edited:
Back
Top Bottom