• If you enjoy the forum please consider supporting it by signing up for a NES Membership  The benefits pay for the membership many times over.

3D printing

Yeah, magnetic beds are the way to go for just about everything as long as you tailor the bed adhesive to the filament.

Dollar for dollar, the Ender 5 Plus has a lot going for it if you are into upgrades but there are also great printers out there under $1k that perform out of the box. Just depends what your thing is: Printing or Tinkering.
 
I am content with it as set up right now. Well, aside from the hot end, bowden tube, and the aluminum extruder that arrived earlier. I like tinkering to a point. Seems to me the small screws are harder to manipulate the older I get. It feels like finding a flying lower detent spring sometimes.
 
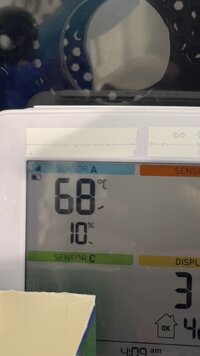
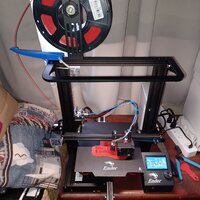
Seems my enclosure is working too well, will have to upgrade my temp sensor as it crapped out shortly after this.

IMG_2894.jpeg

Y belt has been slipping as well and since I have slowed speeds, tightened, and aligned them in response and it still happens, my guess is its just too hot for the stock Ender 5 movement system at 70 Celsius or so and the belt stretches. =\

Going to leave the door open to modulate temps and see if that helps. Don't think ASA needs 70+ enclosure temps
 
Last edited:
Seems my enclosure is working too well, will have to upgrade my temp sensor as it crapped out shortly after this.

View attachment 868025

Y belt has been slipping as well and since I have slowed speeds, tightened, and aligned them in response and it still happens, my guess is its just too hot for the stock Ender 5 movement system at 70 Celsius or so and the belt stretches. =\

Going to leave the door open to modulate temps and see if that helps. Don't think ASA needs 70+ enclosure temps
70C [shocked].
Most commercial grade electronic components are only good for 70C. If they are in a poorly ventilated box, they'll be well above 70C from self heating.

Also, if there's any plastic parts under strain, I bet they are starting to warp at 70C. The "frame" of my old Robo-3D was plastic and I slightly warped it when I got the enclosure up to 60C.
 
Yeah, the stepper motors sure aren’t happy. I have heat sinks on them and they get hot enough to burn you. Even the 2020 rails get hot to the touch just from the ambient heat. I had a PLA fan shroud that looked like Salvador Dali drew it after one use lol. Reprinted in ASA and it’s fine.

I started cracking the door but it’s not normally ventilated at all and built of foam insulation board so it passively heats up real good.

When I take everything apart for the Mercury One rebuild, I’m going to relocate the electronics outside and actively cool the stepper motors. The steel rails will handle heat much better than the stock Ender system as well.
 
Last edited:
One of the main guys behind the Mercury One also designed this electronics case that neatly organizes everything with a screen on front. Very well thought out and modular.


My current plan is to print the Merc1 parts, EVA tool head, and get the Merc1 up and running with the current config including Mosquito & Bondtech DDX.

Then use that setup to print the electronics enclosure with which I will house the upgraded controller board, pcu, & display then install the Mosquito Magnum & Sherpa extruder with lightweight gantry (all of which I already have).

I will share the build here, assuming someone will be interested. Should be very enlightening, I’m excited to see what the Ender 5 base unit can become with some ingenuity, effort, and money.

Future upgrades are Hydra (275mm three axis Z) & MMS, which is why I bought the upgraded MCU.
 
Last edited:
MMS options, both designed to be printed and assembled using common components and modular.

Enraged Rabbit Carrot Feeder (ERCF): Open source, Voron-based project.
1712084734867.png

Tradrack: Annex Engineering
1712084765699.png
 
Last edited:
Ordered a ball bearing spool roller and am printing an arm to get the filament feed out of the straight down angle into the extruder. I hope one day to leave it running, walk away, and come back to a completed job with no stringing.
 
Last edited:
One of the main guys behind the Mercury One also designed this electronics case that neatly organizes everything with a screen on front. Very well thought out and modular.


My current plan is to print the Merc1 parts, EVA tool head, and get the Merc1 up and running with the current config including Mosquito & Bondtech DDX.

Then use that setup to print the electronics enclosure with which I will house the upgraded controller board, pcu, & display then install the Mosquito Magnum & Sherpa extruder with lightweight gantry (all of which I already have).

I will share the build here, assuming someone will be interested. Should be very enlightening, I’m excited to see what the Ender 5 base unit can become with some ingenuity, effort, and money.

Future upgrades are Hydra (275mm three axis Z) & MMS, which is why I bought the upgraded MCU.


Do you guys want to see the build here or would you rather I start a discrete thread to follow the build?
 
Once I install the double gear extruder it will be smoother sailing. What a huge difference with the roller bearing spool ollder and filament arm. So quiet now with just these changes. 20240404_171354.jpg
 
FWIW, the 2020 rails on those printers use mlok. Might be more secure than a zip tie. You can get a 100 t nuts from Alie for a couple dollars & use an m3 bolt.

The other thing you can consider is a better fan duct for part cooling. There’s probably a million of them that direct air better than the stock scoop.
 
Received the extruder. The light mount being in the way is why I use the ties. I have an enclosure that has not been assembled yet as well.
 
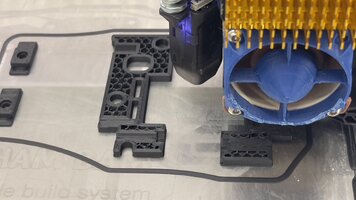
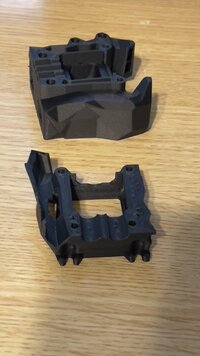
I’ve been printing with 3dx ASA-CF for the toolhead to keep it as light & stiff as possible, amazing stuff. I wasted half a roll on the wrong toolhead before changing from EVA3 to a Voron Stealthburner to maximize the print area. Also realized I hadn’t calibrated my extrusion since putting the DDX in… had to drop extrusion to 84% but now it prints amazing. Damn near production quality at 250 in a 60 degree enclosure on magigoo. Played with the bridging settings and even doing well without supports, something ASA struggles with.

It’s at the stage where I just feed it parts and it prints, which is the point that I wait for something to break lol

From everything I see, should end up with 310x310x300 or close to it. Based on parts availability it will be May before I can complete that part.
 
I’ve been printing with 3dx ASA-CF for the toolhead to keep it as light & stiff as possible, amazing stuff. I wasted half a roll on the wrong toolhead before changing from EVA3 to a Voron Stealthburner to maximize the print area. Also realized I hadn’t calibrated my extrusion since putting the DDX in… had to drop extrusion to 84% but now it prints amazing. Damn near production quality at 250 in a 60 degree enclosure on magigoo. Played with the bridging settings and even doing well without supports, something ASA struggles with. Also been using Cura’s newish honeycomb infill to maximize part strength, Mother Nature is a genius.

IMG_2929.jpeg

It’s at the stage where I just feed it parts and it prints, which is the point that I wait for something to break lol

From everything I see, should end up with a 310x310x300 build area or close to it. Based on parts availability it will be May before I can complete that

IMG_2928.jpeg

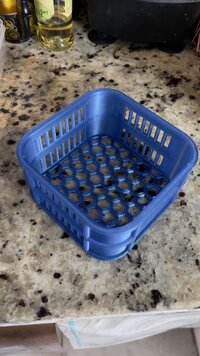
Also wanted to share one of the more useful thing I’ve printed, a berry basket.

IMG_2926.jpeg
 
Last edited:
I have found the pla likes 214° although there is no way to check actual temps. My laser thermo is disappeared.
You will find that each brand will print a little different - and the thermistors used vary quite a bit from true (can be ±5°C)
If you have a thermocouple thermometer you could check the actual nozzle temp but it doesn't really matter - use what works on your printer.
 
I’ve been printing with 3dx ASA-CF for the toolhead to keep it as light & stiff as possible, amazing stuff. I wasted half a roll on the wrong toolhead before changing from EVA3 to a Voron Stealthburner to maximize the print area. Also realized I hadn’t calibrated my extrusion since putting the DDX in… had to drop extrusion to 84% but now it prints amazing. Damn near production quality at 250 in a 60 degree enclosure on magigoo. Played with the bridging settings and even doing well without supports, something ASA struggles with. Also been using Cura’s newish honeycomb infill to maximize part strength, Mother Nature is a genius.

View attachment 870416

It’s at the stage where I just feed it parts and it prints, which is the point that I wait for something to break lol

From everything I see, should end up with a 310x310x300 build area or close to it. Based on parts availability it will be May before I can complete that

View attachment 870413

Also wanted to share one of the more useful thing I’ve printed, a berry basket.

View attachment 8704126"
Those prints look awesome

I need to get a new dryer - tried to print nylon the other day and it's wet even after 8 hours at 55°C
All of my filament is in a closed plastic tote but it isn't sealed and was floating around when my basement flooded a few weeks ago.
 
I have a dehydrator for large drying and the new Creality dry box for feeding filament during printing. The creality gets up to 70 C I think? And will go for 48 hours. Fan is louder than it needs to be, I may take it apart and replace that w a noctua fan.

I screwed up again, need to reprint parts. The first set of x carriage parts don’t have a mount for the x stop micro switch (which is asinine). More wasted ASA-CF that I’m almost out of. New roll comes Thursday. Stuff is amazing to print but pricey.

I also switched from the EVA3 to Stealthburner tool heads which required more reprinting but discovered plans for fitting the CR10 build plate in my Ender 5 which will give me 310x310x300 from a very efficient cube.
 
Last edited:
I have a dehydrator for large drying and the new Creality dry box for feeding filament during printing. The creality gets up to 70 C I think? And will go for 48 hours. Fan is louder than it needs to be, I may take it apart and replace that w a noctua fan.
Will probably grab a unit that does 70°C
I screwed up again, need to reprint parts. The first set of x carriage parts don’t have a mount for the x stop micro switch (which is asinine). More wasted ASA-CF that I’m almost out of. New roll comes Thursday. Stuff is amazing to print but pricey.
That's why I print in PLA to prototype while trying to work out parts - errors get expensive fast.
 
That just sounds smart. I will do that … next time lol

Problem is I thought I had it worked out before printing, then continued research and discovered mods that opened up new possibilities and thus changed the parts I needed to print.

I’m already planning this in three stages.
1. Get corexy running
2. Upgrade electronics
3. Expand build area

Stage three requires new printed parts and extrusions that I have mostly worked out now. But I think printing in PLA first to test the setup makes sense, tho ASA isn’t terribly expensive.
 
I test fit the Voron Stealthburner toolhead modules together and test fit with the X gantry today. Almost cried when it all fit together. Non standard hot end, extruder, and gantry make it much more complicated.

I plan to tear it apart Friday and do the corexy motion upgrade this weekend.
 
I did the conversion last weekend, will post build pics below.

I am currently fighting the BTT Octopus Pro with TMC2240 drivers. The documentation is hard to find, multiple revisions, and they changed pin outs. First board was bricked, couldn’t even get it into DFU to redo the bootloader. Second one suddenly decided to stop connecting. Idfk

I will say that the klipper part of the conversion, from Creality board to a controller board, is far far more daunting than the physical conversion from Cartesian to corexy. Mind numbing my difficult with no sample configs to even base settings off and no prebuilt firmware.

I am going to return the BTT Octopus and use a Fystec Spider 3. Much better documented and by all reports more robust and durable. Not sure I would ever buy another BTT board after this. Also switching to TMC5160t Pro drivers for xy and 2209 for z & e after this.

Just too many undocumented settings for the 2240 drivers that make it a nightmare. Apparently the Klipper team got in a pissing match with BTT over how they went about releasing a product before securing support in the community for it. Much like how the Voron community stopped support for Slice Engineering which has resulted in using community, poorly QA’d designs for the print head.

This has resulted in me designing my own print head specific for my use case with the hardware I have. My goal is to use the Voron Stealth burner and make it stronger, smaller, and have better parts cooling. I want to maximize my print area so an ungainly modular print head is an impediment to that. I have a good idea what to change and how to accomplish my goal, will share my development.

I also had a problem with the Mini Sherpa extruder, where I ordered the 8 tooth and got the 10 tooth. Well, the 10t does NOT work with the 8t settings and it took a few days to try the other gear ratio as I chased down other possible culprits.

Then once I get that all sorted and the rotation distance right, it kept crapping out on the UART connection between Octopus & Pi. Idk if my jury rigged cable is too long, too much interference, or what but I will be using usb on the next setup. UART is fine for drivers but not communication over distance.

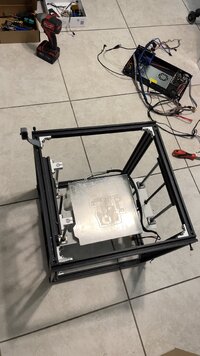
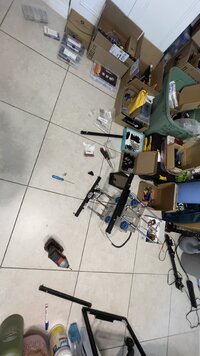
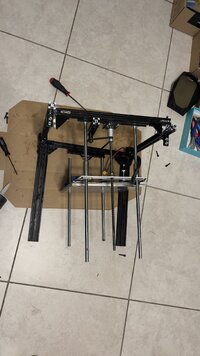
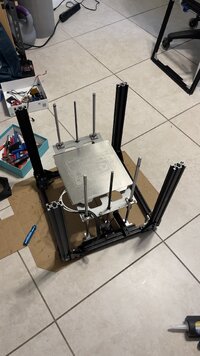
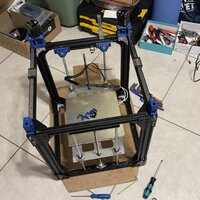
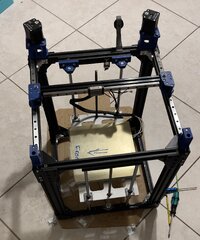
Anyway, here are some disassembly pics:
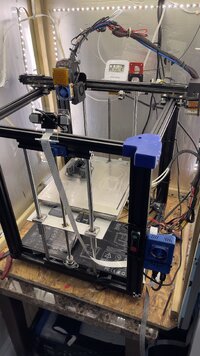
IMG_2972.jpeg IMG_2975.jpeg IMG_2983.jpeg IMG_2984.jpeg IMG_2987.jpeg IMG_2985.jpeg

Took it down to the studs. Then reinforced the snot out of it with corner brackets and braces in every corner. The stock blind screws had it out of square so I replaced many of those with mlok t nuts that depend less on the angle of the threaded hole.

This was 1-2 days of straight work.

Then began assembly, where I discovered that most of my parts were over extruded and needed to be “adjusted” for fit and fasteners. I should have done all this work ahead of time. =\

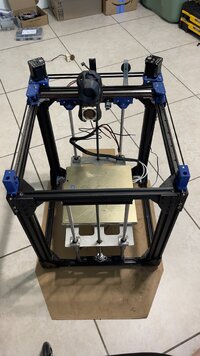
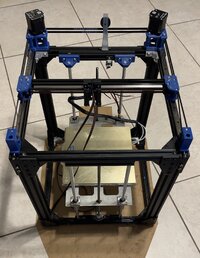
Corexy system coming together:
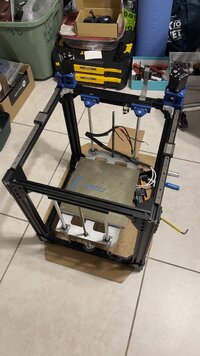
IMG_2987.jpeg
IMG_2990.jpeg
IMG_2993.jpeg
IMG_3001.jpeg
IMG_2995.jpeg

And finally electronics, where I discovered that the stock creality 4.2.2 board has a setting called stealthchop that doesn’t work with extenders for some ungodly reason and can’t be turned off. So I had to scrap the stock board and use the Octopus, which has had a massive massive slew of its own issues.
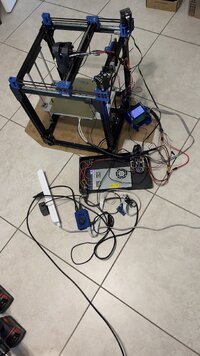
IMG_3004.jpeg

It was at this point that Belt tuning occurs. And where I discovered that if your belts aren’t IDENTICAL LENGTH, your gantry won’t be square no matter what you do. So apart it came and I redid the belts. Three times. Then clamped the gantry to the front towers and finally got it right, using a sound app to tune the frequency of the belts for tension.

That’s where the Octopus saga begins and I won’t bore you with that.

Hopefully my next update will be more positive.
 
Back
Top Bottom