3D printing

What they said lol.

I have dry feed boxes and don’t print much PLA so yes, there is a difference for me. The dry feed boxes particularly help with large nylon prints where the spool would start to swell in the humidity.
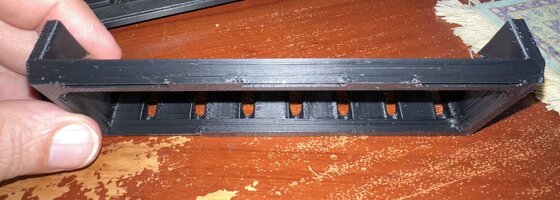
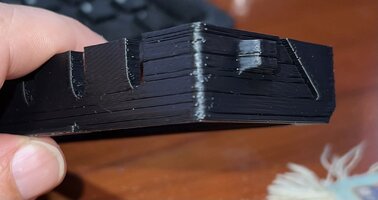
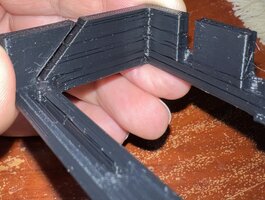
 
i decided to try the ruby one - it is on sale now at amazon for $24.90, so i could will return it back if it fails to deliver.

steel nozzles i have now make very good lines, but, with forcing up speed they cannot really do same good as copper/brass ones.
but unfortunately, brass wears off fast. i did have a brass one on the old printer, and really did not even notice how badly print quality went down until i got a fresh new printer setup. now with steel all stringing went away, lines are perfect, but, i got an extruder hitting the limit on the old printer, sporadically and it makes wall line prints defects as can be seen below.
interesting that new printer with new extruder is not doing it, only old one does, on a same hardware, profile and settings. probably stepper motor wear shows.

View attachment 704949
auckchually :) it looks like i got a new glitch. it is not an extrucer or mechanical. this shit goes concentric for a whole layer. wtf it could be i wonder.
i though i had all mechanically induced issued by now, but this does not seem to be the same.
looks like a glitch of the coasting feature, may be, but, why? i never had this shit before and looking at the other print on the new printer i saw the same looking sample there, only on new one it happens way less than on old one.
 

Attachments

  • IMG-3190.jpg
    IMG-3190.jpg
    407.7 KB · Views: 10
  • IMG-3193.jpg
    IMG-3193.jpg
    172.5 KB · Views: 11
  • IMG-3195.jpg
    IMG-3195.jpg
    569.2 KB · Views: 11
Last edited:
and it is not like layers did not stick - the issue is this - like it suddenly stopped printing the whole layer. wtf?

1672710010098.png

trying to reprint now same model with the old profile i used for months. so puzzled right now.
 
and here how it looks like on a new printer - one single spot there. all the rest is perfect. really, wtf?
trying to compare profiles - no damn differences, and both had coasting feature on.
old one prints now, so far shows no such defects. holy crap. if it is a cura glitch - it is so odd.
grr.jpg

so many f#cking variables in this tech, it is just insane, you never know what is it you have that gonna get you. a mechanical, or software, or both.
 
Last edited:
Hate coasting and yes, the number of variables in this is infuriating. Laughable really when you hear people say how easy it is. “Ok you try”
 
Hate coasting and yes, the number of variables in this is infuriating. Laughable really when you hear people say how easy it is. “Ok you try”
a print with old profile btw is going on just fine and there is no sign of this failure. it is intriguing. i will try to find out what it is. profiles are almost identical, both are .24mm and on that part the time gain was merely about 10min max according to cura. so odd.

ps. looks like a factual time gain isn't going to be much, as new profile factual time was 2hr 43min, and old one is at 2hrs exactly now and is 71% done. quality of new profile was better, though, on a test cube - less ghosting. such a weird crap.

ps. and cancelled ruby nozzles as it is irrelevant.
 
Last edited:
soooo many variables
yeah. those crazy glitches are the killer. if you look up the thread - i had that shit with arc welder, that was causing the nozzle to prior layer collision and next layer shift as a result.
crazy. yet, repeatable and reproducible. with no fix and no official recognition. devs 'could not reproduce it', so the issue was just closed and ignored.

ps. and it makes me exra pissed as i swapped a nozzle and did a full internal extruder cleanup while it was 300 C hot. all for nothing. but a good thing is - this sprite pro never really clogs. but it was looking so much like a classic nozzle clog. damn.
 
Last edited:
I hate nozzle clogs, especially with tough filaments like GF or CF nylon. May as well toss the nozzle or torch it, which is a good reason to have a supply on hand. Torch several at once. Creates delays for seemingly no reason.
 
I hate nozzle clogs, especially with tough filaments like GF or CF nylon. May as well toss the nozzle or torch it, which is a good reason to have a supply on hand. Torch several at once. Creates delays for seemingly no reason.
well, the puzzle is solved. just missed that in a damn profile somehow, it had a retraction distance hardcoded at 6mm.
that did it, to a direct extruder. damn.
 
So my pla prints looked great, and decided to try ABS. 230c extrusion, 95c bed temp. (No enclousure) . I cant get 1st layer adhesion. Tried tweaking several offsets , and glue nothing is sticking. Another problem is looks like my bed can only reach a max of 98c even though i have a 110c max parameter set). Can i get suggestions on a step by step process to get 1st layer adhesion ? Thanks guys !
 
What kind of bed material do you have?
There are several good PEI options depending what you currently have for a setup.
 
is there anybody here who uses this 'simplify 3d' slicer? is it worth it, for anything?
 
Last edited:
What kind of bed material do you have?
There are several good PEI options depending what you currently have for a setup.

I have a basic glass bed and i have the Wham Bam system . My attempt was using the oem glass bed , i have not tried the Wham Bam yet.
 
Last edited:
Last edited:
So my pla prints looked great, and decided to try ABS. 230c extrusion, 95c bed temp. (No enclousure) . I cant get 1st layer adhesion. Tried tweaking several offsets , and glue nothing is sticking. Another problem is looks like my bed can only reach a max of 98c even though i have a 110c max parameter set). Can i get suggestions on a step by step process to get 1st layer adhesion ? Thanks guys !
Take your failed print and cut it into small pieces.
Fill a small bottle with about 100ml of acetone and add a couple of grams of ABS. Close it up, shake well, and let it sit to dissolve. Once dissolved add a couple more grams of ABS and let that dissolve.
you are looking for a solution that is only slightly viscous.

Clean your bed meticulously and paint with the ABS solution then let dry. Heat the bed at 80°C for about 10 minutes before printing to drive off the rest of the acetone.
You will need a brim on anything with sharp corners or tall aspect ratio.
but that would make it pretty much an ABS only bed after that, right? not if that it would not be the best approach, to have a dedicated glass bed per a type of material.
 
but that would make it pretty much an ABS only bed after that, right? not if that it would not be the best approach, to have a dedicated glass bed per a type of material.
Nope - pretty much anything will stick to the ABS goo and it wears off (the print pulls it off)
If you want to get rid of it just wipe with a clean acetone soaked paper towel.

Do not apply this to BuildTak or a plastic print bed
Use only on the smooth side of a glass bed (it will work on some flex beds but they need to be acetone safe so just use glass)
 
Last edited:
Take your failed print and cut it into small pieces.
Fill a small bottle with about 100ml of acetone and add a couple of grams of ABS. Close it up, shake well, and let it sit to dissolve. Once dissolved add a couple more grams of ABS and let that dissolve.
you are looking for a solution that is only slightly viscous.

Clean your bed meticulously and paint with the ABS solution then let dry. Heat the bed at 80°C for about 10 minutes before printing to drive off the rest of the acetone.
You will need a brim on anything with sharp corners or tall aspect ratio.

Ok thx ill give this a try and report back !
 
Back
Top Bottom