• If you enjoy the forum please consider supporting it by signing up for a NES Membership  The benefits pay for the membership many times over.

3D printing

I picked up the X5SA Pro for well under $300 so it was a too good to pass up deal. I was interested mostly in the speed since I can print at 150mm/sec pretty easily but the extra bed space helps a lot.
The sprite cable is plenty long enough but the following needs to be fixed
1 - both fan connectors are reversed for the tronxy board
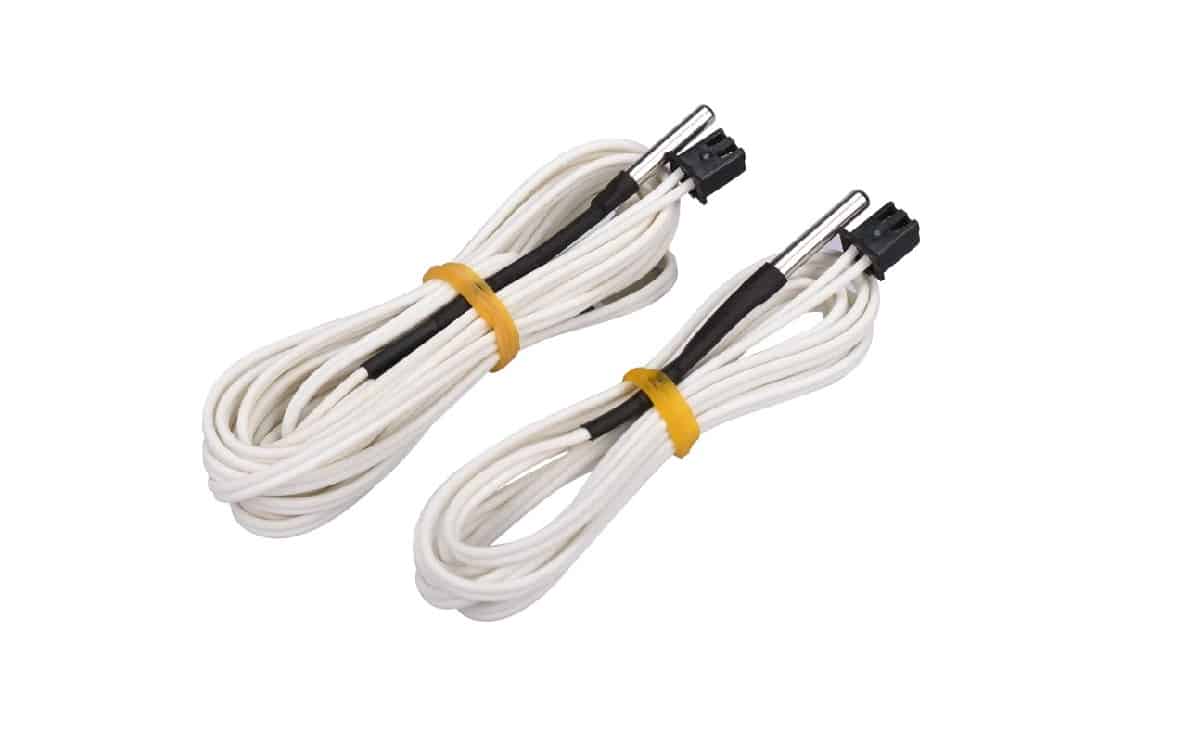
2 - the sprite cable had individual wires with ferrules for the thermistor so those need to be cut off and a connector installed.
3 - the ribbon cable wires need to be separated back further for all of the connections to easily reach.

4 - I used the existing x-limit switch wire and the BL touch cables I installed instead of adding connections to use the ribbon.

I'm using thermistor type 11 but I'm pretty sure it isn't very accurate for the sprite thermistor. As time permits I'm going to hook up a thermocouple and map every 10°C from 150->300.
The included thermistor cannot get to 500°C - the resistance curve flattens out around 270-280 and doesn't change much above 300°C. Take a look at the header (.h) file defining the thermistor.
If you want to hit 500 look at a PT1000 that will go to 500°C or, even better, add a K type thermocouple and SPI interface.
Once I remap the thermistor, I'll PM you the file to include in your firmware if you care about absolute temperature values (not really a concern unless you have multiple printers that you share filament properties between)

The steps/mm on the tronxy are 2x that of the Creality boards.
Would be interesting to see results of what that thermistor curve is.
I lost what the type of a thermistor it was there, but I think i saw somewhere it was rated to 350. May be I was wrong.
 
I found that preheating the nozzle raised enclosure temps sufficiently for impregnated nylon. Any hotter and I’d need a new printer as many of the supporting electronics would need to be cooled or relocated outside the nozzle enclosure, which is a PITA.
 
The included thermistor cannot get to 500°C
i found what it was.
Thermistor: NTC100K B3950 thermistor
presumably usable up to 320 degrees, and that makes sense, as it craps out with error for me for anything above 315 now, when the initial overheat jumps above 320.
it is not a correct listing for the sprite pro one, but it is the same type and it has tech data there.
The problem is that the Beta model for the resistance vs temperature is not accurate at the higher temps used for printing since the model only uses two points 0°C and 50°C for the calibration.
So the performance of two different thermistor models with the same 100k 3950b can differ widely at 200-300°C. If you want accurate temps you need the actual manufacturer's data or you need to create your own calibration table.

It does not look like marlin devs are too concerned about that. Do you have means to make a more accurate table? All I can think of, is a boiling water test to get 100C readings, but I have no way to get a 300C point that is actually needed.
 
It does not look like marlin devs are too concerned about that. Do you have means to make a more accurate table? All I can think of, is a boiling water test to get 100C readings, but I have no way to get a 300C point that is actually needed.
I have a thermocouple meter that I can use.
The best way would be to mount the thermistor in a thermocouple controlled heat block but I don't want to go through the trouble.
I'm going to drill out an old nozzle and mount a the thermocouple with pure lead.
Then set the extruder temp in ten degree increments from 155 to 315 (will need to play some games in the firmware to get to 315). Using the printer's displayed temperature and the table of actual temperatures I can back calculate the resistance/temperature curve.
Or I can get lazy and do a SH fit and get within a couple of percent if my fit points are in the 200-300 range.
Or get seriously lazy and just leave the firmware alone and use temp towers to get to a printable temperature.
 
Or get seriously lazy and just leave the firmware alone and use temp towers to get to a printable temperature.
i can only tell you that the seriously extra lazy approach with the type 11 in the firmware works more or less ok for me so far. :)

there are just too many variables in there that are difficult to control, if you want to check and construct your own table for who knows what is in the thermistor.
please send me the table if you will find the ways to make it. i do not even have an infrared thermometer nor thermocouple capable of measuring up that high.

i am still extremely surprised about a total silence on reddit and everywhere else about the ender s1 pro that comes with that extruder by default - as they advertise it to be capable of doing 300C out of the box, and with stock marlin compiled using type 1 for a thermistor is HAS TO crap out at 290-295 maximum temp. yet i see no complaints about it online yet, so odd.
probably speaks volumes of how many people do print something other than pla.
 
I’d bet the ratio of PLA to everything else is 10:1 or thereabouts if not higher
90% of what people print, PLA is "good enough", cheap, and much less prone to print failure.

My first experiences with printing ABS were on an "open frame" printer, and while it is doable, you really want something enclosed for any of the more "advanced" filaments.
 
Why not identify the temps your application requires and then calibrate your setup at those temps?
the whole point there is - an accurate calibration of those thermistors in that exact platform is a very difficult task.
as an inaccurate one is already done for marlin beta tables. the challenge is - how to make it better.
 
90% of what people print, PLA is "good enough", cheap, and much less prone to print failure.

My first experiences with printing ABS were on an "open frame" printer, and while it is doable, you really want something enclosed for any of the more "advanced" filaments.
horses for courses. modern pla+ is an amazing material, and it is now even quite surprisingly consistent from most suppliers. when you get is for $9-$13 per kg, it is difficult to complaint about it.
 
I just mounted a Sprite extruder on my Tronxy X5SA Pro.
Haven't run it through its paces yet as I just got the firmware done and haven't gotten a response back from Creality on the thermistor temperature data (might have to create an accurate table to 315° myself)

I had to modify the supplied backplate and design a couple of parts but the swap is pretty easy.
so, as i just got a new one for next build - i saw something. those 2 screwes on this model, they get loose.

as i was looking at new one - i went to deal with old one. it started doing an elephant foot on me recently, and i was mostly ignoring it.
new sprite came with those 2 bolts not tightened at all.
so as i dealt with new one, i just swapped out nozzle on the old one as well, and tightened it all up - those 2 bolts on the old one, they were also damn loose, completely loose.
i think head was bouncing due to that, yet all was printing fine. so with new steel nozzle and bolts and all tight - the elephant foot is completely gone now. something to keep an eye on with this design, i guess. obviously, the old sprite was tightened fine originally, i did even set old bolts there on the locktite, so, go figure.


1672371104111.png
 
Last edited:
i can only tell you that the seriously extra lazy approach with the type 11 in the firmware works more or less ok for me so far. :)

there are just too many variables in there that are difficult to control, if you want to check and construct your own table for who knows what is in the thermistor.
please send me the table if you will find the ways to make it. i do not even have an infrared thermometer nor thermocouple capable of measuring up that high.

i am still extremely surprised about a total silence on reddit and everywhere else about the ender s1 pro that comes with that extruder by default - as they advertise it to be capable of doing 300C out of the box, and with stock marlin compiled using type 1 for a thermistor is HAS TO crap out at 290-295 maximum temp. yet i see no complaints about it online yet, so odd.
probably speaks volumes of how many people do print something other than pla.
Lots of people complain that it is not 300° capable out of the box with Creality firmware and then they go away when people tell them to build their own firmware - too lazy to do it for themselves and didn't really need it to go that high anyway
 
90% of what people print, PLA is "good enough", cheap, and much less prone to print failure.

My first experiences with printing ABS were on an "open frame" printer, and while it is doable, you really want something enclosed for any of the more "advanced" filaments.
I have ABS and Nylon on hand - neither will print much at all in my basement in the winter (too cold) on my open frame printers.
 
so, as i just got a new one for next build - i saw something. those 2 screwes on this model, they get loose.

as i was looking at new one - i went to deal with old one. it started doing an elephant foot on me recently, and i was mostly ignoring it.
new sprite came with those 2 bolts not tightened at all.
so as i dealt with new one, i just swapped out nozzle on the old one as well, and tightened it all up - those 2 bolts on the old one, they were also damn loose, completely loose.
i think head was bouncing due to that, yet all was printing fine. so with new steel nozzle and bolts and all tight - the elephant foot is completely gone now. something to keep an eye on with this design, i guess. obviously, the old sprite was tightened fine originally, i did even set old bolts there on the locktite, so, go figure.


View attachment 703597
Mine were loose out of the box
 
I have ABS and Nylon on hand - neither will print much at all in my basement in the winter (too cold) on my open frame printers.

I built an enclosure around my 5Pro without much effort out of foam board. Keeps dust down, stabilizes temps, and makes the whole process more repeatable.
 
Baby #2. $108 v2 donor plus $126 sprite/cr touch combo plus $25 second z axis kit.
Plus $8 camera and $30 t95 max box for octoprint.

0F501038-8A0D-4E77-911C-6639A0B58C68.jpeg

if it does not look like an s1 pro to you - it is an optical illusion. :)
 
Last edited:
Nice!
Don’t think I have a proper shot of my setup, tough to get since it’s in a box lol

I am a huge fan of the Slice stuff, that’s what I use with the Nylons and it’s excelled at the PLA’s too.
 
did you have a chance to test it - what max extrusion speed did you get from your sprite pro?
Haven't gotten to that test - too many irons in the fire.
Just got a Libre LePotato (Pi 3 clone) setup with octoprint - accelerometer is in the mailbox to setup Klipper with input shaping.
Did load up my worst filament for stringing/blobs and it's only getting wispy strings with no blobs.

Will try to run an extrusion test and see where it starts falling off.

Edit: Did a quick flow test this morning with PLA
200mm, 0.6g sample

Temp​
Max Flow mm^3/s​
Sec/100g​
Min/100g​
180​
8​
4167​
69​
200​
12​
2778​
46​
220​
16​
2083​
35​
240​
17​
1961​
33​
 
Last edited:
Did load up my worst filament for stringing/blobs and it's only getting wispy strings with no blobs.
nozzles it comes with are total crap, with my steel ones stringing is almost gone.
so, with 15-17 volumetric flow, did it print well? what cura wall print speed it correlated with? i am stuck with cura params realm for now, cannot force myself into klipper.

printing now pla+, profile set to 0.24mm, wall speed 150mm/s, acceleration 1000, jerk 20, seems to work well.
i wonder if it`s worth trying to push it harder or not.

Send: M503
Recv: echo:; Linear Units:
Recv: echo: G21 ; (mm)
Recv: echo:; Temperature Units:
Recv: echo: M149 C ; Units in Celsius
Recv: echo:; Filament settings (Disabled):
Recv: echo: M200 S0 D1.75
Recv: echo:; Steps per unit:
Recv: echo: M92 X80.00 Y80.00 Z404.00 E424.90
Recv: echo:; Max feedrates (units/s):
Recv: echo: M203 X1000.00 Y1000.00 Z30.00 E100.00
Recv: echo:; Max Acceleration (units/s2):
Recv: echo: M201 X1500.00 Y1500.00 Z200.00 E7500.00
Recv: echo:; Acceleration (units/s2) (P<print-accel> R<retract-accel> T<travel-accel>):
Recv: echo: M204 P1500.00 R1500.00 T1500.00
Recv: echo:; Advanced (B<min_segment_time_us> S<min_feedrate> T<min_travel_feedrate> X<max_jerk> Y<max_jerk> Z<max_jerk> E<max_jerk>):
Recv: echo: M205 B20000.00 S0.00 T0.00 X10.00 Y10.00 Z0.30 E5.00
Recv: echo:; Home offset:
Recv: echo: M206 X0.00 Y0.00 Z0.00
Recv: echo:; Auto Bed Leveling:
Recv: echo: M420 S0 Z5.00 ; Leveling OFF
...
Recv: echo:; Material heatup parameters:
Recv: echo: M145 S0 H200.00 B60.00 F50
Recv: echo: M145 S1 H280.00 B95.00 F0
Recv: echo:; Hotend PID:
Recv: echo: M301 P15.24 I1.39 D41.75
Recv: echo:; Bed PID:
Recv: echo: M304 P301.39 I58.86 D1028.73
Recv: echo:; LCD Brightness:
Recv: echo: M256 B250
Recv: echo:; Power-loss recovery:
Recv: echo: M413 S0 ; OFF
Recv: echo:; Z-Probe Offset:
Recv: echo: M851 X-31.60 Y-40.20 Z-2.80 ; (mm)
Recv: ok
 
Last edited:
nozzles it comes with are total crap, with my steel ones stringing is almost gone.
so, with 15-17 volumetric flow, did it print well? what cura wall print speed it correlated with? i am stuck with cura params realm for now, cannot force myself into klipper.

printing now pla+, profile set to 0.24mm, wall speed 150mm/s, acceleration 1000, jerk 20, seems to work well.
i wonder if it`s worth trying to push it harder or not.
Cura doesn't deal with flow limits so that is why I calculated time to print 100g

At 0.24mm layer, 0.4mm line width and 150mm/s wall speed that's 14.4mm^3/sec so you are likely right on the edge of maximum speed.

If you want to go faster then you will need to melt the filament faster in order to keep extrusion pressure down -
Or a cheap chinese clone
well, i got to that setting level empirically, so to say :), as the extruder can push it out faster, but most pla+ filaments i use now do not really bind walls well at higher speeds anymore, no matter the temperature bump.

pushing acceleration higher or jerk higher makes whole thing rattle too much. next level would be to bolt it down to the bench, but, will wait on that. it would be always nice to make it print faster, but, it will do for now.

i was wondering if your box printer will be capable to hit 250-300mm/s with this extruder.
Travel - yeah it can jump around fast but as you've found you can only lay down layers at a certain max speed so once you start getting diminishing returns it's time for a second printer.
 
I built an enclosure around my 5Pro without much effort out of foam board. Keeps dust down, stabilizes temps, and makes the whole process more repeatable.
Question, are you observing better overall quality printing within an enclosure ? I have all the stuff to build an encloseure as well, my semi-finished basement runs about 62F and I generally don't heat. I'm wondering if an enclosure would definately benifit my prints.
 
Question, are you observing better overall quality printing within an enclosure ? I have all the stuff to build an encloseure as well, my semi-finished basement runs about 62F and I generally don't heat. I'm wondering if an enclosure would definately benifit my prints.
Depends on the materials and what you print.
PLA not going to see much improvement
ABS/Nylon - anything over 5-10mm tall will be much easier to print.

My basement is much colder (<50) so even PLA can get effected if I don't preheat the bed for 20 minutes
 
Question, are you observing better overall quality printing within an enclosure ? I have all the stuff to build an encloseure as well, my semi-finished basement runs about 62F and I generally don't heat. I'm wondering if an enclosure would definately benifit my prints.
My makerspace has a mix of enclosed (Bambu, Dremel) and open frame (Ender, Kossel) printers, and there isn't a huge difference in results between them when printing with PLA. But the only way I've had any success with large ABS prints has been with at least a "tent" enclosure.

If your basement is humid (+45% RH), I'd build an enclosure even if you only print PLA/PETG, and a dry feed box if you start to get into PA (Nylon).
 
Cura doesn't deal with flow limits so that is why I calculated time to print 100g

At 0.24mm layer, 0.4mm line width and 150mm/s wall speed that's 14.4mm^3/sec so you are likely right on the edge of maximum speed.

If you want to go faster then you will need to melt the filament faster in order to keep extrusion pressure down -
Or a cheap chinese clone
i decided to try the ruby one - it is on sale now at amazon for $24.90, so i could will return it back if it fails to deliver.

steel nozzles i have now make very good lines, but, with forcing up speed they cannot really do same good as copper/brass ones.
but unfortunately, brass wears off fast. i did have a brass one on the old printer, and really did not even notice how badly print quality went down until i got a fresh new printer setup. now with steel all stringing went away, lines are perfect, but, i got an extruder hitting the limit on the old printer, sporadically and it makes wall line prints defects as can be seen below.
interesting that new printer with new extruder is not doing it, only old one does, on a same hardware, profile and settings. probably stepper motor wear shows.

1672707905378.png
 
Back
Top Bottom