Home Made Curing Oven - How To

beaker

NES Member
Joined
Jun 30, 2009
Messages
13,336
Likes
14,952
Location
LV-426
Feedback: 26 / 0 / 0
IMG_6976.JPG


I've gotten a couple of requests recently for information on building a curing oven. I built my curing oven to finish my Uzi using Gun Kote, a similar color and finish to the original IMI Uzi Carbines.

So this is what I did, it worked for me. If you make your own oven, you do so at your own risk. I am not responsible for anything you may do with the information provided in this thread. I can answer general questions, but if you don't have a good idea of how this all works, maybe you shouldn't take on a project like this.

My wife wouldn't be too happy if I tried to do this in the kitchen oven, so I needed a way to bake my parts after applying Gun Kote. I looked around, there are some other sources on-line for others who have done this, some use wood planks, some use old metal lockers, I didn't see anything that would work for me. I wanted to do it safely, but also at very low expense. I thought what cheap, safe and available material to use for the carcass; at first I though about drywall, but when I looked into it I realized it would be a terrible choice since it becomes flammable once it dries out, as it might when used in an oven... [thinking] I had just finishing rehabbing a bathroom in my house and I thought, "what about cement backer board?". Its cement, it has pretty good flame retarding properties, and it is really cheap. I actually had a sheet + left over from the bathroom project. In fact many of the materials I used I had lying around from other home improvement and hobby projects.

The other home built ovens i'd found used various heat sources. Charcoal starters (electric), heating elements from dryers, toaster ovens etc. The one I chose was a toaster oven. I liked toaster ovens because the heating element is already mounted into a metal container with heat shields, its already wired and I could strip it and mount it into the oven directly without worrying about mounting and protecting the heating elements. I wanted something small, with a good size heating element. I started looking around, and eventually found a perfect unit at Ocean State Job Lot. $12. sweet. Other sources would be thrift stores, or maybe your own junk pile.

Once I had a heat source, the next step was to find a way to control the temperature. I found a perfect setup on ebay, a sestos temperature controller, a 25amp heater relay, and a K type thermocouple. Here is one that is on ebay now. I think I paid about $37, shipped from china. These are used a lot for beer brewing setups, and it was perfect for what I was doing.

Now I had the carcass material, a heat source, and a temperature controller. The last major component was the insulation for the inside of the carcass. I looked around and found this high temperature fiberglass insulation from McMaster-Carr. This was the most cost effective insulation I could find that could handle the high temperatures I needed to hold.

HI-Temp Rigid Fiberglass Insulation Foil Faced, Medium Density, 1" Thick, 24" X 48" item 9351K1 $18.59 each. With shipping (they are pretty big) this was the most expensive part of the build.

Time to start figuring numbers. I knew wanted a cabinet that would be long enough to hang the uzi parts (receiver, barrel, etc.) and possibly a longer item later so I started doing a sheet layout. The final outside carcass dimensions are 36" high x 18" wide x 10" deep. This can be done mostly from a full sheet of cement board IIRC. You lose 1" on all internal surfaces when you put the insulation in.

LAYOUT and Controller:
IMG_6950.JPG


Cut up Cement Board:
IMG_6953.JPG


I used drywall corner beads from Home Depot (steel and cheap) to hold the cement board together. I used some small machine screws as fasteners.
IMG_6954.JPG


IMG_6957.JPG


IMG_6960.JPG


IMG_6961.JPG


IMG_6965.JPG


IMG_6967.JPG


Once I got the carcass bolted together, I used a bunch of 1/8" marine plywood I had in the shop to cover the outside. Mostly to reinforce the cement board, and prevent it from being cracked or damaged. I just used some self tapping screws into the metal corner beads underneath to hold it on.

IMG_6971.JPG


IMG_6972.JPG


I stripped everything off of the small toaster oven, and terminated the wires for inside the junction box.
IMG_6969.JPG


I drilled a hole in the side of the carcass to put the wires out, this is under the junction box on the side of the oven where the power cord and switches are located.

Part II coming next...

- - - Updated - - -

1
 
Part II

Here is the toaster oven mounted in the base of the unit:
IMG_6977.JPG


I used expanded aluminum gutter material over the toaster oven to prevent stuff from falling into the unit while it was on. It isn't shown in this picture, but I also put some solid aluminum flashing to the right and rear of the toaster oven to deflect the hot air from the insulation. I'll take some pics of that and post later. It is the hottest part of the oven and did darken the insulation in the testing. Once I put the deflector in place, no issues.

I used two long machine screws to mount it to the front base plate (you can just see them in the bottom of the picture) Of course, the insulation was put in last but I don't have any pics without the insulation.

I used plastic electrical conduit to run the wires on the side of the oven. I used a heavy gauge cord set for the plug, and 12 gauge wire for the internal wiring.

I used regular electrical light switches for the oven master power on/off. So power comes in from the wall to the switch mounted near the bottom right, and when switched on, powers the controller, and also provides power in to the relay. When the controller requires heat based on the temperature settings, and the measured temperature from the thermocouple, it opens the relay, and lets power flow to the heating elements (in the toaster oven). When temperature is good, it shuts down the power.

IMG_6970.JPG


Here is the inside of the controller box (I had an old electronic project box I used for this):
IMG_6974.JPG


IMG_6975.JPG


Here is the wiring setup from the side:
IMG_6976.JPG

The handle is there so I can pick it up and move it around. It is surprisingly easy to move around. There is another mounted on the other side.


Controller manual:
Sestos+Manual+Page+1.JPG


Controller Wiring Diagram:
Sestos+wiring+diagram.JPG


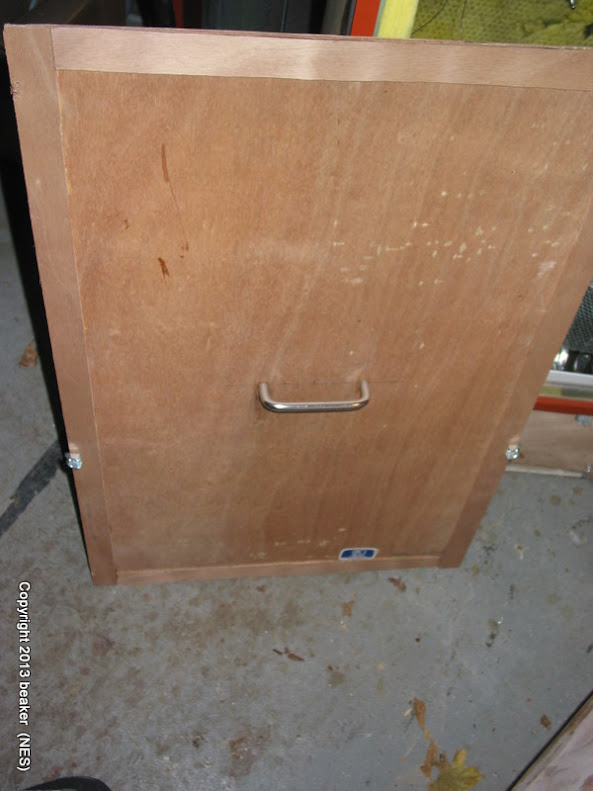
The front door is made from the same 1/8" plywood. It has another piece of the fiberglass insulation mounted on the front, it fits into the unit, and I have some latches that keep it on.

I found some aluminum trim at home depot (flashing) that was a good way to finish the front of the unit. All of the fiberglass was glued into place with RTV silicone on the foil backer of the fiberglass insulation. Only use RTV silicone, as the latex stuff is not sufficient at high temperatures.

I have to take some more pics of those details and post tomorrow.

The oven worked extremely well, and came up to temperature very quickly. I tried it without insulation first and the heat loss was high and it wouldn't come up to temperature. After insulating the inside, it was a different world. Came up to temperature quickly and the controller maintained it extremely well after a little tuning of the control parameters.

On the top inside of the unit, I used a junk steel wire shelf as a hanger. I'll take some more pics of that as well.
 
Last edited:
Part III

Some additional pics. I used some aluminum flashing from home depot to cover the front sides of the cabinet, and to neaten it up. Then I used some RTV silicone to attached a silicone seal material to that for the door. Probably overkill, in hindsight.

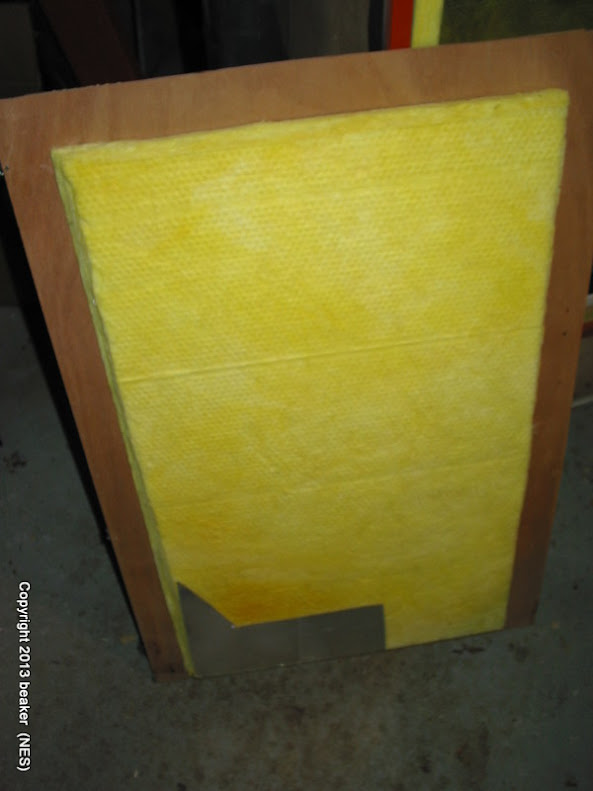
The door was just another pc of 1/8" plywood, neatened up with some strips to make it look like a cabinet door. I cut a piece of insulation to fit into the opening and glued it to the door panel with RTV silicone. The long area to the left of the toaster oven is for longer items like barrels. I actually used the oven as a spray booth (hence the black stuff on the insulation) and it worked pretty well. I held the item with one hand (holding the stainless steel wire) for larger items, then hung on the rack for touch up. When the spraying was done, I put the door on and turned on the oven for baking.

Here is the hanger - which was a junk bin divider from a wire bin that was being discarded at work. I cut it to fit and used J-Hooks to mount it to the top of the oven. Th long metal rod is a candy thermometer I stuck in to verify the temperature and adjust the controller (also good to have a backup temperature monitoring method). The hole in the top goes to a recirculation fan. It works, but isn't necessary during heating. It is great for cooling down the items fast though after the baking is done.
IMG_6238-001.JPG


The thermocouple, mounted through the back (wire runs around the back from the controller)
IMG_6239-001.JPG


Heat Shields to prevent the insulation from being damaged. Worked great (just aluminum flashing)
IMG_6241-001.JPG


Top down, you can see the extended area on the left for hanging long items.
IMG_6242-001.JPG


IMG_6244-001.JPG


Two bolts holding the toaster oven in. Button head screws on the inside, T nuts on the outside, covered with RTV Silicone. They get bloody hot!
IMG_6243-001.JPG


Door panel - outside
Door+Outside.jpg


Door Panel - Inside, the Insulation is glued to the panel with RTV Silicone.
Door+Inside.jpg
 
Last edited:
OMG I would go crazy with all that time and work, (ditch the wife and get a gf who likes gun stuff) I just throw the parts in the ole kitchen oven, the lowest setting is 170, but if I crack the door a few inches- (which also helps heat the house being winter and all) it averages out to 110, I bake the parts for 3 hours and they come out great! but hey, whatever works for you. Dont take this personally, but it looks like you're on the "make work" program.
oven.jpg
 
OMG I would go crazy with all that time and work, (ditch the wife and get a gf who likes gun stuff) I just throw the parts in the ole kitchen oven, the lowest setting is 170, but if I crack the door a few inches- (which also helps heat the house being winter and all) it averages out to 110, I bake the parts for 3 hours and they come out great! but hey, whatever works for you. Dont take this personally, but it looks like you're on the "make work" program.
View attachment 58124

Don't take this personally, but I'm not surprised your gf doesn't care about your rusted out oven.

OP, sweet curing oven [thumbsup]
 
I'll try not to take it personally, but I'm not going to leave my wife and three kids over an oven, thanks for the advice. I made a tongue and cheek comment about the wife, but I wouldn't bake a flammable, nasty, poisonous material like GunKote in the same oven I also cook food in, call me crazy... It requires baking at 325-350F BTW, not 110 so it might be hard to maintain a tight temperature range with the door open, even if happens to be winter and the excess heat and poisonous fumes will help regulate my house temperature...

Thanks for the advice - So you told me I should leave my wife and kids and use my kitchen oven to bake my gunkoted parts and not "waste my time" building good tools that support my hobby because hey, that's not what you would do. Are you going to start telling me what kind and how many guns I can own?

BTW, don't take this personally, but you might want to clean that oven, it's kind of nasty...

OMG I would go crazy with all that time and work, (ditch the wife and get a gf who likes gun stuff) I just throw the parts in the ole kitchen oven, the lowest setting is 170, but if I crack the door a few inches- (which also helps heat the house being winter and all) it averages out to 110, I bake the parts for 3 hours and they come out great! but hey, whatever works for you. Dont take this personally, but it looks like you're on the "make work" program.
View attachment 58124
 
See, you did take it personally lol

Btw, my gun oven is in a shed, if I cleaned the oven, I'd have to clean the shed!...and that would be the "make work" program again


Sent from my iPhone using Tapatalk
 
You cook your food in the shed? it's worse than I thought... [wink]

See, you did take it personally lol

Btw, my gun oven is in a shed, if I cleaned the oven, I'd have to clean the shed!...and that would be the "make work" program again


Sent from my iPhone using Tapatalk
 
You cook your food in the shed? it's worse than I thought... [wink]

Whoa, I should be more clear, before your thoughts run away with you
1 ditch the wife, keep the kids
2 keep your guns, by all means, don't gunkote ALL of them tho
3 I didn't admonish you not to waste your time- just said I wouldn't. You are free to

Ya see when you have a thought in your head, and then embellish it to something seemingly factual, you start making it up as you go. It has an entertainment value though!
Sorta be like me replying back "What!?? you feed your kids GunKote!?[shocked]

You don't do you?
 
let's stop crapping in this informative thread where a NESr decided to share knowledge with others in a project where he built a oven that serves any purposes such as:

-baking shit NOT in your kitchen
-baking shit like long rifles that DON'T fit in your kitchen oven
-NOT being a cock to your wife baking stinky shit in your kitchen

gunslinger2a- GTFO and stop thread crapping. You've added zero to this thread. If you want to start your own thread about baking bullshit in your kitchen oven, go do that that instead of thread crapping in here. Yes I am insulting you (and neg repping you) because you've openly asked for it by being a dickhead.

ftr- I have baked things in my kitchen oven. I can see the benefits to having a purpose built tool for baking objects.

DIN temp controllers are the balls, btw. They work pretty well for kegerators [wink] too
 
Last edited:
Great work. Wish I had those skills. I don't but I love admiring work like this.

And sometimes I engage in projects that take way too much time and effort, or money, but overcoming the challenge is the reward. I do know that feeling... and it is a good one!

:)

Rich
 
let's stop crapping in this informative thread where a NESr decided to share knowledge with others in a project where he built a oven that serves any purposes such as:

-baking shit NOT in your kitchen
-baking shit like long rifles that DON'T fit in your kitchen oven
-NOT being a cock to your wife baking stinky shit in your kitchen

gunslinger2a- GTFO and stop thread crapping. You've added zero to this thread. If you want to start your own thread about baking bullshit in your kitchen oven, go do that that instead of thread crapping in here. Yes I am insulting you (and neg repping you) because you've openly asked for it by being a dickhead.

ftr- I have baked things in my kitchen oven. I can see the benefits to having a purpose built tool for baking objects.

DIN temp controllers are the balls, btw. They work pretty well for kegerators [wink] too

Well said (and well deserved!) +repped for your intervention
 
Wow!

Great thread! I have not ventured into painting furniture for this reason. When you have the chance I would appreciate seeing a picture of the interior with the hangers installed.

I'm still a little unsure of the wiring, but what's the worst that could happen? A little electrical fire? [shocked]
 
Thanks. I will add some more pics this weekend.

Wow!

Great thread! I have not ventured into painting furniture for this reason. When you have the chance I would appreciate seeing a picture of the interior with the hangers installed.

I'm still a little unsure of the wiring, but what's the worst that could happen? A little electrical fire? [shocked]


Sent from my Galaxy Nexus using Tapatalk 2
 
inside pics added.
Beaker-
Great build how-to and info. Can you go into more detail or post a better explanation about the wiring? I have read the first page a bunch of times and im still kinda confused on how you wired it and why it looks like there are two switches but you only talk about one. Could you make a hand drawn wiring diagram or show some more pics with instructions. BTW I purchased the heating element controller combo you spoke about on page one. Looks like the project is going to be easier then I figured with the controller setup.
 
Back
Top Bottom