• If you enjoy the forum please consider supporting it by signing up for a NES Membership  The benefits pay for the membership many times over.

The Bullet Casting Info Megathread

I went to the range today and shot sixty rounds of my 180gr gas checked RCBS 32-170-FN cast bullets made out of WW W/2% pewter
(now measuring around 12-13 BHN).

These were loaded with 25.1gr of 2230 and shot out of my .32 Win Spl, Pre-64, Win '94. Accuracy is fine (as good as I could shoot with jacketed) and
the really good part is that the bore of that rifle came home sparkling clean. I would swear it's cleaner than if I was shooting jacketed fodder. Part of
it is that 2230 is a very clean burning powder as well. There is absolutely no leading at all. My bore (groove) is .322" and the bullets are sized to .323".
I give it a medium crimp to put the lip of the case just behind the crimp groove on the bullet. The crimp is necessary since the cartridges sit in a tubular
magazine and if not crimped would push the bullets into the case. I couldn't be more pleased with this setup and the cost of doing all this shootin' is
about .10/rd plus my time. [smile]

I do need to get that neck expanding die as I crushed five cases when seating the bullets. I finally had to manually open up the case necks to prevent
crushing more. I also think I need to harden the bullets up a skoosh since a round occasionally will 'catch' when chambering. If I take the bullet out and feed
it manually I will chamber just fine. When I looked at the bullet after it catches, there is a slight groove in a couple of places where it seems to have dug in.
I have around 500 of these cast so I will have to live with the softer bullet for the time being.

As a final note, I picked up some 7.62x39 brass. Is anyone interested in these?
 
I know I'm slower than most of you, but today I made my LP gas tank smelting pot.

I used a saws-all with a metal cutting blade. It was pretty easy!

One tip, that may be obvious to others. I had a tough time trying to take the tank valve off, to fill the tank with water (then dump it out) before starting my cuts. The ring that protects the tank valve made it tough to get the wrench in to spin the valve off.

Then it hit me, I fired up the saws-all, cut off the protection ring. This allowed me to get the wrench around the valve and spun it off. Of course I did have to use a strap around the tank to help old the tank from spinning! It would be tough to do this alone, I had a helper. We clamped the strap onto one of those portable work benches where the top doubles as a clamp, this held the tank from rotating while pressure was put on the wrench to remove the valve. There was no way we were going to be able to remove that valve without something holding the tank (bare hands wouldn't do it).

Removed the valve, filled the tank with water, emptied it, then proceeded to cut the permiter of the tank with the saws-all. Later I cleaned the edges of the cut with a grinding wheel and some sand paper so I won't risk cutting my hand in the future.

So now I just need my burner and I'm ready to start smelting.

I already picked up a Lee 6 cavity 200 gr 45 ACP mold (.452), handles and a bottom pour melting pot. Next is to find a lubrisizer and I should be just about cought up with the rest of you! LOL
 
I actually used that ring, which apparently is there to protect the valve, to hold the tank. I put a piece of pipe that was close in size to the round hole in the side of the ring in a vise and laid the tank over it. I have access to all kinds of pipe fitting tools so I used an offset pipe wrench to take off the valve.

Take a look at this burner http://cgi.ebay.com/ws/eBayISAPI.dll?ViewItem&item=400147736881&ssPageName=STRK:MEWNX:IT

Unfortunately we didn't have a lot of pipe fitting tools. I felt lucky that my buddy had the saws-all with a metal cutting blade. That made short work of this project.

I looked at that burner:

They state:
a regulator & hose-the flame does not have a control on it,
so you will only get 1 size flame, cannot be turned up or down.
There is no BTU rating, so please do not ask. I have been asked and cannot find it in the manual at all

So I would stay away from it because no adjustable burn rate, and without knowing the heat output, it could be very low output. By the time you add a new regulator to it, it could cost as much as one that is setup properly to begin with.
 
Most of the other fryers with a similar burner are listed at 50K BTU. That red knob looks like a gas valve more than just a shut off. The tank has the shut off. You can always add a gas valve in. They are only a few bucks.

Unfortunately we didn't have a lot of pipe fitting tools. I felt lucky that my buddy had the saws-all with a metal cutting blade. That made short work of this project.

I looked at that burner:

They state:


So I would stay away from it because no adjustable burn rate, and without knowing the heat output, it could be very low output. By the time you add a new regulator to it, it could cost as much as one that is setup properly to begin with.
 
Dunno if any of you saw this post over at castboolits:

http://castboolits.gunloads.com/showthread.php?p=1049879#post1049879

QUOTE:
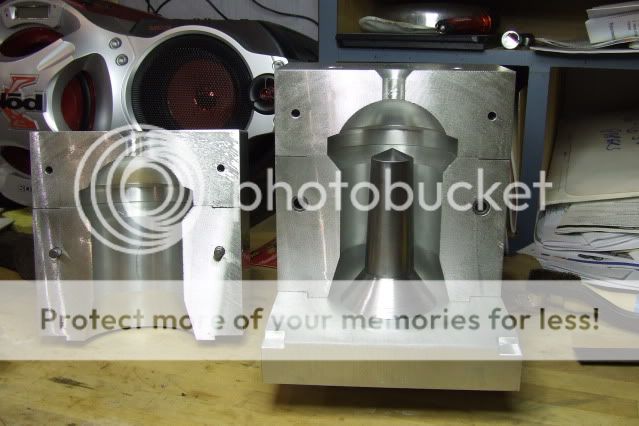
"Here's a new boolit I've designed to try out in my 10-pounder Parrott Rifle for N-SSA rifled artillery competition. I based the design on a JSB Exact Jumbo .177 cal pellet scaled up to 3" diameter with slight modifications. I had a local machine shop make the mold to my specs, spent a couple hours with a file tweaking alignments and on the lathe polishing the core pin for easy release, then set about our first casting session. Here are some photos. Projectile weight about 7.3 lbs, cast out of 1:20 tin:lead.

DSCF6115.jpg
 
There's another guy, in the Group Buy area, offering cast ZINC balls for his mortar:

Castboolits said:
The mould drops a round ball 2.59 inches in diameter that weighs 2.3 lbs. Cost for one ball is $6.90. 10 balls, $65. Price is plus postage and Rotometals will do flat rate boxes if you ask.The price may seem high, but these are fire and recover projectiles and can be used over and over again. Rotometals does not use scrap zinc as their customers require certified metal.
standard.jpg
standard.jpg


We could create a whole new event for the NES get-togethers..........
 
I did my first smelt yesterday. The propane tank 'pot' worked great!

I couple of questions... I thought I remember someone mentioning an issue with the stick on wheel weights, can someone remind me what it was? Were they all zinc or something? If there is no problem with them, I'll just toss them in with the other WWs.

Also, should I work hard to sort out the WW's that say Zn on them? I was trying to do that but it make it slow going when grabbing a handfull of WW out of the bucket and trying to sort out those marked Zn.

I don't have a source of sawdust, so I only fluxed with some parafin wax.

Has anyone thought of trying to use corncob media to flux? I wonder if this would work as a flux? Could this be a good use of the used corncob tumbling media before we thow it out? How can one test to know if this will be acceptable or not.

R1ch,

You don't need to sort any of the wheel weights IF you keep the temp to just above the melting temp of the
lead. The zinc weights melt at a higher temperature. You definitely do not want zinc in with your lead. It will
cause you lots of grief and render your melt worthless not to mention possibly making your pot worthless.

As to flux, almost anything will work as flux. Be careful of using wax fluxes as they will ignite. Make sure you are
not looking into the pot or using it anywhere that could be a problem with it igniting. I've used cedar pet bedding,
sawdust, etc. for fluxes The only issue I can see with using used corn cob media is that it might be contaminated
with lead and inhaling that would definitely be a bad thing. Flux material is cheap and readily available. Toss the
tumbling media and pick up something cheap. You could also use leaves which are readily available in my yard
by the bagful. [smile]
 
Thanks for the info. I didn't think of leaves, I also have plenty fo those at this time of year.

My thought was that using the used corn cob media is free and I have some of that. But trying to find saw dust isn't as easy, unless I buy a bag of it somewhere or visit a local home depot and ask for some floor sweepings near their lumber saw.

Perhaps using used corn cob media would reclaim a little lead too. LOL. I try not to breathe any vapors coming from the smelting pot, and of course it's done outside.

I think at first I may have had my heat up too high as it was a bit breazy, but later as I added more WW, I turned down the heat. After doing my first pot, I'll try to control the heat better. So maybe I have a little zinc in the first batch, how can one tell now that I have some ingots?
 
Please DO NOT use the USED polishing media. There's a BUNCH of nasty stuff in there, and any of it that smokes will get into your system. There is NO USABLE LEAD to recover from the lead based chemicals in the primers. Think of those lead chemicals in the same way that you would think of lead based paint. You certainly would not use lead paint for fluxing! Don't use your lead based used polishing media either.

You can get pine wood shavings at the pet store, or at your farm store (if you have any)... the stuff is sold in bags and bales as "BEDDING"..... Pine is better because it has resins, which help with the fluxing. I like to use it for my first few fluxes every batch, and then switch over to the finer wax for the finishing fluxes.

I would skip the leaves, since those would be hard wood, and not have any resins. Pine needles, maybe. Chunks of pine sap would even be great, if you have pine trees available.

One trick I have taken to doing is to leave the last bit of fluxed lead in the bottom of the smelting pot. I fire up the smelter, and melt that first (before adding anything else.) That way, I can more closely control the process temperature. If you just dump a big pile of weights in the cold pot, and then fire up the burner, it's possible to get over heated at the very bottom of the smelter. Even one ZINC wheel weight (at the bottom, at the start of a melt) will virtually ruin a batch.
 
Last edited:
Duke, thanks for the reply! I haven't used any corn cob media, I was more thinking out loud. I didn't actually think there was any reclaimable lead in there, LOL!! Shows how bad thinking out loud in a post can be! I didn't think about the polish and other stuff in there.

I guess I'll head out and buy some pine bedding stuff. I certainly don't need a bail of the stuff, a small bag will probably be plenty for now.

So I wonder if I may have some usless ingots if I may have some zinc in there since I started with a new pot and only raw wheel weights. How can I test or tell if I do have too much zinc in my ingots? Or if I don't know, are these ingots useless now?
 
The primary tell tale sign that I have seen posted is that the lead turns into a kind of OATMEAL lumpy texture, almost no matter what temperature it is.

I'm not talking about that "oatmeal" condition that even pure lead goes through just before it finally melts.

I am talking about a somewhat thicker oatmeal like consistency that the metal will take on, no matter how much heat you put in it.

Most of the time, you will KNOW if you have problem. I'd hope that Bob J or Mark will pipe in, since they seem to have had some recent experience with it.

The best thing to do with "questionable" lead is to turn it in to the scrap place, and get wheel weights in payment (instead of cash).

And, since a lot of states are going non-lead in the wheel weights, more and more zinc and steel wheel weights will be showing up everywhere.
 
Duke you are spot on as usual....... The main indicator is a significant change in the texture of the melt..... Won't pour or fill worth a darn.... No question when you have it..... [thinking]

The primary tell tale sign that I have seen posted is that the lead turns into a kind of OATMEAL lumpy texture, almost no matter what temperature it is.

I'm not talking about that "oatmeal" condition that even pure lead goes through just before it finally melts.

I am talking about a somewhat thicker oatmeal like consistency that the metal will take on, no matter how much heat you put in it.

Most of the time, you will KNOW if you have problem. I'd hope that Bob J or Mark will pipe in, since they seem to have had some recent experience with it.

The best thing to do with "questionable" lead is to turn it in to the scrap place, and get wheel weights in payment (instead of cash).

And, since a lot of states are going non-lead in the wheel weights, more and more zinc and steel wheel weights will be showing up everywhere.
 
Just picked up about 6 lbs of pewter today at a couple of junk shops for 13.40. GOing to melt them down and cast some soldiers for my son to play with. I figure when he outgrows them I will add then to the casting material stash.

From what I understand time is getting short for lead wheelweights. My last bucket was probably about 20% zinc and steel.
 
Yeah, read somewhere that ALL of the rest of the states will be joining Maine in a FEDERAL ban on lead wheel weights. Their days are numbered.

As much lead as I have, I'm constantly on the lookout for more.

-Hooked on Lead-
 
Thats the truth. I sat down the other day and figured out I have better than 1600 pounds of various lead, tin and alloys. Realistically that will probably last me better than the rest of my life. Funny thing is I am still looking for more. Under my grandmothers stairs is about 300 lbs that I still need to snag and I have my father save all the flashing he gets. Now I haunt all the junk shops and have guys saving me junk pewter. It really is an addiction. I figure that they long before I run out of lead they will ban lead bullets and my kids will be hit for the hazmat cost of cleaning out Dads garage. I am now starting to look at casting zinc for just that reason. I might soon be battling guys for buckets of zinc wheelweights.
 
Zinc is certainly castable, and there are some guys doing it.

HOWEVER......

I look at the quality of my guns and preserving that quality is important to me. Zinc is very much HARDER than lead, and sending a zinc bullet down a barrel has to wear on the barrel much more than a lead bullet would. Especially on the edges of the lands.

So, no zinc for my guns.... ever........
 
Duke you are spot on as usual....... The main indicator is a significant change in the texture of the melt..... Won't pour or fill worth a darn.... No question when you have it..... [thinking]

Thanks for the info guys. I haven't tried (yet) to fill any molds, but the ingots poured and the lead didn't look like oatmeal when I was pouring it (or when it was in the smelting pot), so maybe I'm ok?
 
zinc is softer than copper so I am not that worried. That said an old 38 and a beater Enfield or Mauser would probably be used in any experimentation.
 
Just whipped up around fifty pounds of 452-200 hollowpoints so I thought I would post a pic. [smile]
Left container is WW w/2% pewter, right one is 50/50 WW and MIT range scrap w/2% pewter.

12_09_2010001a.jpg
 
Last edited:
Just picked up about 6 lbs of pewter today at a couple of junk shops for 13.40. GOing to melt them down and cast some soldiers for my son to play with. I figure when he outgrows them I will add then to the casting material stash.

From what I understand time is getting short for lead wheelweights. My last bucket was probably about 20% zinc and steel.

Thats a good find on the pewter! I usually wind up paying around $3/Lb average for pewter. A little over $2/Lb is easy to live with.
 
Last edited:
Back
Top Bottom