Dillon Press Maintenance and Modifications

Bob J

NES Member
Joined
Mar 30, 2009
Messages
4,588
Likes
423
Location
Quincy MA
Feedback: 31 / 0 / 0
Was working on updating my press (550B) last night and thought the manual detail was a little lite so thought it would be worth starting a thread on Dillon press maintenance.....

Factory manuals can be downloaded from here:

http://www.dillonhelp.com/

Since my press is pretty old I downloaded the latest manual and went through the press part by part against the current configuration..... Lots of changes..... Have built up an upgrade list and will call dillon this PM and order what I need to bring it up to snuff...[wink]

Loaded up a small hand oiler with Mobile 1 and placed a small amount around the main shaft..... Really tough to keep it from leaking all over the place but let sit overnight and will clean up when I get off work..... Have moly grease for all the metal to metal bearings and am planning on buying powdered graphite for the slides (primer and powder)....

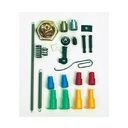
Bought the wrench set and tool holder... Had all the tools before but this mounts them directly on the press within very easy reach...

http://www.dillonprecision.com/#/co.../Dillon__039_s_RL_550_Toolholder_w_Wrench_Set

What do you guys use to maintain your presses?

Any useful modifications you would like to share?
 
Last edited:
Dillon recommendations

Found these on the Brian Enos website:

http://www.brianenos.com/forums/index.php?showtopic=31434&st=0

QUOTE(dillon @ Dec 16 2005, 11:13 AM) *
Here are my lubing notes for 550 seminars:
4)Reassembly of 550, emphasis on lube points
a) lube shaft w/ 30 wt motor oil
B) lube all pivot pins with grease
c) lightly grease short end of op-rod, where it enters bracket
e) clean primer retaining pin hole, lightly grease head end of pin
f) lightly grease underside of shellplate bolt, where it recesses into index sprocket
g) lightly grease rails on connector body collar
h) lightly grease roller on connector body collar

5) primer system troubleshooting
a) check tips for damage, correct installation
B) check cup height (1.215-1.220”), how to reseat on machine
c) check op-rod freeness in bracket, lube
d) clean mag tube w/ alcohol
e) clean primer slide, housing, top of frame
f) shellplate bolt adjustment, use of set screw
g) shim under primer slide
h)multiple primers dropping due to stuck retaining pin
i) adjustment of primer cup stop screws
Again, these notes were written solely for my use when giving seminars, but hopefully will make sense to everyone. I haven't worked up notes on any other loaders at this time.


QUOTE(dillon @ Dec 15 2005, 01:48 PM) *
Here are excerpts from my lecture notes on the 650.
Please keep in mind these are for my use when giving seminars, so they are not
in correct grammar.
4) Cleaning of 650
a) Use 409 or similar detergent cleaner to clean interior of case feeder. Never use petroleum based solvents on any plastics
B) Use alcohol on a small patch to clean interior of primer magazine and pickup tubes.
c) Use orange oil based “Gunk” handcleaner to clean interior of powder hopper, to lighten it after extended powder storage in tube.
d) Use alcohol to wipe off powder bars, and swab out interior of powder measure body where bars slide. Also use alcohol to clean interior of powder drop tube, powder funnel.
e) Use alcohol to periodically wipe off primer disc, primer seating punch.


4)Reassembly of 650, emphasis on lube points
a) lube shaft w/ 30 wt motor oil
B) lube all pivot pins with grease-show grease grooves in pins,lube holes in crank and link arms. Don’t forget mainshaft pivot pin.
c) lightly grease interior of ring indexer, camming surface of ring indexer and indexer block.
d) lightly grease the primer cam on the upper right side of the frame.
e) lightly grease angled cam surface on slide cam
f) lightly grease platform rails where case insert slide rides
g) lightly grease ramp on case insert slide, where camming pin contacts it
h) lightly grease underside of shellplate bolt, where it contacts top of shellplate.
i) lightly grease rails on connector body collar
j) lightly grease roller on connector body collar
k) lightly grease primer disc pin
l) heavily grease underside of station one locator, where it fits into platform entension
 
Hornady LnL lube and maintenence.

Grease two fittings.

Load lots of ammo, repeat as necessary.[laugh]
 
I use a little dry graphite on the primer slide and main shaft. I squirt a bit of Break Free on all surfaces when I think of it. I have loaded over a million rounds with no problems. Who says the Dillon 550 is prone to failures?

Rub it in a little.....[smile]
 
I use a little dry graphite on the primer slide and main shaft. I squirt a bit of Break Free on all surfaces when I think of it. I have loaded over a million rounds with no problems. Who says the Dillon 550 is prone to failures?

Just the people with dillon envy.......;O)
 
I "modified" mine by taking a 1/2" tapered reamer to the powder die. It totally eliminated any "bridging" of long-stick powders.
 
The only problem I have had with the 550 is the priming system which, IMHO, is the machine's Achille's heel. The problem is that the decapping occurs at the same station as priming. Ash residue from the primers is deposited onto the priming system, particularly the slide. To deal with this contamination I keep a tooth brush close at hand and scrub the priming mechanism very once in a while. This cleaning is best done when the ram is in the upper postion and the primer slide is retracted to pick up a primer from the tube, exposing the mechanism for cleaning.

Another annoying, but much less frequent, problem is primers sticking in the feed tube. A little weight on the primer stack will work wonders. I screw a 1/4-20 wing nut on to the top of plastic primer follower. The extra weight improves feeding reliability. This method worked so well that I decided to add a little more weight. I now make all of my followers out of brass rod to add a little more weight. This mod has greatly improved primer feeding.

Although I haven't loaded on it yet, I made a mod on my Square Deal-B. I added metal washers of similar size over the delrin/plastic washers on the sides of the operating handle link arms. Not sure if it will cause the plastic to wear more but it made for a more positive feel. I also tried adding weight to my primer following tube. Deffinitely helped when primers were running low. I was using spent primers for test purposes so I'm not sure if I'll need the weight or not.
 
Excellent idea..... Will have to try this one.....[smile]

The only problem I have had with the 550 is the priming system which, IMHO, is the machine's Achille's heel. The problem is that the decapping occurs at the same station as priming. Ash residue from the primers is deposited onto the priming system, particularly the slide. To deal with this contamination I keep a tooth brush close at hand and scrub the priming mechanism very once in a while. This cleaning is best done when the ram is in the upper postion and the primer slide is retracted to pick up a primer from the tube, exposing the mechanism for cleaning.

Another annoying, but much less frequent, problem is primers sticking in the feed tube. A little weight on the primer stack will work wonders. I screw a 1/4-20 wing nut on to the top of plastic primer follower. The extra weight improves feeding reliability. This method worked so well that I decided to add a little more weight. I now make all of my followers out of brass rod to add a little more weight. This mod has greatly improved primer feeding.
 
Although I haven't loaded on it yet, I made a mod on my Square Deal-B. I added metal washers of similar size over the delrin/plastic washers on the sides of the operating handle link arms. Not sure if it will cause the plastic to wear more but it made for a more positive feel. I also tried adding weight to my primer following tube. Deffinitely helped when primers were running low. I was using spent primers for test purposes so I'm not sure if I'll need the weight or not.

Please take this suggestion in the spirit of which it is offered. Return the SD to Dillon and get a 550. I have owned both and the 550 is a much better press, well worth the extra $. This is not a joke, I have your best interests at heart.
 
Please take this suggestion in the spirit of which it is offered. Return the SD to Dillon and get a 550. I have owned both and the 550 is a much better press, well worth the extra $. This is not a joke, I have your best interests at heart.

If I had actually bought it I would have gone with the 550. I got this 15-20 year old sq deal for free. A very nice guy I shoot with said he hadn't used it in 15 yrs. because it had primer feeding problems. I cleaned it up and replaced the primer magazine tip, which was cracked, and it seems to feed primers fine. I also found that it had a cracked operating handle and dillon replaced that for free.

The last of my reloading tools are on order so I will soon find out how it works. I'm not looking to crank out hundreds of rounds per hour and don't mind taking things slow.

The SD works OK but the 550 is far superior. Sort of the difference between a Yugo and a Ferrari. You just found the secret to primer feeding reliability. Most of the problems are caused by a worn or damaged plastic nipple. Whenever I encounter a problem with primer feding in my 550, I replace the plastic nipple before attempting any other repairs. Unfortunately, I learned this the hard way and just about completely disassembled the 550 before I tried the easy solution and replaced the nipple.
 
Bought one of these kits for my Dillon and so far it has been a godsend....

http://www.grafs.com/product/227737

Has all those parts that typically wear and/or get lost when taking the press apart for maintenance/changeovers.....
 

Attachments

  • RL550B Spare Parts Kit.jpg
    RL550B Spare Parts Kit.jpg
    3.3 KB · Views: 10
Dillon primer feed tubes.

(snip foolishness comparing an SDB to a Yugo [wink])

You just found the secret to primer feeding reliability. Most of the problems are caused by a worn or damaged plastic nipple. Whenever I encounter a problem with primer feding in my 550, I replace the plastic nipple before attempting any other repairs. Unfortunately, I learned this the hard way and just about completely disassembled the 550 before I tried the easy solution and replaced the nipple.

And the easiest way to crush the nipple is to over-tighten the primer magazine cap. (Knurled hollow nut that holds the tube in place)
 
Excellent idea..... Will have to try this one.....[smile]


I just finished the design of my brass rod primer tube follower. I have made several, but had a problem mounting a washer that would operate the primer early warning system. Even if you don't have this system you need some way to tell when primers in the tube are about to run out.

I tried gluing a wooden washer in place but this was time consuming and who knows how long the glue will last? I also tried cutting a groove in the precise spot that the washer must go and the placing a washer at the groove and squeezing it until it entered the groove. This worked, but was a little sloppy. The final solution was an "E" clip, available at your local hardware store. Buy an appropriately sized "E" clip (large enough to activate the lever on the primer early warning system) and then cut a groove in the brass rod at the appropriate location just deep enough to accept the "E" clip. Works like a charm.

Pictures are needed... [smile]
 
I bought the audible primer alarm system when it came out but found that the rod that drops on top of the primers is all you need. Just watch the little washer on top and you know when it's time to add another 100. You can make this follower from a piece of ss welding rod or even the bottom part of a coat hanger, then attach a small washer or whatever at the last primer point. You could even use a Sharpy pen.
 
Lubing the dillon 550B

Ok, my press was starting to get hard to cycle so figured I would go ahead and lube it.... Couldn't find a lot of detail from Dillon/online and this was a bit of an adventure so thought I would write it up in case anyone else needs to do something similar....[smile]

For reference will be using the diagram on page 3 of the Rl 550B manual located here:

http://www.dillonprecision.com/manuals.html

Basic disassembly

Started at the link arm pin (P/N 13700) at the bottom of the two link arms..... Had to remove the handle assembly (P/N 20636) first so I could have full access to the assembly.... Mine had a C clip retaining the link arm pin but the diagram shows newer models have a nut.... Removed the C clip and drifted out the bearing...

Next I loosened the locking screw (P/N 13789) at the bottom of the ram enough so I could drift out the main shaft pivot pin (P/N 13830).... So far so good...

The link arm pins (P/N 13834 and P/N 13881) attaching the arms to the frame were where I ran into trouble... Thought I could just drift them out but quickly found out that heavy hammering had no effect.... Also found out that my ram was now jammed...[crying]

Called Dillon... Mike explained to me that you have to remove the ram to drift out these bearings and that I had probably dinged up my ram..[shocked] To make this worst I found out that these link arm pins (P/N 13834 and P/N 13881) are pressed in and couldn't be backed back out from where I drifted them so I was probably going to do more damage to my ram removing it....[sad2]

To get the ram out I first had to remove the shell plate Platform (P/N 13781) by loosening the two retaining screws (P/N 13966).... Lots of Kroil and dead blow hammer later I got the ram to move.... A bit later I had it out and found I now had a long scratch down the side of the ram due to the bearing..... The good news was that the shaft that houses the ram appeared to be undamaged.... Stoned the scratch and after a bit was back in business....[grin]

Using the flat of an old drill bit I drifted out the left link arm pin (P/N 13834) and then drifted out the right link arm pin (P/N 13881).

Ok, disassembly complete so at this point cleaned and degreased everything... I then inspected each of the shafts and pins for any dings and lightly stoned anything irregular using 600 grit wet/dry sandpaper.... Was careful to always sand in the direction of the bearing travel...[grin] Degreased again to remove any grit....

Reassembly

I lubed both of the link arm pins (P/N 13834 and P/N 13881) with moly grease and reinstalled both of the link arms, tapping the link arm pins in place with the hammer. I then checked the ram housing to ensure that the link arm pins were not protruding...

Lubed the ram with mobil one (I used a small paint brush and a jar) and reinstalled it in the main housing. I then reattached the Shell Plate to the top of the Ram (remember to reinstall the return bracket (P/N 13885)).

Next I lubed (Moly Grease) the Main Shaft Pivot pin (P/N 13830) and reinstalled it with the crank housing (P/N 13409) by tightening the set screw at the bottom of the ram.

Next I lubed (Moly Grease) and installed the link arm pin (P/N 13700). Reinstalled the handle assembly and now it cycles smooth as silk....[smile]


and since I couldn't find the process documented anywhere thought I would cove.... My press is an older one

To remove the left link arm pin you can get a 8 inch carriage bolt (7/16 I think) at Lowes
(Home Despot doesn't carry them) and it will do a great job removing it (along with a big
hammer). Kind of disconcerting to be hammering away at your press to take out those
pins though. My left link arm froze recently as well. I didn't take out the right one since
it hadn't frozen so I lubed the hell out of it as best I could but now I'm thinking that I
should have removed it as well. Did you knock out the right one from the left side?
When I put my press back together I realigned it with the realignment setup that I got
from Dillon previously. Did you use that to set up your press or did you just eyeball it?

My press is an oldie as well. Originally a 550 and did the upgrade to the 'B' version a couple
of years ago.

I called Dillon prior to doing it as I could see that there was no way I could get the link arm
off with the ram in place so I didn't suffer your situation. Under any other circumstances I
might have done the same but fortunately I put in a call to them and got an excellent tech
support person which is not always the case. I would expect your ram to be fine as that is
a big piece of metal.
 
Last edited:
Carriage bolt is a great idea...... I used an old drill bit because I knew it would be hardened and I didn't want to take a chance on the end mushrooming on me...[wink]

With the ram out of the way it was pretty straight forward to remove the pins.... The one on the right is hollow so it was pretty easy to put the drill bit through it and punch out the left side first.... Once that was out of the way it was easy to go in from the left side and punch out the remaining (right side) pin....

Bought this press used and didn't get any alignment tools..... Just the press but didn't have any problem getting it apart and then back together with the coaching from Dillon....

Still pretty disconcerting to go through all this.... Was really sweating it there for a while....[crying]

Not sure why they don't publish a "recommended maintenance" procedure for the press.... Know they have great service but would certainly think it in there best interest to prevent folks doing stupid things like I did....[rolleyes]

To remove the left link arm pin you can get a 8 inch carriage bolt (7/16 I think) at Lowes
(Home Despot doesn't carry them) and it will do a great job removing it (along with a big
hammer). Kind of disconcerting to be hammering away at your press to take out those
pins though. My left link arm froze recently as well. I didn't take out the right one since
it hadn't frozen so I lubed the hell out of it as best I could but now I'm thinking that I
should have removed it as well. Did you knock out the right one from the left side?
When I put my press back together I realigned it with the realignment setup that I got
from Dillon previously. Did you use that to set up your press or did you just eyeball it?

My press is an oldie as well. Originally a 550 and did the upgrade to the 'B' version a couple
of years ago.

I called Dillon prior to doing it as I could see that there was no way I could get the link arm
off with the ram in place so I didn't suffer your situation. Under any other circumstances I
might have done the same but fortunately I put in a call to them and got an excellent tech
support person which is not always the case. I would expect your ram to be fine as that is
a big piece of metal.
 
Not sure why they don't publish a "recommended maintenance" procedure for the press.... Know they have great service but would certainly think it in there best interest to prevent folks doing stupid things like I did....[rolleyes]

I hear you. When I looked at the press (mine) I couldn't figure out how to take out those
pins to free it. I called to ask them how and that is when they informed me that the one on
the right had the hole in it and they also informed me that I had to tear down the press as
I had to remove the ram. I searched the web looking for that information and not finding it
is when I put the call in. As to why they don't publish it? They probably think that anyone
having that level of problem would be satisfied to send it in to get it fixed. Three hours
instead of three weeks and the cost of shipping it? Not for me.
 
Back
Top Bottom