Wanted to share after seeing a number of posts about using one of the Dillon cutters or others expressing interest in using one. The RT1500 is the only available option from Dillon, it will both trim as well as cut brass for 300 blackout with the correct toolhead and die. The RT1200 was discontinued, it was for trimming only. Users seem split between trimming on the press or using an alternative trimmer like the Giraud trimmer.
One of the downsides of the Dillon trimmer was that it didn't chamfer the inside or outside edges like the Giraud. The bonus though being that you only touch the brass once in the sizing process as it'll be sized and trimmed once loaded on the press but this comes at the cost of only being able to full length size the brass. Neck sizing only isn't an option as the trim die also full length sizes. Currently my only experience with the trimmer has been trimming mixed 223 / 556 brass for the purpose of reloading to ring steal with. I wouldn't load precision rounds or trim on the Dillon 650 or with this cutter. In my opinion that's a manual process done on a hand lathe and scale on a single stage press. Of the brass that has needed trimming (trim length set to 1.751) the combination of the Dillon 650 and RT1500 cutter has held tolerance within plus or minus a couple thousandths when testing with the same head stamp brass. Given the variation in case length from different manufactures I was satisfied with this degree of variation.
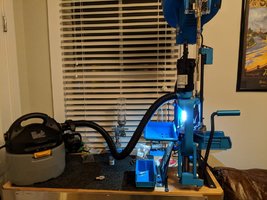
The internet suggested a few different ways to setup the press and cutter for trimming. Dillon requires the cutter head to be in station 4. The internet suggested station 2, 3, or 4 after reading posts on different forums. I put the cutter in station 3 after some trial and error... Setup as follows:
Station 1 Lee universal decap die
Station 2 Empty
Station 3 Dillon trim die / full length size and Cutter head
Station 4 Empty
Station 5 RCBS neck Size Die
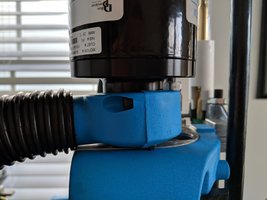
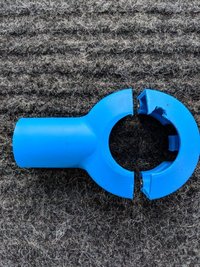
I wanted to set / maintain neck tension after sizing, the Dillon trim die seemed to under size the internal diameter of the brass, the neck size die expands it a bit without having to use a universal case bell die. The lock ring on the full length size / cut die is installed under the shell plate to leave as much space as possible for the vacuum to remove trimmed brass. The housing that goes around the bases of the trimmer to collect shavings had to be modified a bit to allow it to slide over the pin that secures the tool head. This wouldn't be a problem if installed in station 4 where Dillon wants it. If the cutter was in station 2 it wouldn't clear the tube holding the primers, it's pressed in and can't be removed. The RT1500 is just large enough that it will fit in station 2 but pushes the priming unit out of alignment and the press won't run smoothly. Maybe the RT1200 was more narrow, I'm not sure how forum users were able to put it in station 2 and still cycle the press. If you only need to decap, size, and trim and don't wish to neck size station 4 is the spot for the cutter. Another downside of station 3 is that the tool head can't be removed with the cutter attached, the pins won't clear the cutter when taking them out so it's not exactly set it and forget it when swapping tool heads.
Setup / dialing it in isn't much fun. Dillon recommends putting a piece of sized brass in the cut station and raising the ram after setting the depth of the size die. Then lowering the cutter blade down until it touches the brass. Just lock everything in and away you go. That didn't work exactly for me, there was too much variation with the course threads on the cutter and the cutter blade being to high or digging into the brass just enough to be under the measurement I wanted. You have to hold the size die with a wrench while tightening down the cutter or the sizing die moves as you tighten the cutter. After some (lots) trial and error and choice words it was trimming at the desired length. Adjusting it up or down a couple thousandths was a pain as was wrenching down the lock ring on the cut / size die enough so it wouldn't move with the torque of the cutter starting. Once set and everything locked down it hasn't budged after 1k+ pieces of brass.
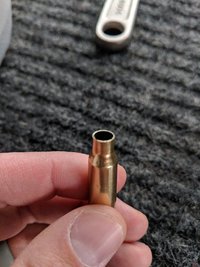
Once setup sizing and trimming couldn't be easier. The cleaned but not decapped brass is loaded into the case feeder and makes its way around the shell plate. Any brass longer than the set length is cut while all the others only decapped and sized. Probably getting 900 brass done an hour. Prior to loading on the press I stand all the brass up and spray lube inside the case mouths as well as the outside of the cases. Even with the carbide size / trim die lube is required. I choose to lube the inside of the cases a bit to ensure the neck size die doesn't pull the case mouth out of alignment when the ball comes out of the mouth. Each brass only needs to stay under the trimmer for a fraction of a second, it's quick to trim. It does leave a bit of a sharp edge or strands of attached / semi attached trimmings sometimes. These seem to be removed though once the brass is tumbled to remove the case lube.
Over all I'm very pleased with the trimmer and setup. Trimming 1k+ brass in a single sitting by hand wasn't do able. I don't have experience with the Giraud but it seems like an extra step compared to trimming on the press. A friend uses the Little Crow trimmer on a dill and wouldn't be able to size and trim this volume of brass as quickly.
Hope this helps anyone looking at the Dillon trimmer. If you have suggestions or recommendations I'm always looking for better ways to do things or maintain more consistency.


