AR15 Pivot Pin Removal

Joined
Jan 24, 2008
Messages
104
Likes
0
Feedback: 22 / 0 / 0
Can anyone tell me if there is any trick to removing the front pivot pin on an AR-15 rifle? I do not want to damage the lower receiver and have not been able to figure out how to remove the pivot pin.

Any help is much appreciated!
 
Are you talking removing the upper receiver from the lower receiver? If the pin won't just press out, a few taps using a non-marring punch will get it on its way.

If you're talking removing the entire pin from the lower receiver (ie for replacement) there is a spring and detent behind the pin. Push the pin all the way out until it stops, there is a small hole in the end of the pin that you can push an unbent paper clip through to depress the detent so it disengages.
100-100-front_pivot_pin.jpg
With the detent pushed just beyond the pin, rotate the pin about a quarter turn and remove it the rest of the way. The detent and spring will then launch across the room unless you have something there to catch them.
 
Not an easy task if the pin does not have a small hole on the other side as mentioned above. If it doesn't have a hole pull the pin out. Look down the groove in the pin. You will see a smaller pin inside that needs to be depressed. Good luck with that.

Here is a video on how to assemble a lower. If you watch the part about the front pin it will make sense as how it's put together.

http://www.wonderhowto.com/how-to/video/how-to-assemble-a-stripped-ar-15-lower-201628/
 
OnTheRoad - your instructions are exactly what I was looking for! I hadn't even noticed that tiny pin hole. Thanks!
 
Is there any reason you want to remove it?

Taking it out is easy... reinstalling it is a bit tricky; the most common result is the detent and spring flying off to nowhere, much time crawling on your hands and knees with a flashlight, punctuated with a barrage of cursing, then spending $5.00 on shipping for $2.50 worth of parts.

Trust me... I know [wink].

That's why on any builds I install the pivot pin while in the tub with the curtains closed and drain covered.
 
Not an easy task if the pin does not have a small hole on the other side as mentioned above. If it doesn't have a hole pull the pin out. Look down the groove in the pin. You will see a smaller pin inside that needs to be depressed. Good luck with that.

Here is a video on how to assemble a lower. If you watch the part about the front pin it will make sense as how it's put together.

http://www.wonderhowto.com/how-to/video/how-to-assemble-a-stripped-ar-15-lower-201628/

Thanks for the link the instructions will become invaluable soon as we get our lowers.
 
Mine doesn't have a pin hole. It was a PITA to remove, especially after I realized I'd been stupid and installed the rear pivot pin into the front hole.
 
someone suggested assembling the parts in a pillowcase, sounded like a good idea.
 
The fit between my upper and lower is extremely tight and its difficult to push out the pivot pins, so I was going to replace them with Yankee Hill EZ Pull Pivot Pins - they protrude beyond the receiver, enabling you to grasp and pull them out.

The AR is one that I built up from parts, so I'm familiar with the difficulties of installing the front pivot pin. Though, it actually wasn't as hard as I had expected. I just used an allen-wrench of the appropriate size; inserted the allen wrench from left to right through the pivot pin holes in the lower receiver and used the allen-wrench to hold the spring and pin in-place, while I slid the pivot pin into position. (not sure how well that was explained...)

While tight is usually good, if it is too tight you might want to look into solving that issue rather than buy new pins.

Minor tweaking of uppers and lowers is not really that big of a deal.
 
icyclefar - you're spot on...I already swapped out the factory pivot pins for the EZ Pulls, but the problem has not been solved. The rear pivot pin is damn near impossible to push all the way in and even harder to pull all the way out. Does anyone have any advice on this? Any help is much appreciated...
 
Usually, the easiest fix is to open up the hole diameters on the upper. But before you get to drilling, remove the rear pin, leave the pivot pin in place, now examine the alignment of the rear pin holes thru the lower to the hole in the lug of the upper. This should give you an indication as to where the problem is.

If you are out of alignment only "left to right" then hole diameter is probably your fix. If you have an "up and down" alignment problem, then your upper is probably not sitting low enough onto your receiver.

Diagnosing the problem is the hard part, from there, fixing it is usually easy.

If you are on the South Shore, I'd be happy to help.

+1

The OP didn't mention if the upper and lower are by the same manufacturer.

Just being a hair out of spec or alignment or even really close tolerances will cause a tight fitting pin... even if both upper and lower are by the same manufacturer.

I've had similar situations with RRA receivers and uppers.

A couple of lite passes with a fine file over the rear lug fixed the problem and the gun still has near zero upper and lower movement.

Another fix would be to take a plastic mallet and brass punch (even a wooden dowel should do), lube the pin and just keep hitting/working the pin in and out
until it loosens up. Using a bit of JBs bore paste or some similar ultra fine compound will work too.
 
Do yourself a favor, and just keep working the pin(s) back and forth. My Bushmaster was a grunt to get the pins to move. Had to hammer them out the first couple of times (nicely). After five or six times they became much more manageable.
 
someone suggested assembling the parts in a pillowcase, sounded like a good idea.

I'm a fan of using a big Ziploc bag to contain such work; easier to tell what's going on. (Unless you put your head in the bag with it, which I think I'd find annoying.)
 
Do yourself a favor, and just keep working the pin(s) back and forth. My Bushmaster was a grunt to get the pins to move. Had to hammer them out the first couple of times (nicely). After five or six times they became much more manageable.

Unfortunately, by doing that I would suspect that you will end up either bending the pin, elongating the holes in the lower, or inducing some other undesirable result. A wee bit of fitting is not all that unusual and will keep the stresses off the surrounding parts. [wink]
 
Unfortunately, by doing that I would suspect that you will end up either bending the pin, elongating the holes in the lower, or inducing some other undesirable result. A wee bit of fitting is not all that unusual and will keep the stresses off the surrounding parts. [wink]

How is moving the pins back and forth going to elongate the holes? Tap the pin out. Tap it back in. The pin will wear as it should.
 
How is moving the pins back and forth going to elongate the holes? Tap the pin out. Tap it back in. The pin will wear as it should.


i think he means by forcing it when it doesn't want to go.

much like when a dog doesn't want to do something, forcing it will just result badly.
 
(Yes, technically this is a thread "resurrection." Sorry.)

So I thought I would pass along a lazy removal method if you have a stout heart. You can still do the "bathtub with shower curtain pulled method" or the "pillow case method" or "large zip loc bag method" along with this, if you don't trust me. And why should you?

I did this sitting in a comfy chair in my living room without any plastic food storage or linen containment. Stout heart. Or just silly.

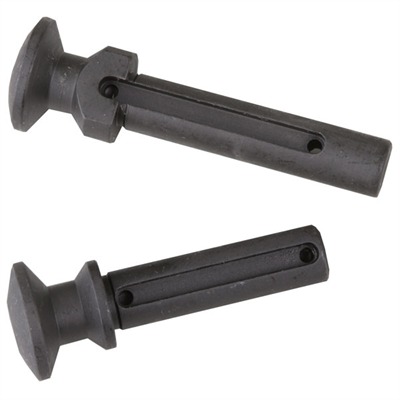
So the pins on this AR build were just too tight for my old fingers. I picked up a pair of the EZ Pull pins from YHM

p_100003690_1.jpg


...along with an extra spring and detent pin because I am not a complete idiot and I just assumed I would lose parts.

So after removing the lower and old takedown pins (with hammer and dowel--yikes), I pushed one pin in through the left of the front hole butted up against the original old pin in the "out" position. The new takedown pin slot was not aligned with the old takedown pin slot. I hoped that the detent pin would just press against the round cylindrical shaft of the left hand "helper" takedown pin without actually snapping into its groove, if this actually worked.

I gently pushed the pointy tip of the carbide of an etching scribe (like this one)

!B,UHg+QB2k~$(KGrHgoOKjYEjlLmZ5C3BKq+R!zviQ~~_35.JPG


...in the slot of the takedown pin and levered the spring to compress it, then gently pushed the left side pin acting as a "helper" while I pulled the old pin. The spring and detent pin now just rested tight against the shaft of that helper takedown pin in through the left. Any possible marring of surfaces was limited to the inside of the groove of the old takedown pin, which I was willing to do considering the low risk and hidden area anyhow.

Now I took a new (notched!) front EZ Pull takedown pin and pushed it in while holding against it a little with the old "helper" pin on the left.

I repeated the procedure with the rear takedown spring (which was the one I really wanted to replace) without putting my eye out or losing the original springs.

Took me longer to type this description than to do it once I decided to try, and I didn't have to remove the stock, which is a EFX-A1 stock, so it's a little bit less annoying than making a castle nut loosey goosey, I realize.

But for once, the simple way worked for me.
 
Last edited:
icyclefar - you're spot on...I already swapped out the factory pivot pins for the EZ Pulls, but the problem has not been solved. The rear pivot pin is damn near impossible to push all the way in and even harder to pull all the way out. Does anyone have any advice on this? Any help is much appreciated...

Didn't read the whole thread but check the decent pin to see if the end of it is rounded or squared off. Think of how the two interact and see that a slope hitting a slope works to move the pin into the hole and get it out of the way. If the small detent is squared or has a burr it will be difficult to move it.

Check the lengthnofnthenspring against a known good one and make sure that too much pressure is not being applied.

Good luck.
 
The pins in most of my ARs are a tight fit. No problem, I just tap them out with a brass rod and tap them in with a plastic mallet. This system has worked well for me for over ten years and the pins are still tight (I like tight). Installing the front pivot pin is best done with a tool made specifically for this job. I made one and it works ok, but I actually prefer the pivot pins with captive springs and detents. The only advantage the original pins have is that they are harder to lose in the bush.
 
Back
Top Bottom