• If you enjoy the forum please consider supporting it by signing up for a NES Membership  The benefits pay for the membership many times over.

Problem reassembling my new MKIII

Prepper

NES Member
Joined
Apr 12, 2007
Messages
29,918
Likes
28,315
Feedback: 11 / 0 / 0
I previously managed to disassemble, clean and reassemble my MKIII, then bring it to the range. I then disassembled it again, cleaned it, and attempted to reassemble it, and now I'm in some kind of a mess because it didn't go smoothly the second time.

I got near the end where it said to insert the pin of the mainspring housing back in, which I did, but no matter what I did I was unable to swing the housing back in without the housing's pin popping out. At the end, it had a hint that if this happens, "repeat step 3", which is to connect the receiver to the frame. BUT, I'm pretty sure this was already well connected before.

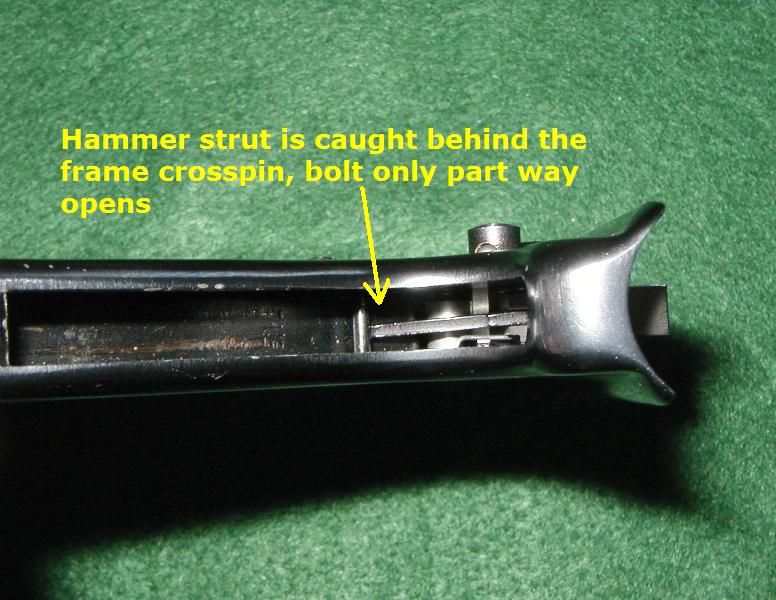
Despite that, I wanted to then remove the receiver from the frame so that I could put it back on again just like step #3 said. Looks like the bolt would first need to be removed before this was possible. BUT, no matter what I do, I can't get the bolt back out... it moves back and forth on its own about 1/2" and something's catching it. Disassembly step #4 claims that pointing gun up and pulling trigger will make the bolt fall out, but this time it's stuck. Well, not completely stuck... it slides back and forth on its own a 1/2" distance still.

What else can I try? Pulling the trigger makes a click sound but doesn't help. Whether the magazine is in or out, doesn't seem to matter. I tried looking into it from different directions to see what is going on but I'm not sure. I'm baffled! Any ideas?
 
Funny thing happened, after struggling for a hour and then finally posting here in desperation, I went back to the gun again. I think I pressed down on the slide stop and pulled the trigger, then it finally stops clicking when I pull the trigger (although I have no idea what that's accomplish). After that, I was able to easily insert the housing and snap it closed. (I never did manage to "repeat step #3".)

I think it's assembled properly now. Although I wish I fully understood what is really going on here.
 
I nearly made a similar post yesterday about a similar issue with this gun. It was my first time and taking it apart and I couldn't get the frame and receiver apart. After a lot of futzing and reading I was able to get it back together. Of course, I was warned multiple times from Carl and others at FS, don't take this apart unless Ruger support is open or you'll be unhappy..
 
I'm glad you managed to get it back together! I spent a good couple of hours taking mine apart and putting it back together again the day I got it. I, too, was told not to take it apart unless I had to for the very same reason.

Just for the sake of future issues that may arise and someone tries to do a search:
I've found the key to be the hammer position. It needs to be cocked position in order to insert the bolt. You then need to push the hammer into the un-cocked position before trying to insert the back piece. (I use a tooth pick or q-tip.) When inserting the back piece, get the pin all the way through the receiver and bolt, then point the entire gun towards the ceiling with a mag (empty of course) in the gun while pulling the trigger--This is key! The back piece should swing down freely. Then, remove the mag and snap the back piece shut. The slide should cycle freely. If assembled incorrectly, the slide will stick in the back position and the slide release will not make the bolt move forward as it normally would. If this is the case, disassemble and reassemble.
 
Last edited:
The manual isn't written so well either. It'll say things like "do such and such then the hammer will fall. If it doesn't, then... " and I'm sitting here wondering, "OK now, how do I tell that the hammer fell if it's covered by the receiver and I can't SEE it?"
 
Haha exactly... The instructions are pretty horrible, actually.
This site is a smidge better than the instructions that come with the gun, but nothing substitutes for experience. Took me about 5 separate field strip attempts to get it back together on the first try.

What cracks me up about the factory manual is the list of tools required for field stripping. Before owning a Ruger, tools like "a block of wood" and "a rubber mallet" had never came to me as tools to disassemble/reassemble a gun. [rolleyes]
 
Yup, it's the only manual I've seen that on purposely tells me to use a mallet.

Is it safe to assume that everything is OK with the gun and that it'll fire properly without breaking something, if basic checks of the gun appear to be OK? Bolt pulls back and catches on the slide stop. Pressing the lever releases it. Gun appears to be cocked after pulling/releasing the bolt. Pulling trigger then clicks once (mag is empty so it obviously won't cycle), then I have to pull bolt back and release before the trigger clicks again. It seems to be OK anyway. Sounds good to go?
 
Thanks Cuda for that link. One of the troubleshooting page is if the bolt won't come out, and it points to this picture:

m3crosspinstuck.JPG


That's exactly what I saw when I looked into the rear of the frame where the mainspring housing goes... some little metal "thing" was behind that pin, just as shown there. But I didn't know to do what it said "Tilt frame forward and lift hammer strut up from behind crosspin and then pull bolt out of the receiver", and somehow got the gun together again. Should I expect this may still be messed up somehow and that I should go disassemble and reassemble the gun before using?

(And how exactly would I lift that hammer strut? It's supposed to be on the other side of that pin in front of it when I'm looking at it?)
 
I have a "Special Hammer" I keep in the gun room for working on my Ruger and I am tempted to take this hammer and.. [thinking]

"scuse me I was having a flashback to the first time I took mine apart...
banghead.gif


Cuda444, thanks for posting that link, that's gonna make life a bit easier.
thumb.gif
 
I just lifted up the mainspring housing to double-check. I see the "hammer strut" is now about 1/4" above that crosspin, clearly not trapped or anything. I'll assume this is the way it's supposed to be, tie a bow around it and call it done.
 
On various other threads when someone was thinking of buying a MK III I posted this comment "when you wish to disassemble the pistol you wish you hadn't bought the damn thing"
Gun Tests magazine bought one for review and said that there biggest problem was re assembly
was a nightmare for the reasons above poor instructions in the manual etc. I will never buy a MK III and should I find the need for another Ruger I will hunt high and low for a MK II
 
Not had any issues myself, but I've only done it twice. I also think the instructions are a royal pain in the ass too. My worry is when you remove the barrel/receiver from the grip frame that it requires quite a bit of force. I'm concerned it might snap the locator lugs on the grip.
 
The thing is that you CAN see everything going on inside. The easiest way to understand how to reassemble the MKIII is to look inside and picture how the mainspring housing is interacting with that pin. You can even see the pin starting into the hole at the top of the mainspring housing so you know it isn't getting stuck.
 
When I got my first Ruger at the tender age of 16, I finally gave disassembly a whirl...It did not go so well. Imagine doing this today: I dropped the pistol into my paper bag, hopped on my bike and rode down to the gunsmiths where my father purchased it. I did this a few times early on. Now, it's just like muscle memory. It's all in the wrist....Yup, bad instructions - maybe even a bad design, but I cannot imagine not buying a Ruger because of that feature. It's in my view one of the best 22 pistols ever made. I have kazillions of rounds through mine, with very little in the way of cleaning and no jams that were the result of the gun, (bad ammo).
 
Like I said, any problems you are having with reassembly, are because of the hammer's posistion. Sometimes you have to insert a mag, point the pistol in the appropriate position (up or down depending if the hammer needs to be "cocked" or "uncocked") and tap the pistol on something (I use my knee)

As far as function checks go, with the mag out of the gun, you should be able to pull the bolt back effortlessly with no snags on the way back. Once you're holding the bolt back simply release it, it should fly forward, fully seating itself. If you've assembled it wrong, it will hang as if the slide lock is engaged and will require you to actually PUSH the bolt forward until the friction releases. If this occurs, start over, take it apart, and redo it.

I love that gun. It will eat anything, rarely jams (as far as 22 goes) and is accurate as all get out. It's a super fun pistol for anyone to shoot, newbie or verteran.
 
You know those reassembly directions that come with the gun? Well, the best thing to do is rip those pages out of the manual, rip them into small pieces and scatter them to the wind. I found this how-to guide on the net and it works flawlessly:

1. Reinstall bolt into receiver while receiver is off frame.

2. Pull trigger, and manually pull hammer up to it's "Fired" position, with it's front face vertical and perpendicular to the top of the grip frame. (Sear pressure on front of hammer should keep it in place pretty securely, once you release the trigger.)

Now that you have the hammer in the "fired" position, DO NOT TOUCH THE TRIGGER until the pistol is reassembled. It's key that the hammer must stay in this "fired" position for the following steps. If you end up touching the trigger, the sear pressure against the hammer will be lost, and the hammer may move to the "cocked" position.

3. Hold grip frame with magazine opening facing down. Carefully lower barrel/receiver assy (with bolt installed) over hammer and onto grip frame. The slot in the bottom of the bolt should be guided down over the hammer. Push rearward to lock barrel/receiver assy onto lug in front of grip frame in the normal manner. DO NOT allow hammer to be bumped back to "cocked" position while doing this. If it does, go back to step 2.

4. Place pistol on it's side, with mag opening nearest yourself, and barrel pointing right or left, parallel to the width of your torso. Install the boltstop pin (attached to mainspring housing) all the way up into reciever while keeping pistol oriented this way.

5. With bolt stop pin fully inserted, but mainspring housing fully pivoted OUT of the grip frame, flip the pistol so the grip frame is facing with the magazine opening UP. (Basically you are rotating the pistol about the axis of the barrel, moving the mag opening from towards your chest, to straight up.) The pistol should now be upside down, facing sideways in front of you.

6. While holding the pistol upside down and sideways across you, tip the muzzle slightly UPWARD (no more than 30 degrees should do it). Holding in this position, close the mainspring housing.

Check for proper operation by pulling the bolt back. If it goes all the way back you did it right. If not, take it apart and do it again.

The whole objective of orienting the pistol as described in the steps above is to keep the hammer uncocked at all times. Doing that keeps the hammer strut free to flop over to join the mainspring housing when you close it.

Most persons get bamboozled when the hammer strut gets stuck behind the pin in the frame, and won't flop out to join the mainspring housing. The only way the strut will get stuck like that is if the hammer falls back towards the cocked position while doing the reassembly.
 
Cuda, I just tried the link you posted so that I could clean and reassemble the gun without looking at that thing that Ruger calls a "manual". It worked pretty well. The only hitches are that the loaded chamber indicator pin had come out about 1/16th of an inch and prevented the receiver from locking into the frame; I managed to push that down and that fixed it -- link didn't mention this (Ruger manual did mention, but wasn't entirely clear that the black pin needed to be flush with the frame). Also, step #8 didn't work as-is until I held the trigger in, which the link didn't mention but the Ruger manual did mention. Without the trigger held in, the bolt stop pin kept popping down. I quickly solved both and got the gun back together, so it went pretty well. And nice pictures!
 
If I recall correctly the MkIII manual fails to mention the bit about removing and reinserting the magazine. It can be confusing the first time. I rarely take mine apart anymore (it seems to shoot better a little dirty) but its no big deal to put back together anymore.

How difficult can it be?... [wink]

http://www.1bad69.com/ruger/FieldStripRuger.mpg

Only difference between the MK-II and MK-III is having to remove and reinsert the magazine.
 
If I recall correctly the MkIII manual fails to mention the bit about removing and reinserting the magazine. It can be confusing the first time. I rarely take mine apart anymore (it seems to shoot better a little dirty) but its no big deal to put back together anymore.

Yeah, that parts a bit of a pain. You need to insert the magazine to get the bolt stop pin/main spring back in most of the way, but then eject the magazine to fasten it properly. It really helps if you're ambidextrous.
 
Back
Top Bottom