Hi gang,
I've LONG been on a quest to develop my own variation of the popular Shoot-N-C or Visishot targets. You know the ones that flake away around the bullet's path leaving a highly visible spot down range.
Yeah I can buy 50 for $15, that's $.30 each and pretty cheap. But I like to make my own stuff when I can. Kind of a two-prong enjoyment and hopefully save money to buy something more important, like an AR or ammo.
Today I tested my FIRST truly viable alternative - a home made Shoot-n-C type target...and wanted to share it with the community.
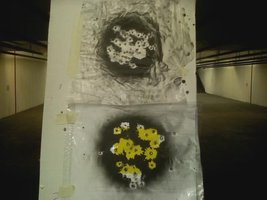
Here is a photo of the TWO designs I tested today.

The white and black one is nothing more than a Walmart bag painted with a spot of matte-black spray paint. It took 5 seconds to make in my basement last night. I found that this target did the trick, but it was shot with .22cal and as you can see the flaking is quite large. That is good for visibility but it eats up the target quick. Plus the semi-translucent bag coupled with it's lack of weight makes it a poor outdoor choice and not that visible in "other than perfect" conditions.
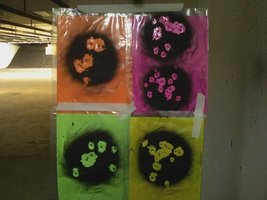
The one with the yellow center is the better of the two. It is made up of a 9x12 polypropelene bag - like the bags they use for magazines and comics. Also the bags I ship zombie targets in. Since I still have 900 of them, this will make a good use for them.![Smile [smile] [smile]](/xen/styles/default/xenforo/smilies.vb/001.gif) This 9x12 bag is open on one side and makes it very easy to slide in a brightly colored sheet of paper. Spray on some matte-black paint and VOILA this target really does the trick! It was shot up with 9mm round nose "berry's" dipped bullets and held up well. I even took a few pucks with the .22 and they were showing up almost EXACTLY like a Shoot-N-C would.
This 9x12 bag is open on one side and makes it very easy to slide in a brightly colored sheet of paper. Spray on some matte-black paint and VOILA this target really does the trick! It was shot up with 9mm round nose "berry's" dipped bullets and held up well. I even took a few pucks with the .22 and they were showing up almost EXACTLY like a Shoot-N-C would.
Below is a link for buying 1,000 bags for $25. Add $15 for 2 reams of bright colored paper. Add $8 for 2 cans of spray paint. Total is $48 for 1,000 targets or $.048 a piece. NICE!! Almost 1/10th of the cost. If you use 1,000 targets in your life of shooting you would save $252.00. Enough for maybe a P22?![Smile [smile] [smile]](/xen/styles/default/xenforo/smilies.vb/001.gif)
http://www.linersandcovers.com/page/LC/PROD/poly-bags/LCF0912
Sure it takes some time to make them & you need a place to let them dry, but they can be painted up real quick and you can slide the paper in them at the range.
If you are really frugal, you could cut the bag in half and use it as a "cover" for the colored paper instead of a sleeve, lowering the cost to $.036.
My next design idea is a white or colored plastic or wax paper plate painted up with black-matte. Not as many color options as being able to insert any color paper you want...but more sturdy and much easier to make / store.
If you have your own variation or viable idea - SHARE!
Enjoy!
I've LONG been on a quest to develop my own variation of the popular Shoot-N-C or Visishot targets. You know the ones that flake away around the bullet's path leaving a highly visible spot down range.
Yeah I can buy 50 for $15, that's $.30 each and pretty cheap. But I like to make my own stuff when I can. Kind of a two-prong enjoyment and hopefully save money to buy something more important, like an AR or ammo.
Today I tested my FIRST truly viable alternative - a home made Shoot-n-C type target...and wanted to share it with the community.
Here is a photo of the TWO designs I tested today.

The white and black one is nothing more than a Walmart bag painted with a spot of matte-black spray paint. It took 5 seconds to make in my basement last night. I found that this target did the trick, but it was shot with .22cal and as you can see the flaking is quite large. That is good for visibility but it eats up the target quick. Plus the semi-translucent bag coupled with it's lack of weight makes it a poor outdoor choice and not that visible in "other than perfect" conditions.
The one with the yellow center is the better of the two. It is made up of a 9x12 polypropelene bag - like the bags they use for magazines and comics. Also the bags I ship zombie targets in. Since I still have 900 of them, this will make a good use for them.
![Smile [smile] [smile]](/xen/styles/default/xenforo/smilies.vb/001.gif) This 9x12 bag is open on one side and makes it very easy to slide in a brightly colored sheet of paper. Spray on some matte-black paint and VOILA this target really does the trick! It was shot up with 9mm round nose "berry's" dipped bullets and held up well. I even took a few pucks with the .22 and they were showing up almost EXACTLY like a Shoot-N-C would.
This 9x12 bag is open on one side and makes it very easy to slide in a brightly colored sheet of paper. Spray on some matte-black paint and VOILA this target really does the trick! It was shot up with 9mm round nose "berry's" dipped bullets and held up well. I even took a few pucks with the .22 and they were showing up almost EXACTLY like a Shoot-N-C would. Below is a link for buying 1,000 bags for $25. Add $15 for 2 reams of bright colored paper. Add $8 for 2 cans of spray paint. Total is $48 for 1,000 targets or $.048 a piece. NICE!! Almost 1/10th of the cost. If you use 1,000 targets in your life of shooting you would save $252.00. Enough for maybe a P22?
![Smile [smile] [smile]](/xen/styles/default/xenforo/smilies.vb/001.gif)
http://www.linersandcovers.com/page/LC/PROD/poly-bags/LCF0912
Sure it takes some time to make them & you need a place to let them dry, but they can be painted up real quick and you can slide the paper in them at the range.
If you are really frugal, you could cut the bag in half and use it as a "cover" for the colored paper instead of a sleeve, lowering the cost to $.036.
My next design idea is a white or colored plastic or wax paper plate painted up with black-matte. Not as many color options as being able to insert any color paper you want...but more sturdy and much easier to make / store.
If you have your own variation or viable idea - SHARE!
Enjoy!

![Wink [wink] [wink]](/xen/styles/default/xenforo/smilies.vb/002.gif)
![Thinking [thinking] [thinking]](/xen/styles/default/xenforo/smilies.vb/010.gif)
![Laugh [laugh] [laugh]](/xen/styles/default/xenforo/smilies.vb/012.gif)
