• If you enjoy the forum please consider supporting it by signing up for a NES Membership  The benefits pay for the membership many times over.

M1 Garand Disassembly Problem

FPrice

Retired Zoomie
NES Life Member
NES Member
Joined
Apr 29, 2005
Messages
26,036
Likes
18,847
Location
Western Mass
Feedback: 104 / 0 / 0
Doing my usual Winter complete disassembly and cleaning of my firearms and ran into a problem with my Garand. Got everything apart easily until I tried to take the gas cylinder plug (new style with Phillips Socket) out. Would not budge a millimeter. Was able to find a Phillips screwdriver that was big enough to fit in it with no slippage out but nothing. Soaked it with Kroil for two weeks and nothing happened. It's almost like it as welded in there.

I think I'm doing everything right but just wanted to ask the NES grope group mind if there is anything else I should look at doing before giving up and taking it to a 'smith? I don't have a vice setup that I could use to anchor the barrel and try to break it loose with something at a 90 degree angle to the plug. So at this point it's screwdriver or gunsmith.
 
do you have any wood clamps/C clamps and a board? if so then clamp to a table top and give it a go. (use the board on the top of the gas assy so you don't mar it, (or put a piece of wood under and on top and clamp it down.
 
Try tapping it with a brass punch and mallet. Hit it once, try again. Rinse and repeat. I have no idea if this helps, just tossing it out there.
 
Sounds dangerous! Gently place it in a padded shipping container and give me your address so I can come and remove it before dogs and children are hurt.

I've had luck with a mix of 50% acetone and 50% transmission fluid. let it soak in for a bit and then apply heat with a heat gun. Keep applying mix being careful not to overheat.
Usually works well on things like this.
 
1/4 ratchet extension fits in there perfect. 3/8ths adapter to a ratchet, place rifle on ground, stand over it and get some leverage going and it will come off.

SUNNY BEACHES! It worked!

Got no idea why anyone would have cranked it down that hard but it's off and I can now clean that end which is kind of oily/kroily.

Thank you.
 
1/4 ratchet extension fits in there perfect. 3/8ths adapter to a ratchet, place rifle on ground, stand over it and get some leverage going and it will come off.
This,
Also anytime you have a stubborn screw,bolt, pin you really need to secure it to something solid. So much of the force is lost if tour trying to hold it in your hands or with your knees.
 
Last edited:
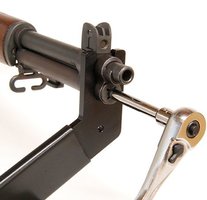
I use one of these to help tighten/loosen my Grands’ gas plug:
Her is a pic of it in action:
Wrench1.jpg
You can get a cheaper version from Fulton Armory:
 
I use one of these to help tighten/loosen my Grands’ gas plug:
Her is a pic of it in action:
View attachment 574767
You can get a cheaper version from Fulton Armory:
Like that one , gives you a good angle to work with
The problem is often over tightening to begin with and carbon working its way into the nooks and crankies

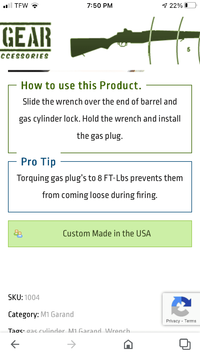
I dont know if this is GI spec but 8ftlbs is not a lot!


0D3C75BF-E1D4-4D89-BC52-719C6F2009F2.png
 
Like that one , gives you a good angle to work with
The problem is often over tightening to begin with and carbon working its way into the nooks and crankies

I dont know if this is GI spec but 8ftlbs is not a lot!


View attachment 574880
Neither of the tech manuals I have for the M1 (TM9-1275 and TM9-1005-222-12) give any torque spec for the gas plug. Every other source seems to agree on 10-15 ft-lbs. Since GIs in the field never had a torque wrench, I just get it good and snug. Seems to work for me.
 
Like that one , gives you a good angle to work with
Neither of the tech manuals I have for the M1 (TM9-1275 and TM9-1005-222-12) give any torque spec for the gas plug. Every other source seems to agree on 10-15 ft-lbs. Since GIs in the field never had a torque wrench, I just get it good and snug. Seems to work for me.
Yeah , if you used a GI tool and holding the rifle in the hands your not applying “ a lot” of torque anyway.
 
Now repeat, never stick the philips in the gas plug.
this brought back memories

My relationship with the Garand was only about three years (when Colt came out with the Hbar sporter, I grabbed one and never looked back). But the first time I took it to the range, an older member had pity on me and gave me a few pointers. His style was very much like this. Do this , don't do this. He had me repeat the key items.

He also gave me a suggested load to use, he had used it " about twenty years ago" to win the NY High power championship. I tried it, and it worked like a charm. I never found a load better in that rifle.
Care to share this secret load?
 
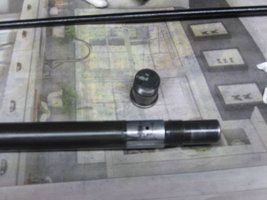
Now that I have the gas plug and the other front parts off, I noticed something on some of the surfaces which looks a little "off" to me. The shiny silver colored parts have a thin, tough coating. It will come off with a little effort. Sorry for the quality of the pictures, they are not some of my best work.

Overall the insides of the rifle were very clean, almost no dirt or gun powder fouling. I don't think I shot this one much so I either received it this clean OR last year I really cleaned it well. Except for the gas plug area. There was a little dirt/gun powder residue which came off easily. The pictures are (obviously) the gas plug and the muzzle end of the barrel and the front end of the op rod.

Any ideas?

Garand 1.JPG Garand 2.JPG
Showing the
 
With respect, it's likely a heavier bullet. No one is really shooting Garands XTC anymore so there is no need for the heavy bullets shooting within 200 yards.
I know a old timer who shot had a garand load for shooting out to 1000 yards when they where not forced to use provided ammo
220 grain bullet pushed hard by todays standards. I asked him if he ever bent op rods. He said did not care you could buy them by the dozen cheap especially at the nationals.
 
Now that I have the gas plug and the other front parts off, I noticed something on some of the surfaces which looks a little "off" to me. The shiny silver colored parts have a thin, tough coating. It will come off with a little effort. Sorry for the quality of the pictures, they are not some of my best work.

Overall the insides of the rifle were very clean, almost no dirt or gun powder fouling. I don't think I shot this one much so I either received it this clean OR last year I really cleaned it well. Except for the gas plug area. There was a little dirt/gun powder residue which came off easily. The pictures are (obviously) the gas plug and the muzzle end of the barrel and the front end of the op rod.

Any ideas?

View attachment 575288View attachment 575289
Showing the
Bright flakes Hard chrome or black flakes carbon
 
Bright flakes Hard chrome or black flakes carbon
They were black. And the black coated areas came clean with some minor pressure. It's not all gone yet.
Did this rifle and gas system even need to be cleaned?
I bought it many years ago (got a good price) meaning to shoot it but it got put in the safe and shot maybe once or twice. I don't recall ever tearing it down for a good cleaning so I am assuming that the seller cleaned it very well, except for the gas plug area, but put it back together without any lubrication.

Fast forward many years until I decide to gift my SA M-1 to my son. At that point we both taught ourselves how to tear down, clean, lubricate, and reassemble them, mainly practicing on his rifle. He's better at it because of his innate ability to understand and work with machinery. Me, I have to practice a lot.

I just got finished with a complete teardown, cleaning, lubrication, and reassemble of mine. I used the Brownell videos for a guide even though I had done it a few times before. It's a 1956 H&R and seems to be in very good shape. I attribute this to it being a late manufacture and probably handled a lot (the stock is dinged up a bit) but not fired very much.
 
Found, quite by accident, this video on the M-1. Good presentation but it's 12 years old and the guy's webpage apparently is no longer good.

 
Back
Top Bottom