• If you enjoy the forum please consider supporting it by signing up for a NES Membership  The benefits pay for the membership many times over.

Durabake...any tips? Pic added

1903Collector

NES Member
Joined
Jan 24, 2007
Messages
6,147
Likes
4,330
Location
Armpit region
Feedback: 85 / 0 / 0
I recently picked up a sad looking G19 for short money, I was going to send it back to Glock to have it refurbed but after learning how damn easy they are to dissasembel and work on I have decided to do it my self. I have a new Glockworx trigger, Lone wolf recoil spring and guide, new nite sights, etc. Gonna keep the barrel for now, for the slide I am going to try the Durabake finish, have any of you folks used this finish? any pitfalls to watch out for? any tips?
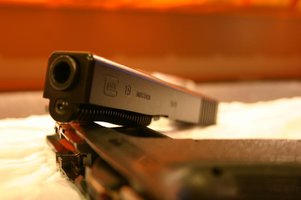

IMG_1245.jpg
Update! So this is how it came out......Not bad at all compared to what it was before! I can definitely see the advantage an air brush has over the aerosol can as well. Now I'll see how the finish holds up. Waiting for the rest of the new parts to come in and it's off to the range.

Thanks.
 
Last edited:
Looks like a big negative on Durabake info...I did a test run on an old AR magazine last nite and I like the way it came out. I made a type of turntable to make spraying the slide easier, we'll see. I will post some pictures if anyone is interested.
 
What are you using to bake it? I'd like to try it.
 
Why not have it finished professionally by a local resource? It costs next to nothing...
 
I did a few jobs with Durabake

Image00022.jpg


My comments:

1. Suppose to spray with airbrush, but finish comes out really thin, thinner than powdercoat, so make sure your surface is what you like, you won't fill imperfections like you would with a thick layer of regular paint.
2. I set my airbrush on max, by pulling paint control pin altogether and just going nuts, put nice thick layer
3. Sometimes you need a thinner, ... I forgot what it is exactly, but it's in HomeDespot.
4. Prep the surface really well, I mean total degrease, acetone scrub, even some pre-etch, no rust etc. It makes a huge difference.
5. Official baking time is total BS, triple or qudruple it. I would not bake at high temp, use 180 or so, but don't rush to pull the part out.

that's about it, otherwise it's a pretty decent finish. It's still not as durable as powdercoating, but pretty good. Also, it sucks that Durabake comes in few colors.
 
Last edited:
Would a standard cheap toaster oven work (for parts that fit obviously?) Does it need to be baked outside?
 
Would a standard cheap toaster oven work (for parts that fit obviously?) Does it need to be baked outside?

I use an old convection oven. It goes up to 450 which is good enough for powdercoat or durabake.

There is an option of using heater lamps, be careful since Durabake is flamable ... I think. Pro shops use those on large workpieces for powdercoat curing. There is also some rumors about wiring shop-lights in parallel to produce more on the red (heat) spectrum as cheapo alternatives. I never tried that, but yep, if you can fit into toaster oven, you may be good. I'd try on low setting first though, just to get rid of the most of gases that may be flamable/explosive and do it outside. I think that toaster ovens have exposed heater elements that get orange hot. My convection oven not so much. Rummage through a Salvation Army store.
 
What are you using to bake it? I'd like to try it.
$20.00 toaster oven from Family Dollar, rigged up a little pan it came with to hang the slide on.

Why not have it finished professionally by a local resource? It costs next to nothing...
For no other reason than the experience of doing it [wink]

Boris, I'm using the aerosol can version so no reducer or airbrush needed but I can see me getting into this so an airbrush may be on my "to get" list!
 
Bead blast it, hang it from a hook, paint, then in the oven, hanging from the hook at 400 deg for 2.5-4hrs.

Or PM me, and I can hook you up with a local north shore guy to cerakote it for ya.
 
Back
Top Bottom