• If you enjoy the forum please consider supporting it by signing up for a NES Membership  The benefits pay for the membership many times over.

92FS hammer

LuvToGoFast

NES Member
Joined
Oct 10, 2011
Messages
1,557
Likes
605
Location
North Shore
Feedback: 19 / 0 / 0
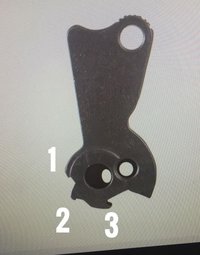
So a coworker has a full size 92FS and wants to smooth the trigger pull, and his idea is to buy a new hammer and smooth out(grind down) the notches a 1 @ 2 on the diagram below. Strikes me as not the best idea as I would imagine they are there for a reason, but what the hell do I know. Can someone tell me what each of these notches do? And the repercussions of making them smooth?
Capture.JPG
 
Isn’t one of those the catch? I just grabbed my 92fs and I don’t think smoothing any of those will change or ‘smooth’ out the trigger pull.

I love the gun. My 10 year old loves it. What my 10 year old does is cock the hammer and then he’s off to the races. The trigger is just fine. It’s the first shot without the hammer cocked that’s the bad part.

Just my two cents. Not a gun smith.
 
It’s the first shot without the hammer cocked that’s the bad part.
There are aftermarket springs to lighten the double action pull. Never had a light strike on mine. And even if you do, just shoot again since double action allows you to
 
I did my own trigger job on my 92FS years ago, really don't remember all that I did at this point. I bought all new parts to modify though so that I could put the originals back in and bring the gun back to 'factory' if I want to.

I got a skeletonized hammer, sear, lighter springs, and I think a trigger bar... Polished all the contact points on the new stuff and installed it. Lightened the trigger pull considerably, smoothed everything, and it breaks like glass now. I don't think grinding the hammer is a good idea, those notches are there for a reason and making them go away will likely break the functionality and do nothing for the trigger feel.

My $.02

-chris
20180419_180318.jpg
 
So a coworker has a full size 92FS and wants to smooth the trigger pull, and his idea is to buy a new hammer and smooth out(grind down) the notches a 1 @ 2 on the diagram below. Strikes me as not the best idea as I would imagine they are there for a reason, but what the hell do I know. Can someone tell me what each of these notches do? And the repercussions of making them smooth?
View attachment 294763

JFC don't "grind down" those notches. They aren't just for decoration...

#1 is the half cock notch, it's an additional safety feature that will keep the hammer from falling if the SA notch breaks.
#2 is the SA notch that engages the sear when in SA mode. Very precise engagement surface that is easy to F up.

DIY trigger job for Beretta 92FS (not the D spring upgrade)
Here's my personal recommendation. I've done trigger jobs on both of my 92s
1. Replace hammer spring with 92D hammer spring. This will immediately take off ~2-3lbs from the trigger weight while maintaining reliability. The 92D hammer spring was specifically for the 92D (DAO version), but is fully compatible with the 92FS.
2. Polish the grey circular areas of the hammer and sear (see the picture in the link above)
3. The parts of the hammer and sear highlighted in red require very precise polishing. Go too far and you will F up your sear engagement, resulting in a nonfunctioning firearm. if you don't know how to do this, skip step 3.

The alternative if you don't want to do any polishing is to buy Earnest Langdon's Beretta trigger job in a bag. This will give you a seriously amazing trigger job
Trigger Job in a Bag - 92/96/M9 Series
 
About that particular gun, what they said. About guns in general, somebody purportedly smarter than us (or at least with a better engineering/smithing/education background) designed stuff that way for a reason. Mild tweaks are one thing, wholesale changes not so much.
 
Langdon Tactical sells a Trigger Job in a bag now. You get all new parts professionally polished, new springs etc. Then you still have all the Factory parts.

Trigger Job in a Bag - 92/96/M9 Series

I’ve been looking at this one for my 92FS. I’ve had the gun since the late 90s, and while the trigger isn’t bad, it isn’t great either. I wouldn’t be going around grinding/filing things down. Who knows what unintended consequences may pop up immediately or down the line.
 
Langdon Tactical sells a Trigger Job in a bag now. You get all new parts professionally polished, new springs etc. Then you still have all the Factory parts.

Trigger Job in a Bag - 92/96/M9 Series

I'm sure its worth every penny, but that's 1/2 the cost of what I paid for my 92/96s to begin with.

Just need to shoot them and have the parts wear in and polish/bed in themselves, by the time that happens, you'll be an expert shooter and trigger wont be a problem. :p
 
worst idea ever. those notches on the hammer are critical for safe function of the pistol. a d spring and steel trigger are all thats needed for a 92. then a few k rounds and its butter smooth.
 
Many of those parts are only hardened on the surface.
Filing /grinding will remove that hardening down to softer steel.
Even if he got lucky and didn't have any immediate issues, he might be a few hundred rounds from a real bad day.
The most I have ever done on any part like that has been a little polishing with a buffing wheel on a dremel to smooth of any burrs or rough spots. And I stress the "Little " part.
I had to replace some parts on an old Mauser rifle that some guy messed with that would fire on closing the bolt.
Damn near shot his buddy in the back of the leg out hunting.
 
Shave it down and report back what happens. I think the manufacturer put them there just to sell aftermarket trigger upgrades.
 
Wilson Combat sells springs, triggers, skeletonized hammers for the 92. I bought ultra thin grips from them, but it shoots just fine for me so I haven’t modified it. I do think it would be a fun project to gussy it up though.
 
JFC don't "grind down" those notches. They aren't just for decoration...

#1 is the half cock notch, it's an additional safety feature that will keep the hammer from falling if the SA notch breaks.
#2 is the SA notch that engages the sear when in SA mode. Very precise engagement surface that is easy to F up.

DIY trigger job for Beretta 92FS (not the D spring upgrade)
Here's my personal recommendation. I've done trigger jobs on both of my 92s
1. Replace hammer spring with 92D hammer spring. This will immediately take off ~2-3lbs from the trigger weight while maintaining reliability. The 92D hammer spring was specifically for the 92D (DAO version), but is fully compatible with the 92FS.
2. Polish the grey circular areas of the hammer and sear (see the picture in the link above)
3. The parts of the hammer and sear highlighted in red require very precise polishing. Go too far and you will F up your sear engagement, resulting in a nonfunctioning firearm. if you don't know how to do this, skip step 3.

The alternative if you don't want to do any polishing is to buy Earnest Langdon's Beretta trigger job in a bag. This will give you a seriously amazing trigger job
Trigger Job in a Bag - 92/96/M9 Series
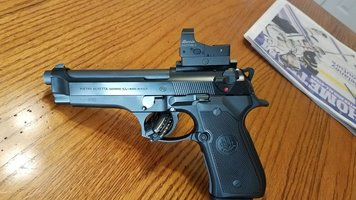
How do you mount the optics and how do you like it?
 
i seriously thought this was a thread about 92FS's being used as hammers. It's all mine is used for.
 
So a coworker has a full size 92FS and wants to smooth the trigger pull, and his idea is to buy a new hammer and smooth out(grind down) the notches a 1 @ 2 on the diagram below. Strikes me as not the best idea as I would imagine they are there for a reason, but what the hell do I know. Can someone tell me what each of these notches do? And the repercussions of making them smooth?
View attachment 294763
WTF. If you want to smooth out the trigger don't grind anything. Most trigger work is accomplished by smoothing (light stoning) and buffing friction/wear surfaces not modifying the actual lock work. Even that shouldn't be taken lightly if you don't know what you are doing or you dont mind ruining parts or creating an unsafe gun.
Most DA/SA's can be smoothed out by feeding them ammo and then cleaning them regularly.
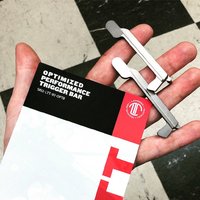
The best upgrades for a 92 would be a "D-spring" and the Langdon Optimized trigger bar. Langdon makes a "trigger job" in a bag now if you want replace all the parts that one would normally address in trigger work. I have only had experience with the new trigger bar (which is excellent), but really only addresses the single action over travel and reset.

2C1E20F1-0B26-4478-A956-2F825B89DBE0.JPG
 
There is some excellent advice in this thread about how to improve the trigger in a Beretta.

But I mainly want to emphasize the importance of showing respect for the fire control parts in all firearms. Correct maintenance of fire control parts is a safety issue. I very rarely use bold, but in this case it is justified.

Incorrect modification of hammers, sears, safeties, triggers, and other parts of the firing mechanism can result in a variety of unsafe conditions. Some of these unsafe conditions may be immediately apparent, but others may be intermittent, or not noticed until the gun is dropped. It is never ok to guess about how to modify a hammer or sear. I am not saying that only professional gunsmiths should modify firearms, but anyone who modifies a firearm should have a very good idea what he is doing. And he should know how to do safety checks on the specific firearm he is working on.
 
Just wanted to add that I recently installed the Langdon Trigger Job in a Bag (1st with the Wilson Combat Trigger Bar and then about a week later when I realized he released his new Optimized Trigger Bar - I swapped that out as well). Coupled with the standard Wilson Combat springs and Recoil Rod - my M9A3 feels, racks, and shoots like a buttery smooth dream. I literally can’t explain the beautiful sound/feeling of racking that slide now...and the reset from Langdon’s trigger bar is amazing. Truth. Also - I can recommend Flitz polish (sparingly and very carefully) if you want to smooth out any areas that have rough edges, etc. Side note - the Wilson Combat Short Reach Trigger DOES NOT fit the M9A3. I mean technically it does - but it actually hits the bottom of the trigger well before it hits the machined trigger stop. I even bought a second one just to make sure I didn’t just get an odd one. I am running the factory trigger with everything above and am VERY pleased.
 
Back
Top Bottom