• If you enjoy the forum please consider supporting it by signing up for a NES Membership  The benefits pay for the membership many times over.

80% Lower AR Build

Joined
Aug 17, 2012
Messages
94
Likes
6
Feedback: 19 / 0 / 0
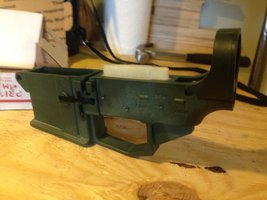
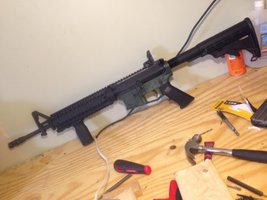
Purchased an E P Armory 80% polymer lower in OD green. I dont have a whole lot of faith in polymer AR lowers but considering its jigless and that i own a dremel i figured.. What the hell.. Lets try it. Ive spent $60 on stupider things. And they also have a lifetime warranty for normal malfunctions so thats a plus.

With hopes that im able to complete this build and have a fucntioning ar i would assume it will eventually fail at the rear takedown pin area as polymer lowers seem to be infamous for. If it does... Lets see how many rounds it will take first.

This is my first 80% build though ive assembled a few ars. I wanted to document the build and get feedback from more experienced NES'rs. I also plan on reviewing the lower once the rifle is complete.

image.jpg
I ordered OD green... Imo it looks like they melted a bunch of those army guy toys and molded this out of it. Its no where close to my moe stock in od. Havent decided if im gonna paint it or not and what color if i do paint it.


image.jpg
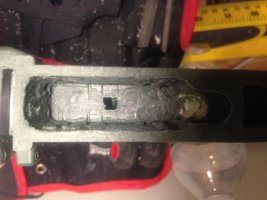
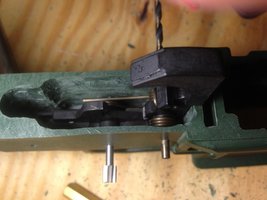
Started by drilling a few tiny holes then eventually worked my way up to what u see here. So far so good.


image.jpg
Eventually i worked my way up to a 3/8 bit then took it down some more with a dremel. I used a flat bottom cutting bit (#196).


image.jpg
After that used a sanding bit then a file.

Waiting for a cmmg lpk to come in. Until then im done.

Im using my iphone for pics and everything else on this thread so i apolgize for the picture quality.
 

Attachments

  • image.jpg
    image.jpg
    168 KB · Views: 134
  • image.jpg
    image.jpg
    152 KB · Views: 139
Not quite but close... Im waitn for the lpk before i remove any more material... Compared to one of my lowers its about 1/16 of an inch to go
 
Yeah drill press and at the very least a hand drill.

If you have a hand drill find some one to make you a drill/tapping block . It's just a sq block of steel with a hole drilled in it matching the size of the drill bit. It helps you keep a hand drill straight .
 
Do you have a drill press at least to drill out the selector and fcg pin holes?

I don't know how else you can get the trigger pin holes and selector hole to be straight/square in the receiver without a press. I imagine the trigger, hammer and disconnector might bind (or go full auto) if the holes are not drilled just right.


I have done one on a mill, and will probably do more in the future. Sure the plastic cuts easily with a hand drill or dremel, but there are some important dimensions that need to be precise.

+1 for doing it yourself, that's all of the fun in a project like this, but I personally would not attempt this without at minimum a drill press.
 
I was considering buying a cheap harbor freight drill press for this project... Looks like thats gonna be the way to go.
 
I've been looking into the EP lowers. The jigless design and centering indents for the FCG pins is pretty a interesting idea.

Please keep us posted on your thoughts after its done.
 
Last edited:
I have done 3 of the EP 80 lowers and have broken 2 of the 3 lowers. I did a cheap PSA upper on it and that seems to be the problem according to EP 80. They replaced the first one I broke with no problems. I had less then 200 rounds through it before it snapped right where the buttstock attaches. The second one snapped same location but only after 2 rounds same upper. EP 80 suggested I should use a DPMS upper to avoid problems.
 

Attachments

  • image.jpg
    image.jpg
    134 KB · Views: 53
Last edited:
I have done 3 of the EP 80 lowers and have broken 2 of the 3 lowers. I did a cheap PSA upper on it and that seems to be the problem according to EP 80. They replaced the first one I broke with no problems. I had less then 200 rounds through it before it snapped right where the buttstock attaches. The second one snapped same location but only after 2 rounds same upper. EP 80 suggested I should use a DPMS upper to avoid problems.

Why would the upper make a difference?
 
looks like you can rig up a small t or L square to make the sides a bit smoother...as a hand guide for the dremel. Neat idea.

- - - Updated - - -

I may get one as a fun project....

- - - Updated - - -

I have done 3 of the EP 80 lowers and have broken 2 of the 3 lowers. I did a cheap PSA upper on it and that seems to be the problem according to EP 80. They replaced the first one I broke with no problems. I had less then 200 rounds through it before it snapped right where the buttstock attaches. The second one snapped same location but only after 2 rounds same upper. EP 80 suggested I should use a DPMS upper to avoid problems.

is it simply poor material or something else causing the breaks? why would DMPS uppers be preferred?

- - - Updated - - -

but looking at the polymer, and knowing a bit about prop making, could someone do a casting for some polyurethane... i cant believe Ive never thought of this before? Could one sell the molds for casting?
 
Had another NES member come over last night to use one of the communal jigs and my drill press for a lower like that...

Consider this... You can get a forged aluminum 80% for anywhere between $60-$100 these days. If you know someone with the correct tooling, it's about an hour to machine that 20%. Then you have a much better lower to use with any configuration you want... I wouldn't even think about getting an 80% polymer lower.
 
Why would the upper make a difference?

Sounds like bull shit to me . If the upper is in spec there's no difference between them .

The reason it's snapping the buffer tube off is pretty simple to figure out .
You got a spring inside of there with a buffer filled with weight. You got a bcg that has weight to it . When the ar cycles it transfers all that force to the buffer extension . Only thing holding the buffer extension on is a little bit of plastic . More or less the tower area is flexing from the action. It might be just a deg or two but it adds up . You can snap metal by hand flexing it back and forth .

The only poly lower I would buy is one that has metal embedded some where in the buffer tower.
A poly lower going to fail its just a question how many shots .
 
I asked EP 80 the same question they told me they had a known fitment problem with the cheap Chinese made PSA uppers. I was told most PSA uppers didn't line up on the take down pin holes. Mine had a nice tight fight didn't have to ream the take down holes or anything. It fit the way it should. Since I had broken two of them now I asked EP 80 what they recommended and they told me DPMS.
 
Anyone looking to mill an 80% lower(aluminum) hit me up I have the tools.

I've never done a plastic one but I think it would be much the same.
 
Had another NES member come over last night to use one of the communal jigs and my drill press for a lower like that...

Consider this... You can get a forged aluminum 80% for anywhere between $60-$100 these days. If you know someone with the correct tooling, it's about an hour to machine that 20%. Then you have a much better lower to use with any configuration you want... I wouldn't even think about getting an 80% polymer lower.

I dont know anyone local to me with the correct tools to build an aluminum lower. This is my first 80 build so its more or less a learning experience. Id like to build an 80 aluminum in the future but this will scratch my itch in the mean time.
 
Sounds like bull shit to me . If the upper is in spec there's no difference between them .

The reason it's snapping the buffer tube off is pretty simple to figure out .
You got a spring inside of there with a buffer filled with weight. You got a bcg that has weight to it . When the ar cycles it transfers all that force to the buffer extension . Only thing holding the buffer extension on is a little bit of plastic . More or less the tower area is flexing from the action. It might be just a deg or two but it adds up . You can snap metal by hand flexing it back and forth .

The only poly lower I would buy is one that has metal embedded some where in the buffer tower.
A poly lower going to fail its just a question how many shots .

This right here 100% agree.
 
Interesting.

I've heard of some people having trouble with these breaking like that, and I agree with Ben, there's a lot going on in a place with little material to support it. I wonder if running a rifle length system would help keep them alive.

I think the jigless design is a great idea in theory, it just seems they need to tweak it a bit to make them last. I hope the OP doesn't have any troubles.
 
I have done 3 of the EP 80 lowers and have broken 2 of the 3 lowers. I did a cheap PSA upper on it and that seems to be the problem according to EP 80. They replaced the first one I broke with no problems. I had less then 200 rounds through it before it snapped right where the buttstock attaches. The second one snapped same location but only after 2 rounds same upper. EP 80 suggested I should use a DPMS upper to avoid problems.

this is a bit discouraging lol... Ill keep a round count and see how many it takes before it fails.
 
Interesting.

I've heard of some people having trouble with these breaking like that, and I agree with Ben, there's a lot going on in a place with little material to support it. I wonder if running a rifle length system would help keep them alive.

I think the jigless design is a great idea in theory, it just seems they need to tweak it a bit to make them last. I hope the OP doesn't have any troubles.

Rife gas or stock ? The rifle gas system I think is a little softer recoil . I better if it effects it at all it will last just a tad longer.

I figure a blow back setup like 9mm or 45acp would wreck it pretty fast .
 
Rife gas or stock ? The rifle gas system I think is a little softer recoil . I better if it effects it at all it will last just a tad longer.

I figure a blow back setup like 9mm or 45acp would wreck it pretty fast .

Yeah, a rifle gas system and buffer. Less tension from the longer spring, slower moving buffer, seems like it wouldn't beat it up like a carbine gas system.
 
Update:

image.jpg


Got the lpk in... CMMG lpk cost me $65... Got a buffer tube, endplate, and stock for $10, still need an H buffer, spring, and castle nut (posted in the WTB).

image.jpg

I used a sanding bit on the dremel to take off enough material for the trigger and hammer to sit. I also drilled out the trigger pin, hammer pin, and selector holes to 1/8 inch... Cant find my 5/32 bit.


image.jpg

Opened up the trigger hole with the cutting bit on the dremel. Did it free hand then finished it off with a file. Came out ok.

image.jpg

After test fitting and filing multiple times i got the trigger and spring test fitted in nicely.

image.jpg

The hammer, and spring dropped right in without a hitch.

So far the trigger, hammer, and springs fucntion as they should... I still need to drill out the selector hole to 3/8 and the trigger and hammer pin holes to 5/32. I also need to tap the hole for the grip screw. I would have done it all last night but i only came home wit a 6 pack.

Id like to get this lower complete by this weekend so i can test fire. But im dead in the water without the buffer, spring, and castle nut. Until then im done.
 

Attachments

  • image.jpg
    image.jpg
    170.7 KB · Views: 40
  • image.jpg
    image.jpg
    137.9 KB · Views: 36
Shes pretty much done... The selector hole was a pain in the ass but it works. Prob gonna rape the spring, buffer, and castle nut off another rifle to test her out this sunday. Put my lightweight upper on her and ill tell u its a noticeable difference in weight... I weighed the poly lower after the dremeling and and aluminum lower and its almost 4 oz lighter.

image.jpg


image.jpg

Ill get back with a range report after this weekend.
 

Attachments

  • image.jpg
    image.jpg
    159.5 KB · Views: 28
I thought this was going to be a pistol? what happened? Apparently I misread the title, and wanted to believe this was going to be a pistol.

Why are you trying to shave weight on the lower, if it is not for a pistol build?
 
Back
Top Bottom