amm5061
NES Member
I had a couple requests for a build thread on this monster, so you guys get to experience my joys and sorrows, my highs and lows, my manic episodes and crippling depression that was this build in delayed form. Blame the guy who asked. I was gonna suffer in silence.
Before anyone asks, this cost me way too much, and I’m too scared to total it all up. My GF would literally murder me if she knew what I spent on this.
So because I was bored, and I’ve had a rather strange fascination with .458 SOCOM for the past couple years ever since I read an interesting article about development of the caliber in Guns & Ammo, I decided to finally pull the trigger on a .458 SOCOM platform. Being Massatwoshits, obviously having something so evil as a black rifle is a no no, so goddammit I had to figure out how to make my dream a reality.
I had two options for this: spend a metric shitton of money on a pre-Healey lower, or go buy an 80% and manufacture a rifle that’s not subject to her bullshit edict or really the AWB in general.
Enter my enabler: LANTAC’s straight pull enhanced BCG.
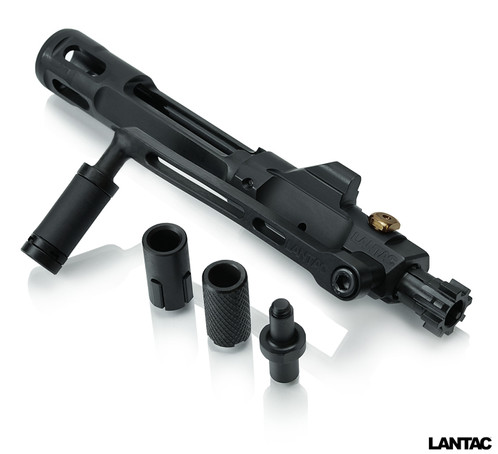

This pretty piece of overpriced stainless steel started the wheels turning—I could build a bolt action! This BCG features a side charging handle that can either be attached directly to the BCG, or using an extension you can bring the handle back further to a more comfortable position near your hand. It also features a piston-style guide integrated into the BCG instead of a gas key, so even if you put in a gas system it’s still a manual action. There’s no reciprocating action, so you have to pull the charging handle to eject the fired round and insert a fresh round from the magazine. Supposedly the bolt is designed that the piston-style guide is set too far back for a piston to engage it, but I can't confirm that from any of Lantac's liturature.
So I picked up an AR-Stoner 80% lower from Midway USA. Seeing as I’ve never done an 80% before and I was sure I would f*** it up, I bought two. (Spoiler alert: I didn’t f*** it up, and now I need to figure out what meets the criteria for making a fixed magazine rifle.)

The lower is a forged milspec 80%, so it’s not one of those good looking billets everyone raves about, but being a big bore caliber, maybe the tiny extra bit of strength a forged lower brings to the table may matter? Can you see me trying to compensate for the aesthetics of my lower? I have lower envy, I can’t help it. Obviously appearance matters.
As for the upper, obviously I needed to find something special, since this is a side charger. Thinking about it some, and doing some looking, I decided to mate the BCG with the upper it was designed to work with. Yup, another wallet raping from Lantac.

So now I had my upper, my lower, and my bolt carrier group picked out, what about the rest? Need a barrel, right? This one had me a little stumped. Where do you get a .458 SOCOM barrel? I started looking around. Hardened Arms, Radical Firearms, KAK, Wilson Combat, so many choices. In the end, I went with a Tromix light weight barrel with matching bolt and compensator, because might as well put a little quality into this frankengun.
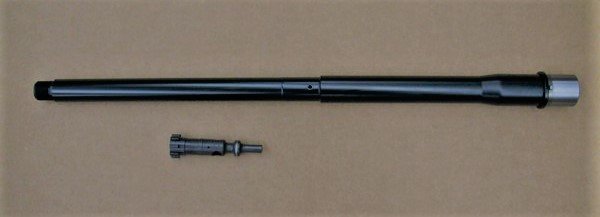
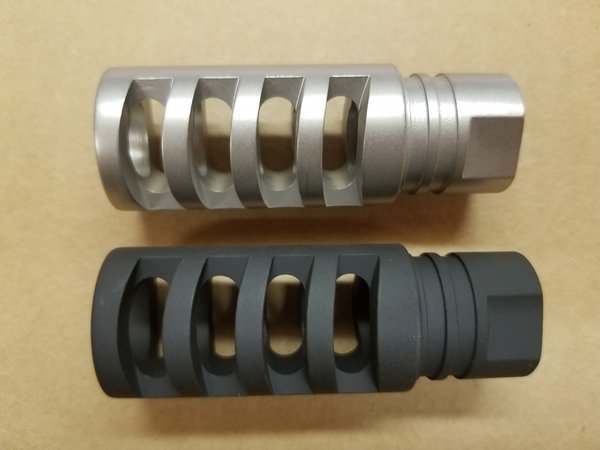
The barrel is their 16.25” light weight barrel with a 1:14 twist and carbine length gas system (not that that mattered to me). The bolt is mated to the barrel and properly head spaced before Tromix ships it out. The muzzle brake is…. Well…. Black and a muzzle brake. We’ll see how well it works when I finally get this beast to the range. I’ll let you all know.
Now the handguard. This was pretty easy, since I had a firm idea of what I wanted. Free float, M-Lok, something around 12”, and not retarded looking. Settled on the Midwest Industries 3GM gen 3 in 12.625”. I’m actually very impressed by how light the thing is.

That was most of the important stuff. Picked up the lowest model Geissele 2-stage trigger to drop into the lower, along with the cheap AR-Stoner branded customizable LPK from Midway USA. This turned out to be pointless, as I would later replace a most of those parts with better looking stuff that cost more individually than the parts kit did.
Grip is a BCM Gunfighter Mod 3, because it fits my hand and I like it. Buffer tube, spring, and buffer are also the BCM standard carbine buffer/tube/spring kit with a BCM castle nut and QD end plate. Honestly, this stuff matters not for a manual action, but meh.
The stock is the Magpul fixed carbine stock. I may replace this later on when I start shooting the thing depending on what the recoil is like.
I did have a little trouble deciding how to block off the gas port in the barrel. I settled on using a Superlative Arms adjustable gas block and turning it all the way closed. If this turns out to be a stupid idea, I can take it off and replace it with a cheap Yankee Hill low profile block turned backwards. We’ll see what happens.
Currently I have a BCM gunfighter ambi charging handle for it, but that might later be replaced with a cheap standard one since the idea is to use the side charging handle. Might as well use the good one someplace else.
So that’s it for the parts, build details with pictures coming next!
Before anyone asks, this cost me way too much, and I’m too scared to total it all up. My GF would literally murder me if she knew what I spent on this.
So because I was bored, and I’ve had a rather strange fascination with .458 SOCOM for the past couple years ever since I read an interesting article about development of the caliber in Guns & Ammo, I decided to finally pull the trigger on a .458 SOCOM platform. Being Massatwoshits, obviously having something so evil as a black rifle is a no no, so goddammit I had to figure out how to make my dream a reality.
I had two options for this: spend a metric shitton of money on a pre-Healey lower, or go buy an 80% and manufacture a rifle that’s not subject to her bullshit edict or really the AWB in general.
Enter my enabler: LANTAC’s straight pull enhanced BCG.
This pretty piece of overpriced stainless steel started the wheels turning—I could build a bolt action! This BCG features a side charging handle that can either be attached directly to the BCG, or using an extension you can bring the handle back further to a more comfortable position near your hand. It also features a piston-style guide integrated into the BCG instead of a gas key, so even if you put in a gas system it’s still a manual action. There’s no reciprocating action, so you have to pull the charging handle to eject the fired round and insert a fresh round from the magazine. Supposedly the bolt is designed that the piston-style guide is set too far back for a piston to engage it, but I can't confirm that from any of Lantac's liturature.
So I picked up an AR-Stoner 80% lower from Midway USA. Seeing as I’ve never done an 80% before and I was sure I would f*** it up, I bought two. (Spoiler alert: I didn’t f*** it up, and now I need to figure out what meets the criteria for making a fixed magazine rifle.)
The lower is a forged milspec 80%, so it’s not one of those good looking billets everyone raves about, but being a big bore caliber, maybe the tiny extra bit of strength a forged lower brings to the table may matter? Can you see me trying to compensate for the aesthetics of my lower? I have lower envy, I can’t help it. Obviously appearance matters.
As for the upper, obviously I needed to find something special, since this is a side charger. Thinking about it some, and doing some looking, I decided to mate the BCG with the upper it was designed to work with. Yup, another wallet raping from Lantac.
So now I had my upper, my lower, and my bolt carrier group picked out, what about the rest? Need a barrel, right? This one had me a little stumped. Where do you get a .458 SOCOM barrel? I started looking around. Hardened Arms, Radical Firearms, KAK, Wilson Combat, so many choices. In the end, I went with a Tromix light weight barrel with matching bolt and compensator, because might as well put a little quality into this frankengun.
The barrel is their 16.25” light weight barrel with a 1:14 twist and carbine length gas system (not that that mattered to me). The bolt is mated to the barrel and properly head spaced before Tromix ships it out. The muzzle brake is…. Well…. Black and a muzzle brake. We’ll see how well it works when I finally get this beast to the range. I’ll let you all know.
Now the handguard. This was pretty easy, since I had a firm idea of what I wanted. Free float, M-Lok, something around 12”, and not retarded looking. Settled on the Midwest Industries 3GM gen 3 in 12.625”. I’m actually very impressed by how light the thing is.
That was most of the important stuff. Picked up the lowest model Geissele 2-stage trigger to drop into the lower, along with the cheap AR-Stoner branded customizable LPK from Midway USA. This turned out to be pointless, as I would later replace a most of those parts with better looking stuff that cost more individually than the parts kit did.
Grip is a BCM Gunfighter Mod 3, because it fits my hand and I like it. Buffer tube, spring, and buffer are also the BCM standard carbine buffer/tube/spring kit with a BCM castle nut and QD end plate. Honestly, this stuff matters not for a manual action, but meh.
The stock is the Magpul fixed carbine stock. I may replace this later on when I start shooting the thing depending on what the recoil is like.
I did have a little trouble deciding how to block off the gas port in the barrel. I settled on using a Superlative Arms adjustable gas block and turning it all the way closed. If this turns out to be a stupid idea, I can take it off and replace it with a cheap Yankee Hill low profile block turned backwards. We’ll see what happens.
Currently I have a BCM gunfighter ambi charging handle for it, but that might later be replaced with a cheap standard one since the idea is to use the side charging handle. Might as well use the good one someplace else.
So that’s it for the parts, build details with pictures coming next!
Last edited:


![[popcorn]](/xen/styles/default/xenforo/smilies.vb/043.gif "Popcorn [popcorn]")


")


